Overview
In this part we’ll continue working on our Hero’s Trail project. Previously we built up our player’s powers by making them able to collect coins and defeat enemies using a sword, and now we’ll work on interactive level design.
We’ll add locked chests that can be unlocked with keys, gates that can be opened by pulling levers and make the player able to complete a level and start a new one!
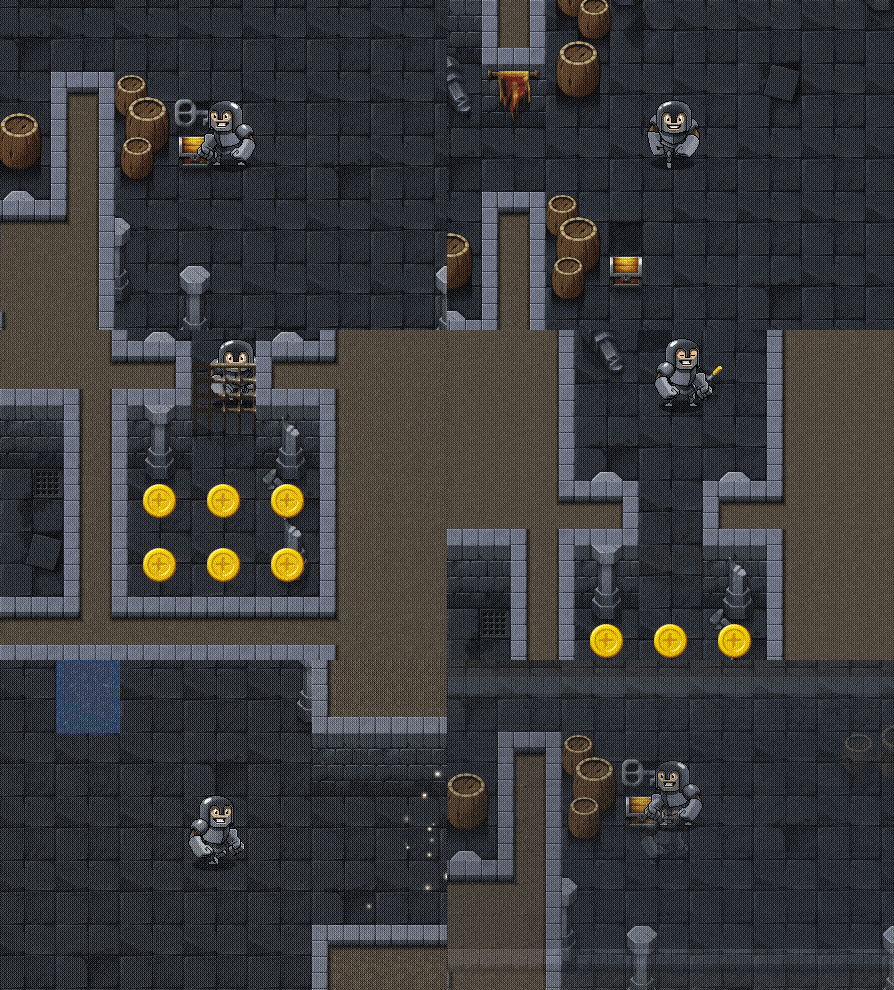
This tutorial has the following sections:
Chests
Gates
Opening Chests
We're going to place chests in the room and allow the player to open them and get a large amount of coins!
How Will This Work?
The project contains an object for the closed chest (obj_chest).
We'll create a new object which will act as the opened chest (obj_chest_open).
When the player collides with the closed chest and presses "E", the closed chest will change into the open chest object!
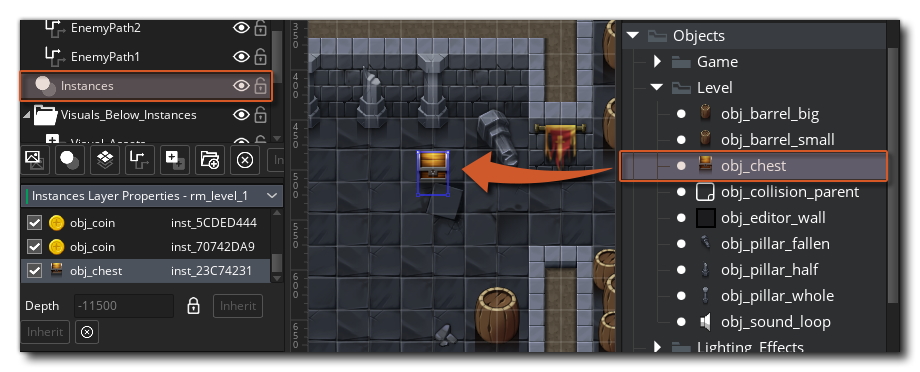
The existing chest object (obj_chest) can be found under “Objects”, inside the “Level” group.
Go ahead and place it somewhere inside the first level (in the “Instances” layer):
Closed vs. Open Chest
We’ll now make the player able to open chests. The chest object we currently have will act as the “closed” chest, and we’ll create a new, separate object for the “open” chest.
Create a new object called obj_chest_open. You can place it in the same group as obj_chest.
Assign the spr_chest_open sprite to it, which can be found under “Sprites” inside the “Level” group.
This is our new object: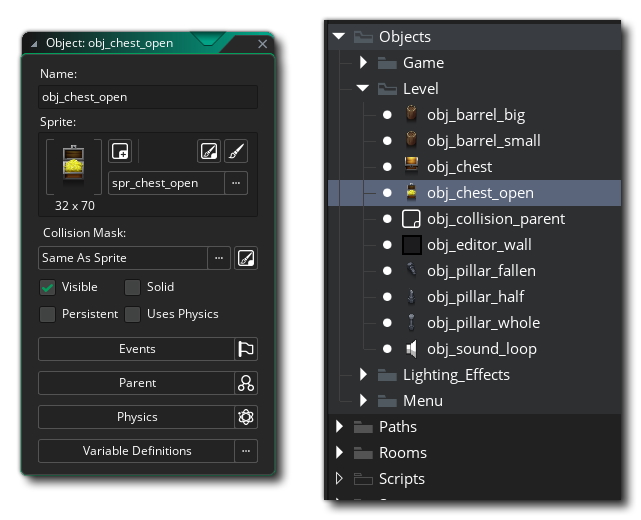
Our “open” chest is now ready, and it doesn’t even need any events! We’ll handle the transition from closed to open in obj_chest (the closed one), for which we will use conditions.
Conditions
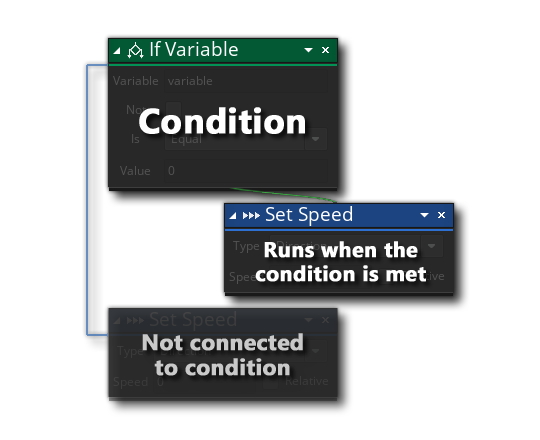
GameMaker has “conditional actions” that can be used to control other actions. You can use these to control multiple actions by attaching those actions to the conditional action.
But what does "control" mean here?
The conditional action (or simply condition) can decide whether its attached actions should run or not, essentially controlling them by turning them on or off!
Time for a milkshake!
I need a drink, but should I use ice or not? Let's propose a simple condition for this:
If the temperature is above 25°C, I use ice.
"If the temperature is above 25°C" is a condition that controls the "I use ice" action. If it is hot enough out there, we put ice in the milkshake, but if the temperature is low, we don't. In that case, the "I use ice" action is simply disabled, because the condition is false.
Similarly, you can create conditions in GameMaker and attach actions to them. They will only run when the condition is true.
If Key Pressed
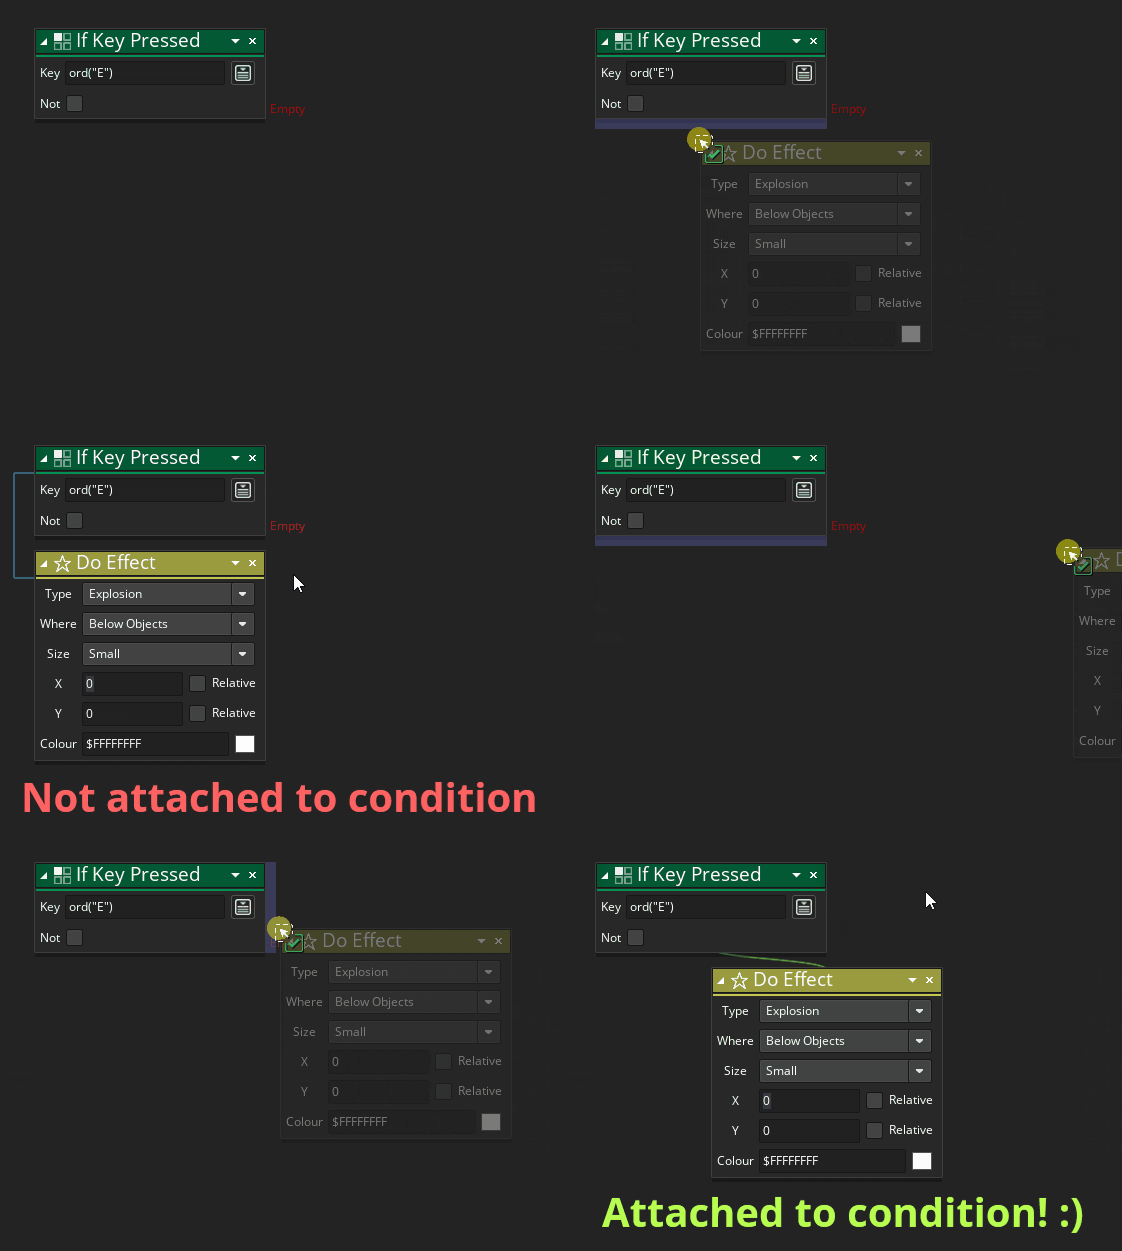
We’ll use a conditional action called “If Key Pressed” to control some actions. Those actions will only run if the specified key is pressed, otherwise, they will not run.
To attach actions to a condition, you must drop them to the right of the action (instead of dropping them below):
Opening A Chest
We’ll do the following to make the player be able to open chests:
Please refer to this section for instructions on adding events, and this section for instructions on adding actions.
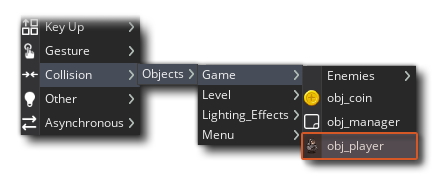
Open obj_chest (the closed one) and give it a collision event with obj_player.
In the Toolbox, search for the “If Key Pressed” action and drop it into the event.
From the “Key” menu, go under “Letters” and select “E”
(or any other key you would like to use to open chests!)
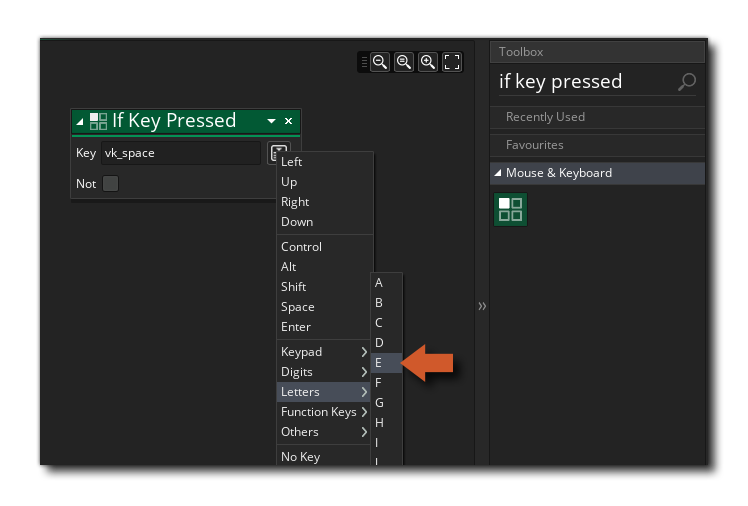
Add the following actions and attach them to the "If Key Pressed" action:
“Do Effect” - creates a particle effect
“Assign Variable” - increases the player’s coins variable
“Change Instance” - changes the closed chest into the open chest
Use the following settings for the actions:
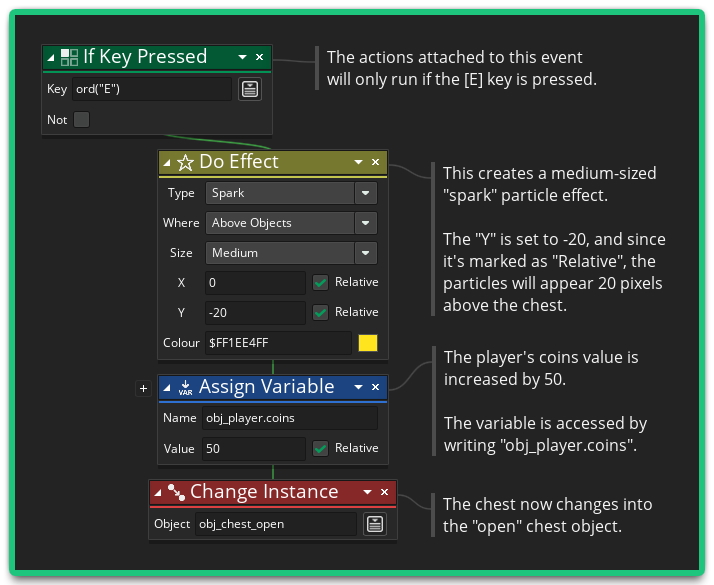
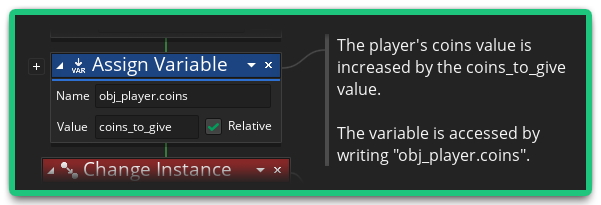
Note that we’re changing the player’s coins variable by writing obj_player.coins. We’re doing this because this event is in the chest object, and the coins variable is in the player object - so to access it we have to mention the object that owns the variable.
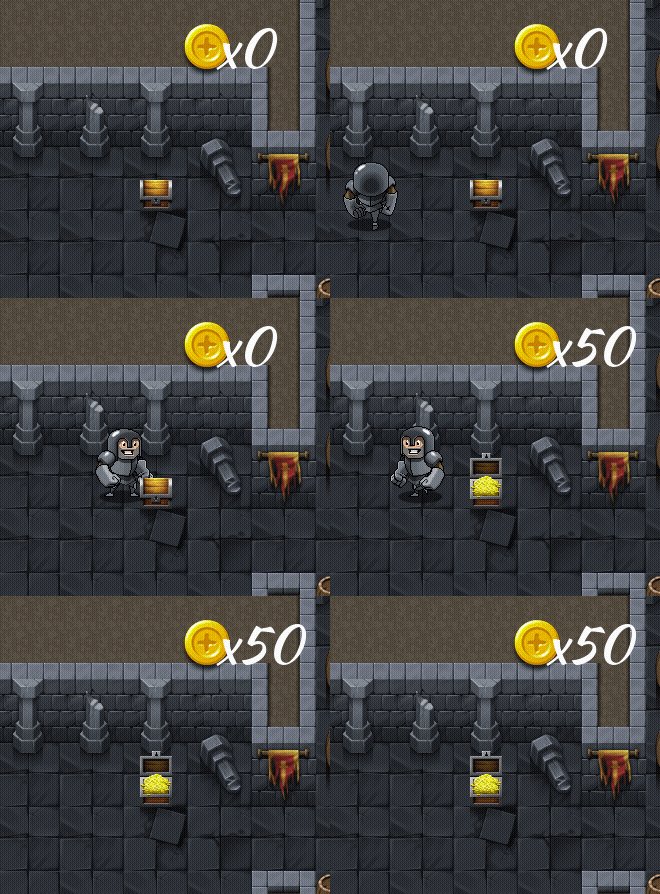
If you run the game now, you will be able to open chests and receive 50 coins!
Controlling Chest Value
Currently, all chests give a fixed number of coins: 50. That is not ideal, as we should be able to assign a different amount to each chest, so we’re going to add that.
How Will This Work?
We'll essentially give each chest instance a different value, which is the amount of coins it should give the player.
This means you should able to select a particular chest in the room, and change the number of coins it contains!
This is done using variables: each chest will have a variable with the same name, however that variable can hold a different value in each chest!
This will be achieved by adding a Variable Definition. Once a variable has been defined for an object, its value can be changed for any of its instances.
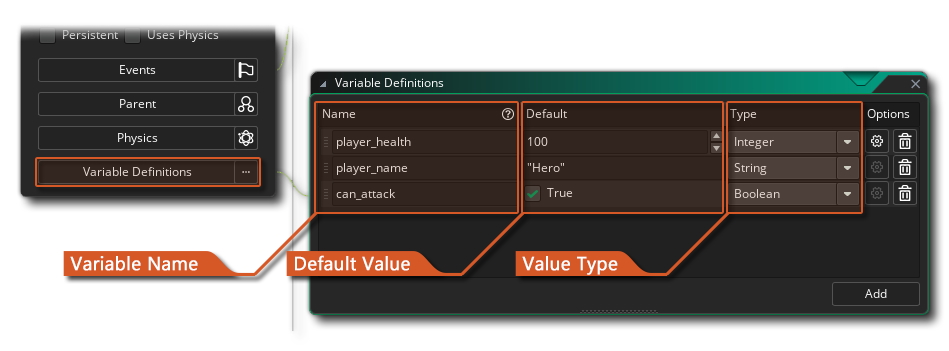
Our chest will have a variable called coins_to_give, which
stores the number of coins it should give to the player on being
opened. This variable can then be changed for any chest instance, allowing
you to place chests that give different amounts of coins.
Creating A Variable
Let’s do the following:
Open the obj_chest object. In the leftmost window, click on the “Variable Definitions” button.
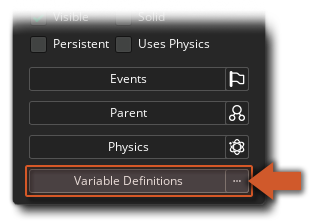
This will open a new window where you can create your own variables!
Click on the “Add” button to add a variable. Give it the following values:
Name: coins_to_give
Default: 10
Type: Integer
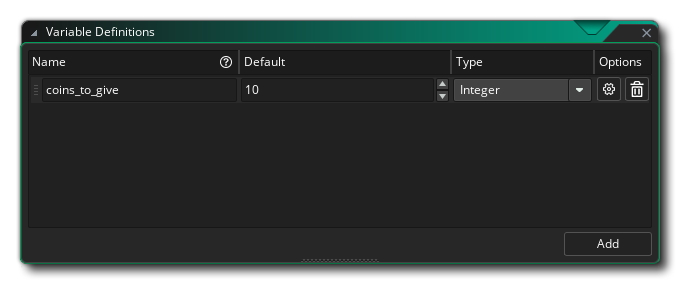
-
This creates an integer variable called coins_to_give. Its default value is 10.
Changing the Variable
You can now go in a room and change this variable for any chest instance:
Go to the level 1 room (rm_level_1) and double click on a chest instance.
Click on the “Variables” button. This will open the Variable Definitions window for that specific instance.
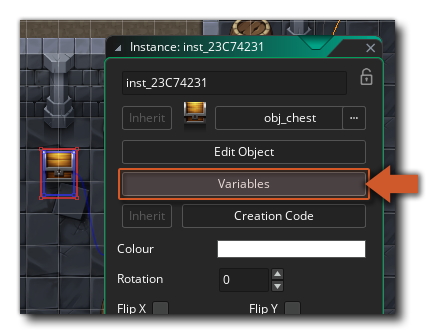
Click on the
 pencil icon next to the
coins_to_give variable, and give it a new value.
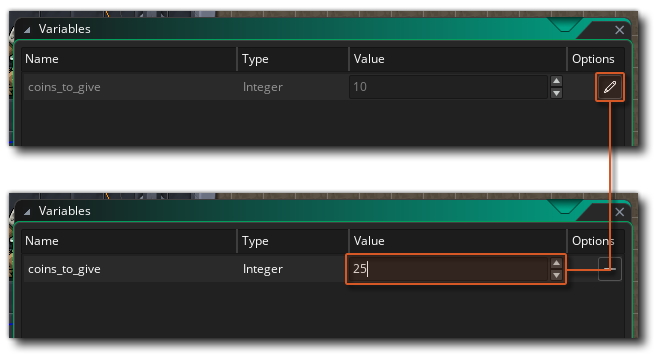
This value will now be specific to this instance only!
Using the Variable
I have made this chest contain 25 coins, however, it will still give the default amount of 50 coins as that's the value that our actions still use. Let’s change that now!
Go into the obj_chest object and open its collision event with the player.
In this event, find the "Assign Variable" action.
This is the action that adds 50 to obj_player.coins.
In the "Value" field, replace 50 with coins_to_give.
You may get the variable in auto-complete while typing it, which makes it easier to confirm variable names: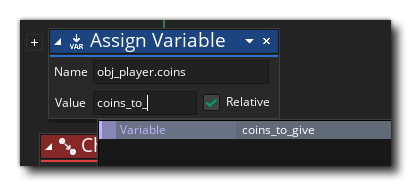
This will now give the player the exact amount of coins specified in that variable!
So, for example, if the variable is set to 10, then this action will give the player 10 coins.
It's simply reading the value that is stored in the variable and using whatever it gets!
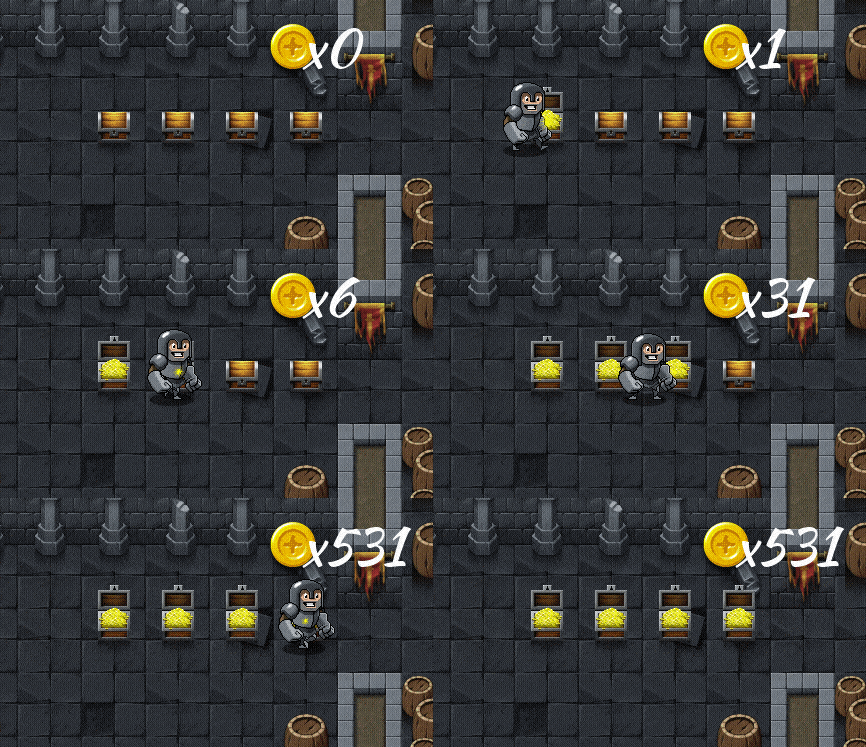
Run the game, open the modified chest and you will get the same amount of coins as you entered into its coins_to_give variable! This way you can easily make chests that give different amounts of coins without having to create a new object for each.
Locking Chests
We’ll now add a variable that can be used to lock a chest. This way you can add chests to your level that are locked, and other chests that are unlocked. Later, we’ll also add a key.
How Will This Work?
We'll create a "boolean" variable in obj_chest that can be turned on or off.
This variable will be called locked.
If this variable is turned on, it means the chest is locked and can't be opened.
Let’s do the following:
Go to obj_chest and open its Variable Definitions window.
Add a new variable called locked, and set its “Type” to “Boolean”.
This variable can now be enabled (true) or disabled (false). Keep it disabled by default.
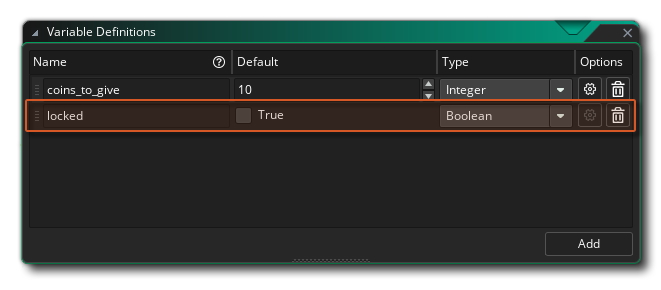
If this variable is set to true, it means the chest is locked and the player should not be able to open it. To implement that, we’re going to use the “If Variable” action.
If Variable
"If Variable" is a conditional action used to check if a variable is equal to a value, less than it, greater than it, etc. Any attached actions are only run when this condition is true.
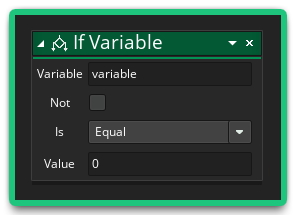
Under the “Is” list, you can find the following options:
“Equal”: check if variable is equal to value
“Less”: check if variable is less/lower than value
“Greater”: check if variable is greater/higher than value
“Less or Equal”: combines “Less” and “Equal” - true in both cases
“Greater or Equal”: combines “Greater” and “Equal” - true in both cases
Lock Chest
We’ll use the “If Variable” action to check if the chest is locked, and in that case, stop the player from opening the chest.
Let’s do the following:
Go to obj_chest and open its collision event with the player.
At the top of the event (before “If Key Pressed”), add an “If Variable” action.
Then search for the “Exit” action and attach it to the new condition.
Use the following settings for these actions:
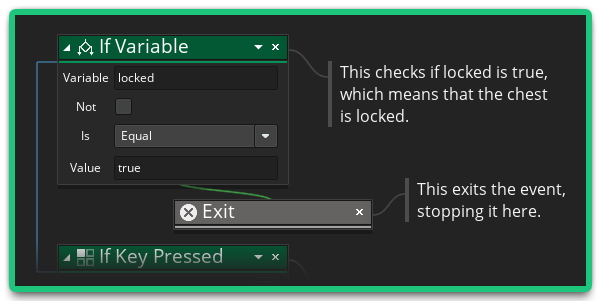
Now, one of the following things can happen in this event:
-
If the chest is locked, this will exit the event, so the rest
of the event will not run. This means that the player will not be
able to open the chest.
- However, if the chest is not locked, then the event will run as normal and the chest will open.
You can now place a chest in the room, go into its Variables menu and mark it as “locked”:

If you run the game and go to that chest, you will not be able to open it. You will need a key, which we’ll add now!
Adding Keys
We'll now create a key object, however, how do we actually tell a key which chest it should open?
Answer:
We'll give each chest a unique name.
The key object will contain a variable with the name of the chest it should open.
This way, the key will know exactly which chest it should open!
Let’s create a key object by following the steps below:
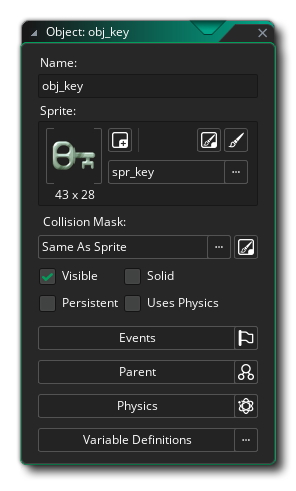
Create a new object under "Objects" -> "Level". Name this obj_key.
Assign the spr_key sprite to it, which can be found in the “Items” group under “Sprites”.
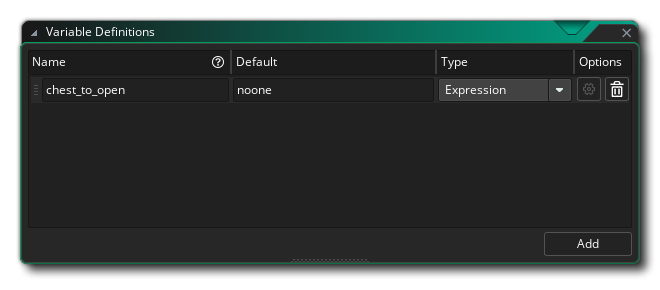
Open the Variable Definitions window for this object, and add a new variable. Give it the following values:
Name: chest_to_open
Default: noone
Type: “Expression”
This variable will store the unique ID of the chest instance that this key opens. By default, it’s set to noone, which simply refers to “no instance”.
Assigning Chests to Keys
We’re now going to use this variable to assign a chest to a
key. For this, we need to give a name to our chest instances, so they can be easily identified.
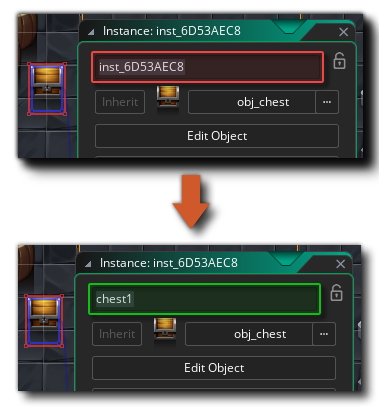
Open the level 1 room, select the “Instances” layer and double click on your locked chest instance.
At the top of the window that opens, you will see a random name assigned to it, starting with “inst_”.
You can change this name and call this chest whatever you like. To keep it simple, we’ll name it chest1.
We can now assign this name to a key, so the key knows that it should open the chest named "chest1"!
Place a key into the layer and double click on it. Click on “Variables”.
Edit the chest_to_open variable, and change the value from noone to chest1.

The key now knows which chest it should open: we gave a chest instance a special name, and supplied that name to the key.
We now have to program the key to use that variable, and open the chest that it points to!
Unlocking Chests
When the player touches a key, the chest assigned to that key should be unlocked.
In this part, we'll learn how one instance can make changes to a different instance: we'll make the key object unlock the chest that is assigned to it.
This will be done by using "Apply To" to apply a group of actions to a different instance.
Let’s implement that by doing the following:
Open obj_key and add a collision event with obj_player.
We want to apply some actions to the assigned chest, so it can be unlocked. For that, add the “Apply To” action from the Toolbox.
This action allows you to apply some actions to a different instance (in our case, the chest), instead of the instance running the event (the key).
Click on the little arrow next to the X button.
By default, an action is applied to the instance running that action. This window allows us to apply it to another instance instead!
In the “Expression” field, enter chest_to_open.
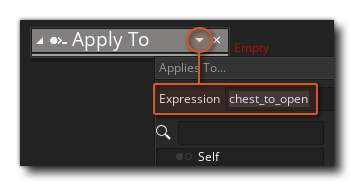
The "Apply To" action is now applied to the chest (that the key needs to open), however this action doesn't do anything by itself: it instead groups other actions under it.
You can now attach other actions to "Apply To", and they'll automatically be applied to the instance that you selected above!
Attach an “Assign Variable” action to it.
Use the following settings:
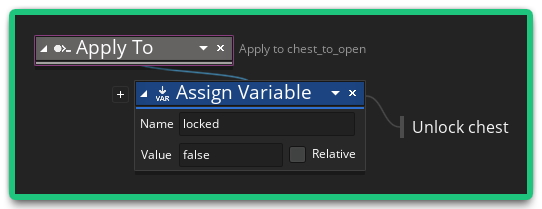
The “Assign Variable” action is setting the locked variable to false. Since it is being applied to the chest (instead of the key), the chest's locked variable will be changed to false, and it will be unlocked!
Now we also need to destroy the key and show a particle effect when it is collected. For that, add the following actions (don’t attach them to “Apply To” -- we want these to be run by the key):
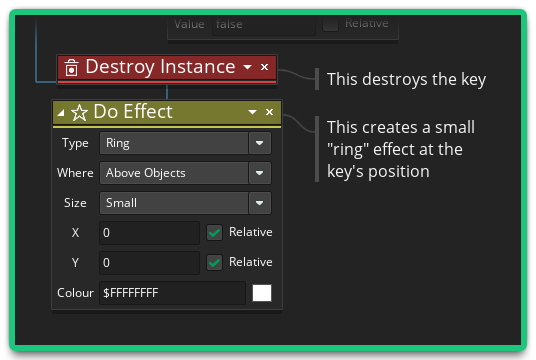
The key can now be collected, and it will open the chest assigned to it!
Locked Chest Graphic
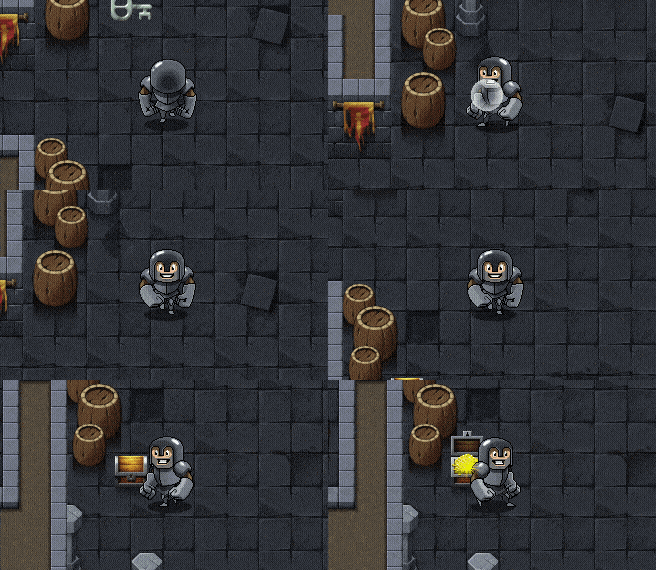
Right now, the chest looks exactly the same whether it’s locked or unlocked. We're going to show the key sprite, with a lower opacity (so it looks slightly transparent), above the chest when it's locked:
![]()
We simply need to draw this over the chest when it’s locked. To achieve this, we’ll do the following:
Open obj_chest and add the Draw event.
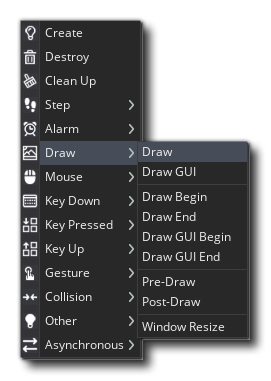
This event is used to draw the instance, and any other sprites on it.
Do note that this hands all draw control over to you, so it will stop drawing the instance itself! We should tell it to draw itself first before we do anything else.
Search for the “Draw Self” action and add it to the event. This will make sure the instance is drawn.
Now add an “If Variable” condition.
Then add a “Draw Sprite Transformed” action and attach it to the condition.We will use the "If Variable" condition to check whether the chest is locked, and then use "Draw Sprite Transformed" to draw a key above it, with a lower opacity/alpha.
Use the following settings:
The “Draw Sprite Transformed” action will draw the key sprite above the chest. This will open happen if locked is equal to true, which means the chest is locked.
You will now see the key on the chest while it’s locked, and it will disappear when you grab its key:
Adding Gates
We’ll add a gate-lever system where gates keep you locked off a certain section of the level, which can be opened by pulling levers.
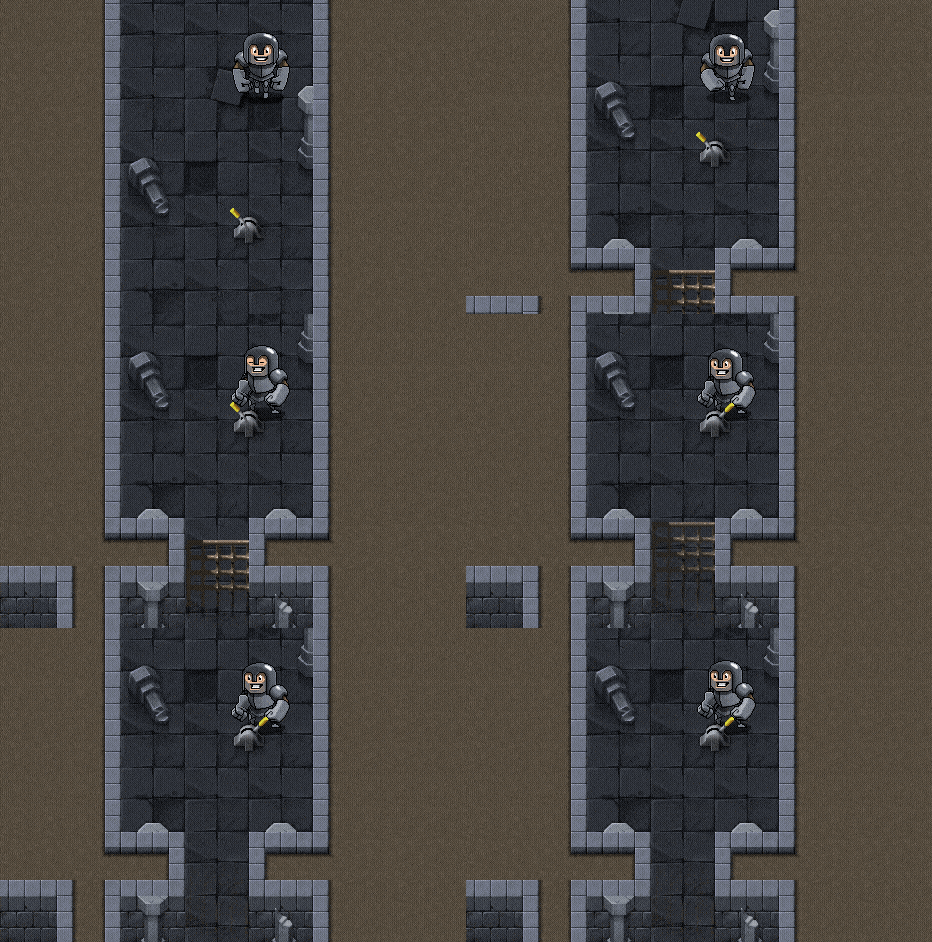
This part will introduce you to managing sprite frames, allowing to change the state of an instance by changing the frame it's on. This technique will be used to push the lever and open closed gates!
Sprite
In the “Level” group under “Sprites”, we have a sprite called spr_gate_iron_1 that has the following frames:
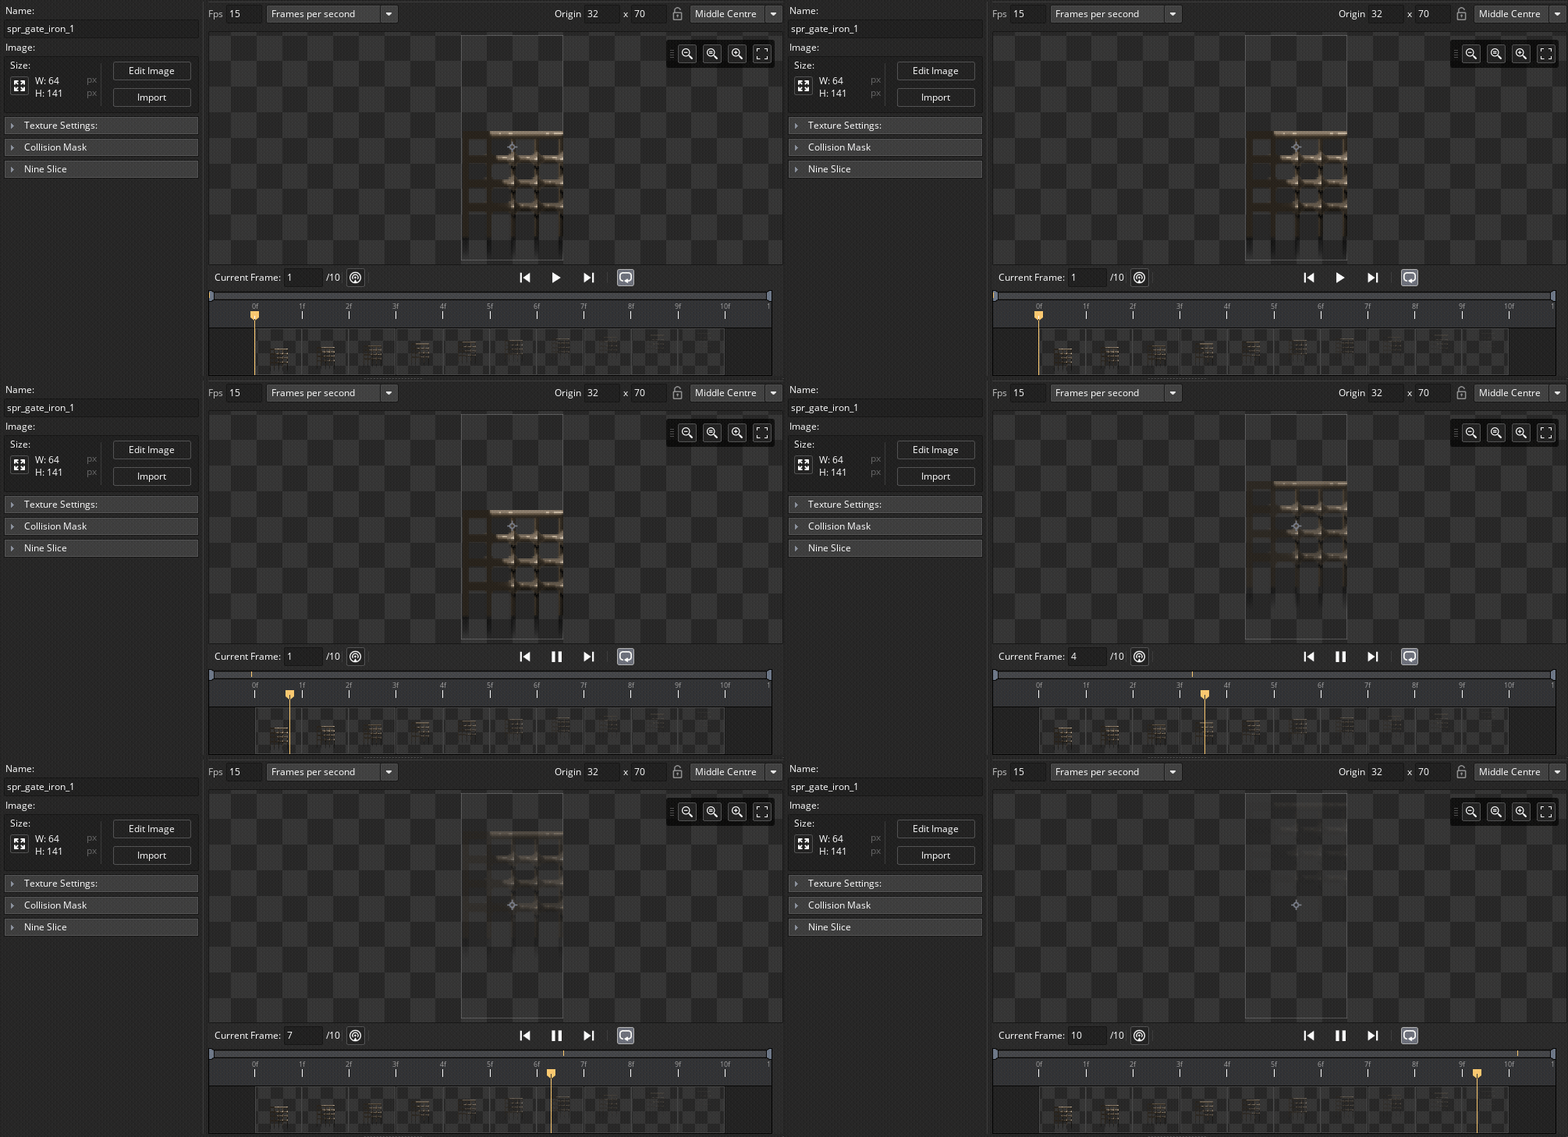
As you can see, this is an animation of the gate opening. By default, we will only show the first frame, and the gate will remain locked. Once the lever is pulled, this animation will play, and the gate will open!
Gate Object
Let’s create the gate object now: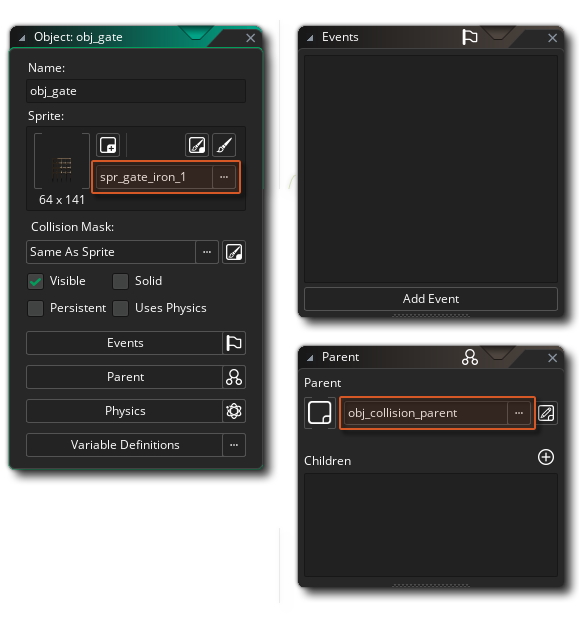
In the “Level” group under “Objects”, create a new object.
Name this obj_gate and assign the spr_gate_iron_1 sprite to it.
There are some additional gate sprites provided as well, such as spr_gate_wood_1 and spr_gate_gate_1; have a look at them and feel free to use whichever one you like!
Open its Parent menu and click on “No Object”. In the Asset Explorer that opens, navigate to “Objects”, then “Level” and select obj_collision_parent.
This will set the gate’s parent to obj_collision_parent, meaning that the player will be able to collide with it. This allows the gate to stop the player so the player can't walk through it.
The gate object has been created, and by default, it will play its opening animation.
This means we need to freeze the gate on its first frame so it remains closed:
Add the "Create" event to this object. This event runs when the instance is created.
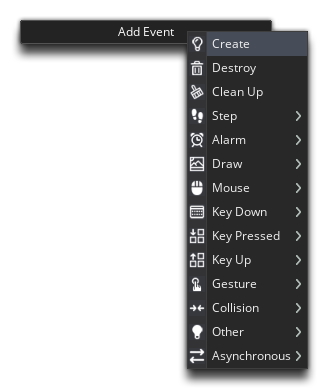
In this event, add the “Set Animation Speed” action and set it to 0.

Doing this in the Create event ensures that the sprite never plays its animation.
Destroy on Animation End
When the gate is opened (via a lever, which we'll add later), its animation will play, and after the animation has finished the gate should be destroyed. Let’s do the following to achieve that:
Add the Animation End event.
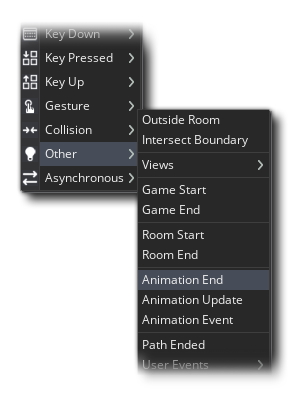
Drop the “Destroy Instance” action into the event.

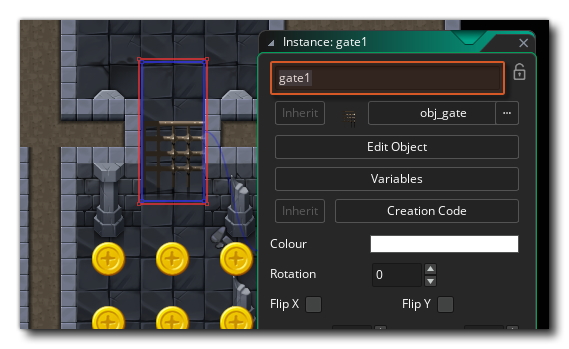
You can now place a gate in your room to lock a path. Just like chests, we will need to name our gates so we can assign them to levers.
Double click on your first gate and rename it to “gate1”:
Let’s add levers now, so that gates can be opened!
Adding Levers
Sprite
In the “Level” group under “Sprites”, we have spr_lever, which has two frames (with the lever in different positions).
In the top-left corner you will notice that the “Fps” setting is set to 0:
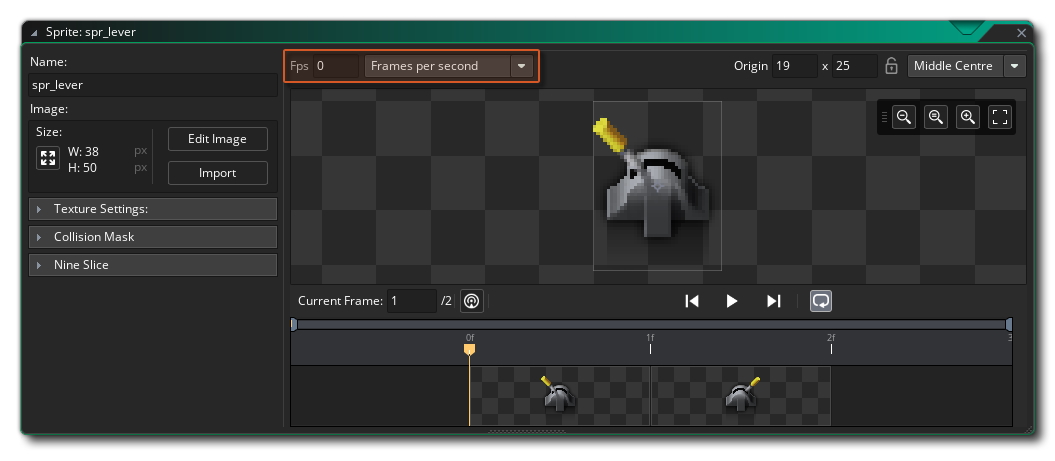
That’s because this sprite is not an animation, and we don’t want it to play at all. It will simply show the first frame by default, and when the player interacts with it, it will switch to the second frame to indicate that the lever has been pulled.
Lever
Let’s create a lever object now:
In the “Level” group under “Objects”, create a new object.
Name this obj_lever and assign the spr_lever sprite to it.
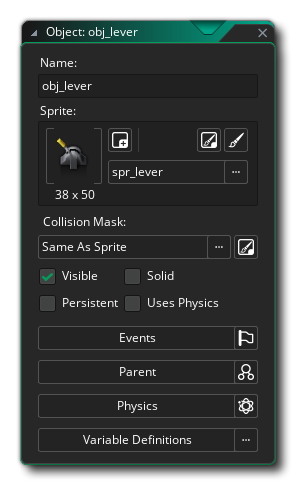
Open its Variable Definitions window and add a new variable with the following properties:
Name: gate_to_open
Default: noone
Type: “Expression”
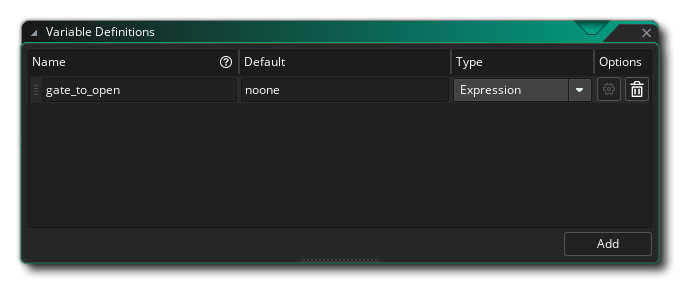
This variable will store the ID of the gate that the lever should open. This system is pretty similar to what we did for keys and chests!
You can now go into the level 1 room, place a lever around the gate and set its gate_to_open variable to gate1 (the gate that we previously added):

The only thing left is to allow the player to pull the lever by pressing "E". Let’s work on that!
Pulling a Lever
Open obj_lever and add a collision event with obj_player. Add the following actions to this event:
- "If Key Pressed" - This will be used to check if the player has pressed a key.
- "If Variable" - This will be used to check if the lever is on the first frame (meaning it hasn't been used yet).
- Then add "Assign Variable" to change its frame number (see the image below).
- Finally, add "Set Animation Speed" to set the animation speed of the gate to 1, playing its animation.
- You will need to use "Apply To" to apply this action to the gate.
- Then add "Assign Variable" to change its frame number (see the image below).
- "If Variable" - This will be used to check if the lever is on the first frame (meaning it hasn't been used yet).
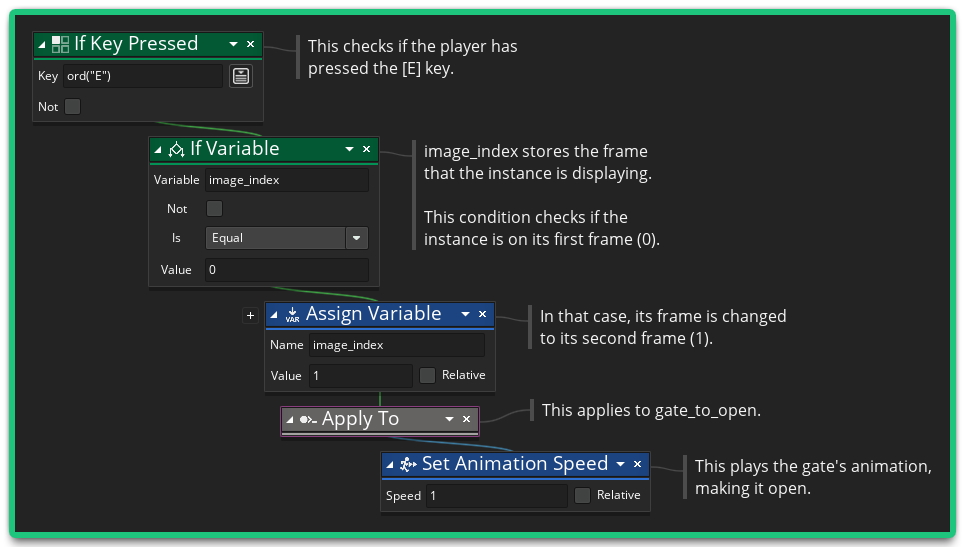
Note: You don’t have to write “ord(“E”)” in the “If Key Pressed” action. You can simply open the Key menu and select “E” under “Letters”.
This is similar to the collision event in the chest, as it checks whether the player has pressed the "E" key. In that case, it checks whether the lever is on its first frame, and changes it to the second frame.
It also uses “Apply To” to apply an action to the gate_to_open instance, setting its animation speed to 1. This will make the gate’s animation play, and it will open.
So make sure the “Apply To” action is applied to gate_to_open:

Run the game now, go near your lever and press “E”. This will cause its connected gate to open, and once the gate has finished its opening animation, it will be destroyed! The player shall now pass.

You can now create a whole level with unlockable chests and gates that can be unlocked using levers. Once the player has finished the level, we should allow them to continue to the next level. Let’s work on that!
Going To The Next Level
There is a sprite given in the “Level” group under “Sprites”, called spr_next_level. It’s simply a placeholder that acts as the trigger to move the player to the next level.
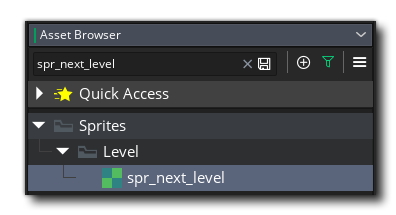
Let’s do the following to implement this feature: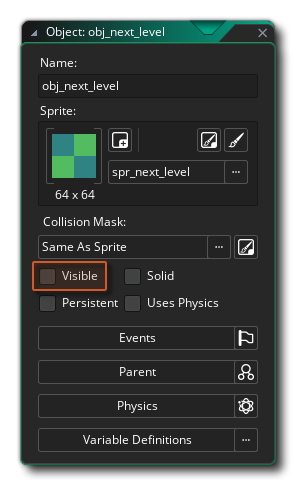
Under "Objects" -> "Level", create a new object called obj_next_level.
Assign the spr_next_level sprite to it.
In the object’s properties on the left, disable the “Visible” property. We don’t want this to be visible in-game (but it will still function normally).
Add a collision event with the player.
In this event, add the “Go To Next Room” action.

This will now switch to the next room as defined in the Room
Manager. You can open it from the  options
menu at the top of the Asset Browser:
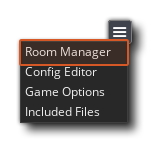
In the window that opens, you will see a tab for Room Order. This defines the order of the rooms and what room comes after a particular room. As you can see, the level 2 room comes after the level 1 room:
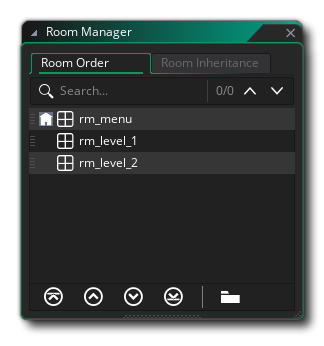
And of course, the menu room is the first room to appear when the game starts. If you add any more rooms to this project, make sure to set up the correct order for them in this menu.
You can now go ahead and place obj_next_level at the end of the first level, and also stretch it to cover the whole exit:
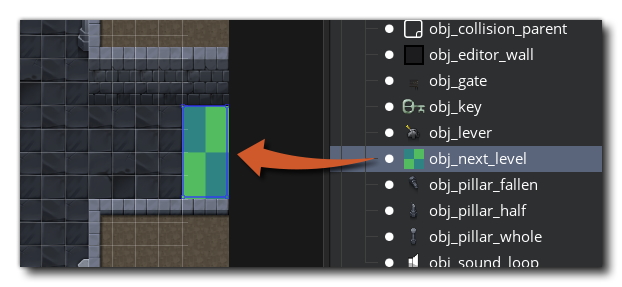
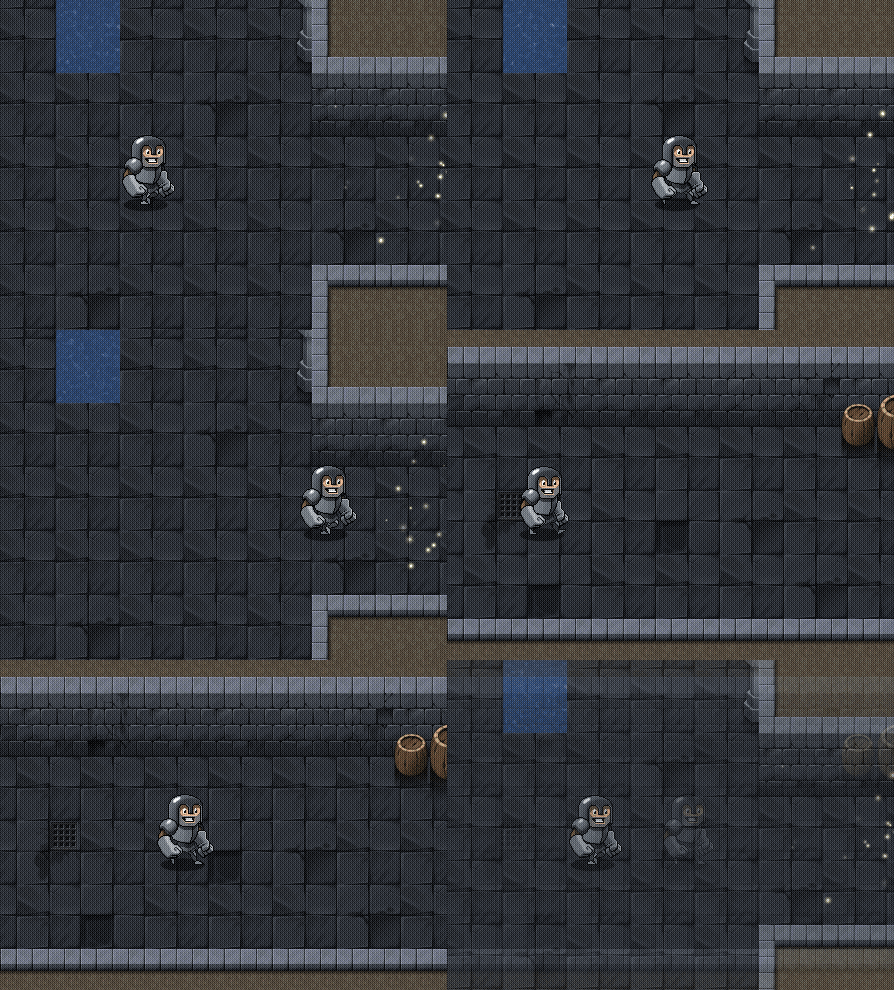
You can now run the game, go to the end of the level, and when you touch the obj_next_level instance (even if you can’t see it) the game will switch to the next room!
NOTE: You can place this instance early in the level for easier access while testing, or alternatively move the player near the end temporarily.
Summary
You can now create multiple levels with locked chests, keys to unlock them, paths closed with gates and levers to open them. The player can also finish a level and continue to the next one, which you can use to create a series of levels!
- You can use conditions to run actions only if something specific happens
- You can give unique names to instances in the Room Editor
- You can create variables to store those instance names
- This way you can create a connection between two instances
- You can use the image_index variable to check the current frame of an instance, and change it to switch the frame
- You can make objects that are invisible in-game but still take collisions
