Welcome to the Fire Jump tutorial! This series will take you through developing an infinite platformer game in GameMaker using GML Visual. You will learn how to make a playable character, generate infinite obstacles, build a solid game loop along with menus and much more.
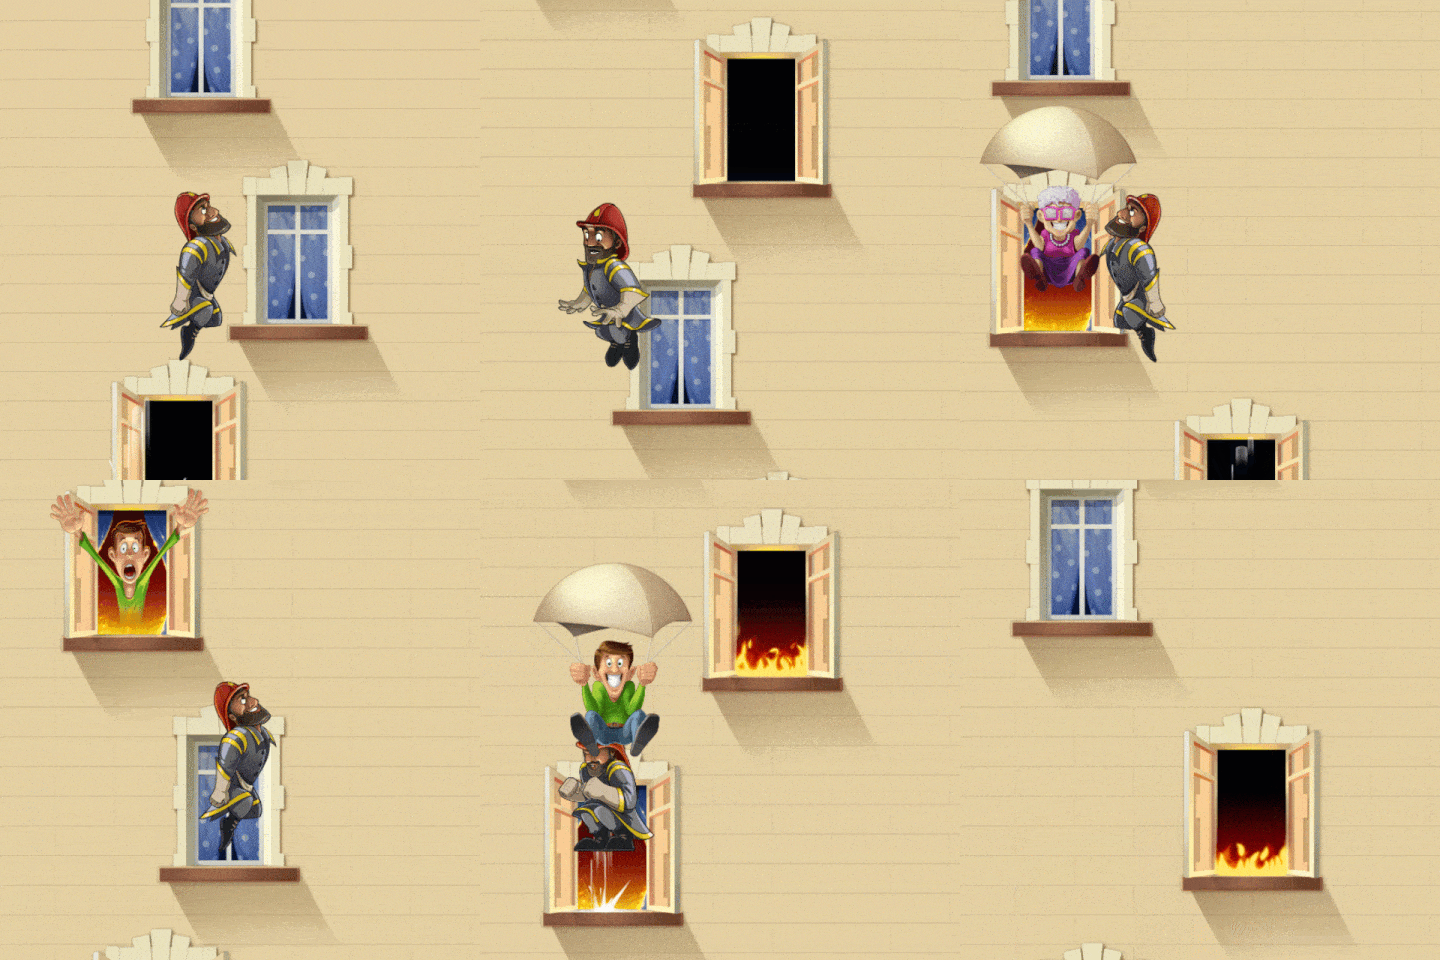
This is Part 4 of a 4-part series, all of which are available for free on this site. You can refer to the index page to navigate to the other parts.
Here is a video version of this tutorial:
Overview
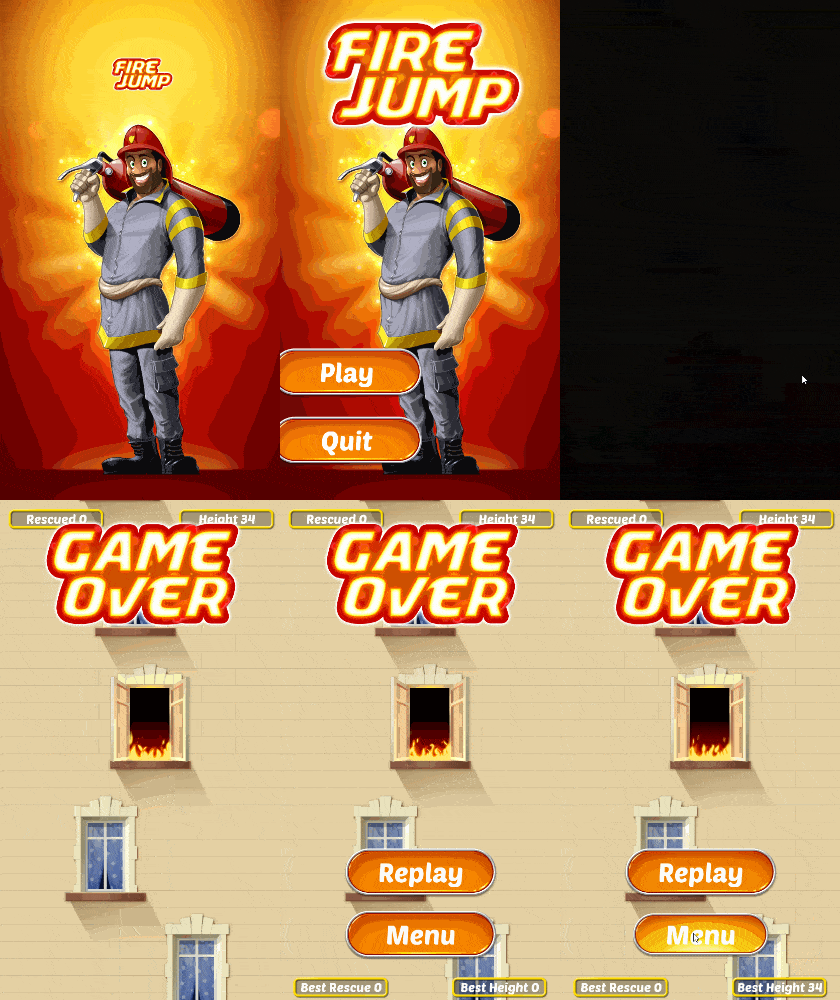
In the previous part, we added fire to our windows which could be extinguished by shooting foam. Now we’re going to expand our game by adding a main menu and a game over screen, using Sequences to animate them. We’ll also add a highscore feature so the player stays motivated to beat their previous score!
This page is divided into the following sections:
- New Room
- Sequences
- Menu Sequence
- Buttons
- Fade Transition
- Game Over Screen
- UI Sound Effects
- High Scores
We will make use of a variety of image assets for our in-game elements and interface animations, which you can download by clicking here.
New Room
We want to add a new screen to our game for the main menu, so for that we need a new room. Go into your Asset Browser, select the “Rooms” group and create a new Room asset. We’ll call this “rm_menu”.
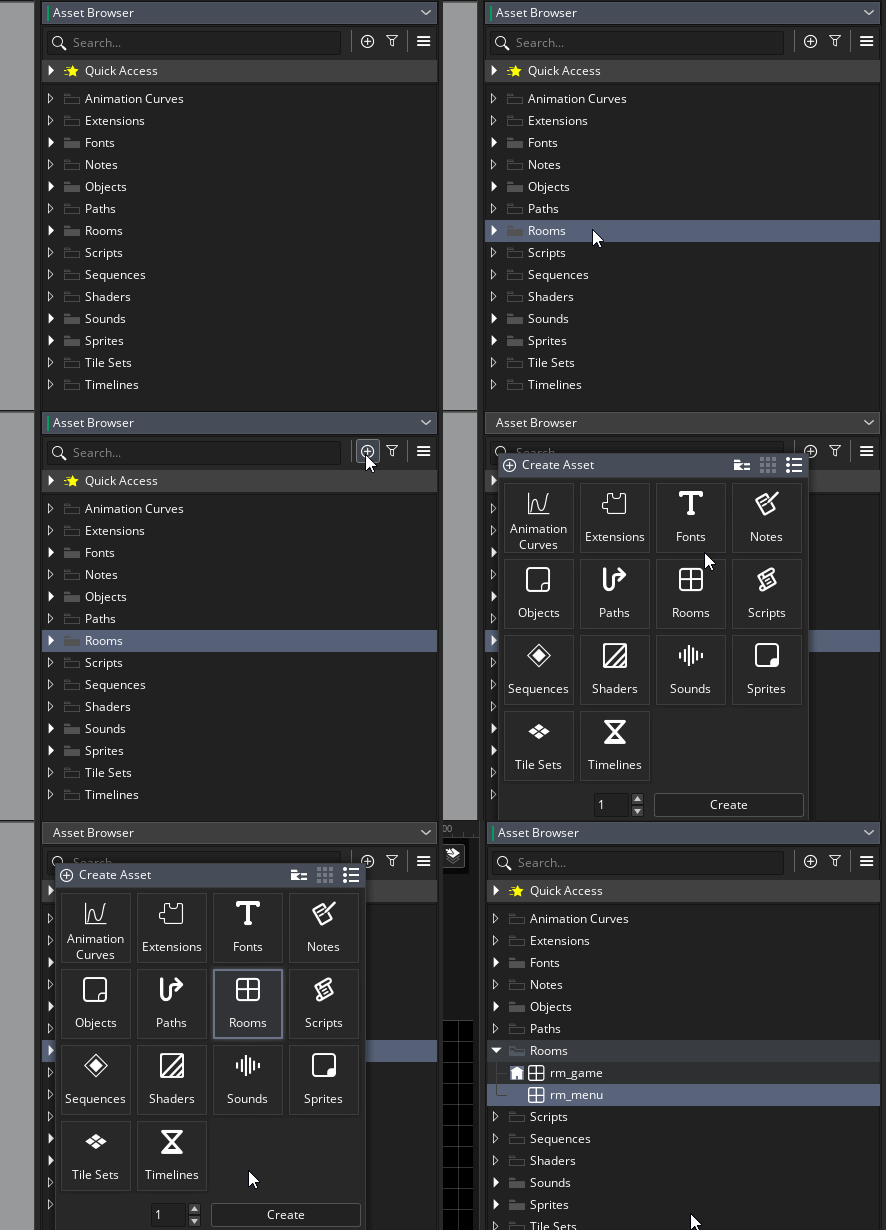
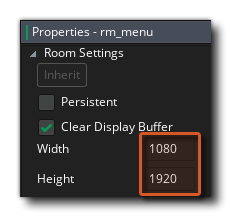
The Room Editor for our new room will open up. We first need to adjust its size, so go into the Room Settings in the bottom-left corner of the IDE, and set the Width and Height to 1080 and 1920 respectively - the same as our game room.
Room Order
In the game, only one room can be active at a time. We want the game to open the menu room first, and then allow us to transition into the game room: however if you run it now, you will see that the game room opens first.
We
want to change the room order, so that the menu room comes first and
the game room comes second. At the top of your Asset Browser, you will
see the  button. Click on it, and from the menu that opens, select
Room Manager.
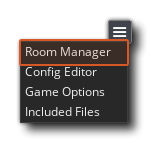
This will open the Room Manager window. Under the “Room Order” tab, you will see a list of rooms, where rm_game is first and rm_menu is second. This is the reason our game room opens first, and to set the menu as the starting room, drag rm_menu and place it above rm_game.
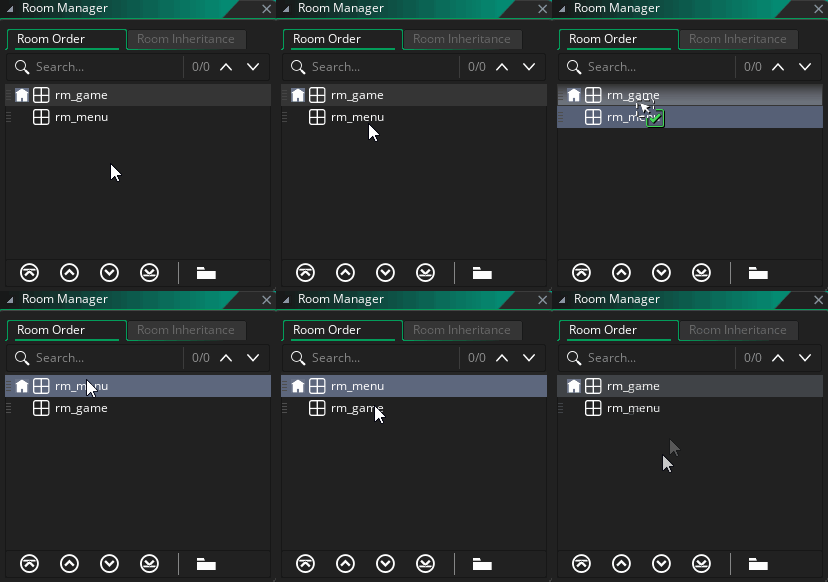
Tip: Thehouse icon next to a room asset indicates that it is the starting room.
If you run the game now, you will see that the menu room opens first, which is simply a black screen. Let’s create an animated menu screen with buttons, so we can welcome players with style!
Sequences
We’re going to use Sequences to create our menu screen. A Sequence is similar to a room, as it has a canvas that allows you to place sprites and objects, however there’s an awesome twist: it allows you to create animations!
Here is how our menu will look after we have finished making it:
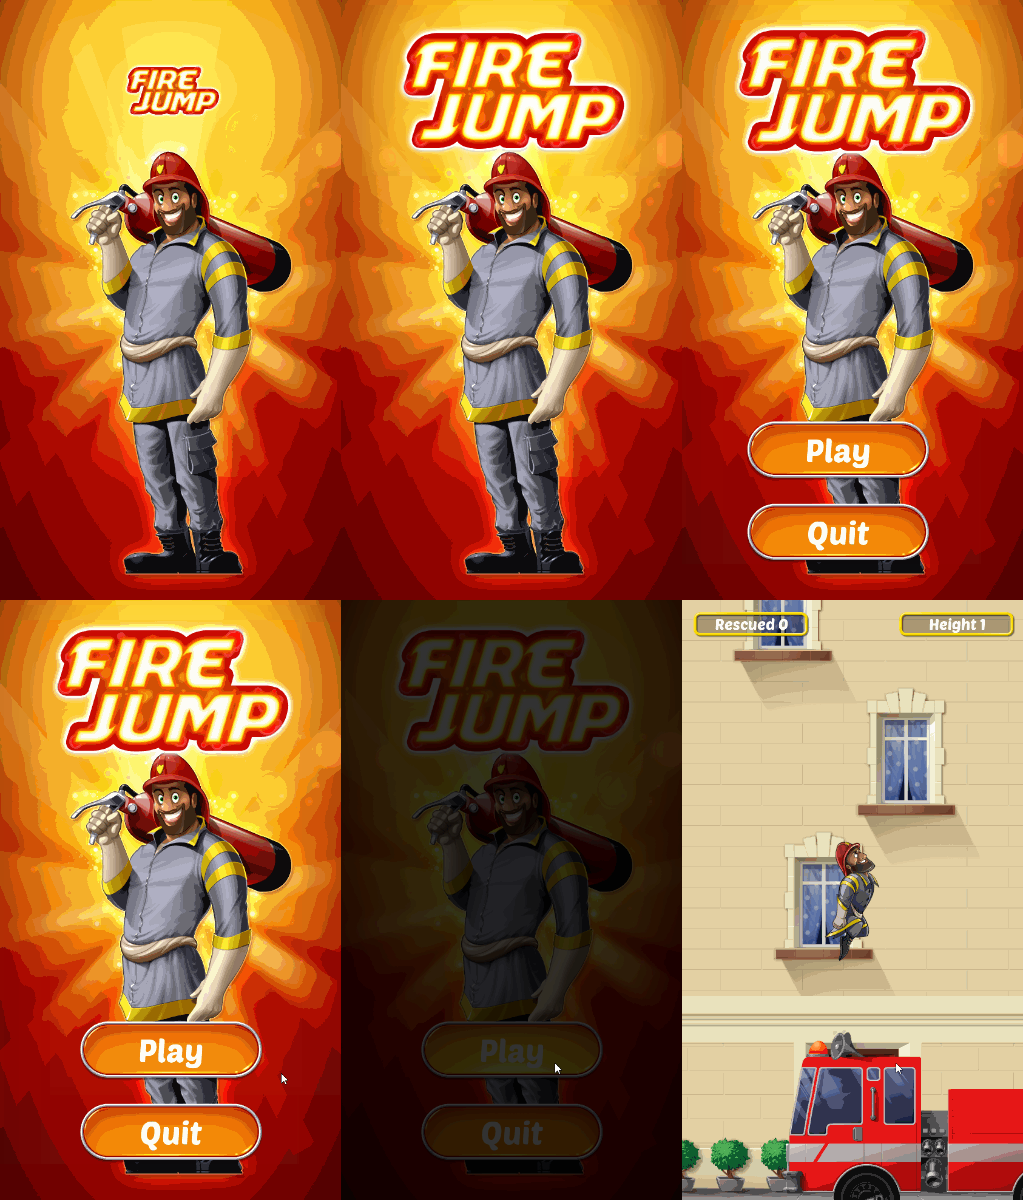
Let’s first create a Sequence asset and learn about the basics of the Sequence Editor.
In the Asset Browser, find and select the “Sequences” group (or create one if you don’t have it). Go into the Create Asset menu and create a new Sequence asset, which we’ll call “seq_menu”.
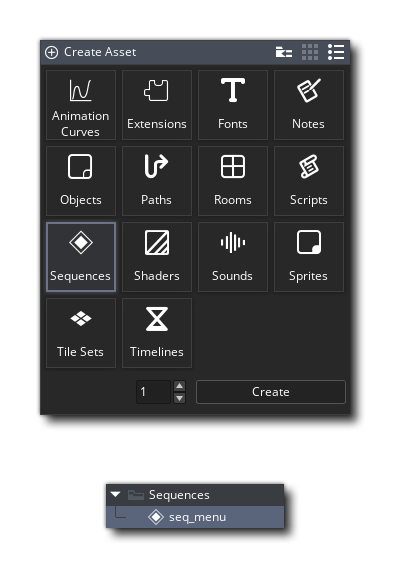
Note: The “seq_” prefix indicates that this is a Sequence asset.
This will open the Sequence Editor window, which has the following parts:
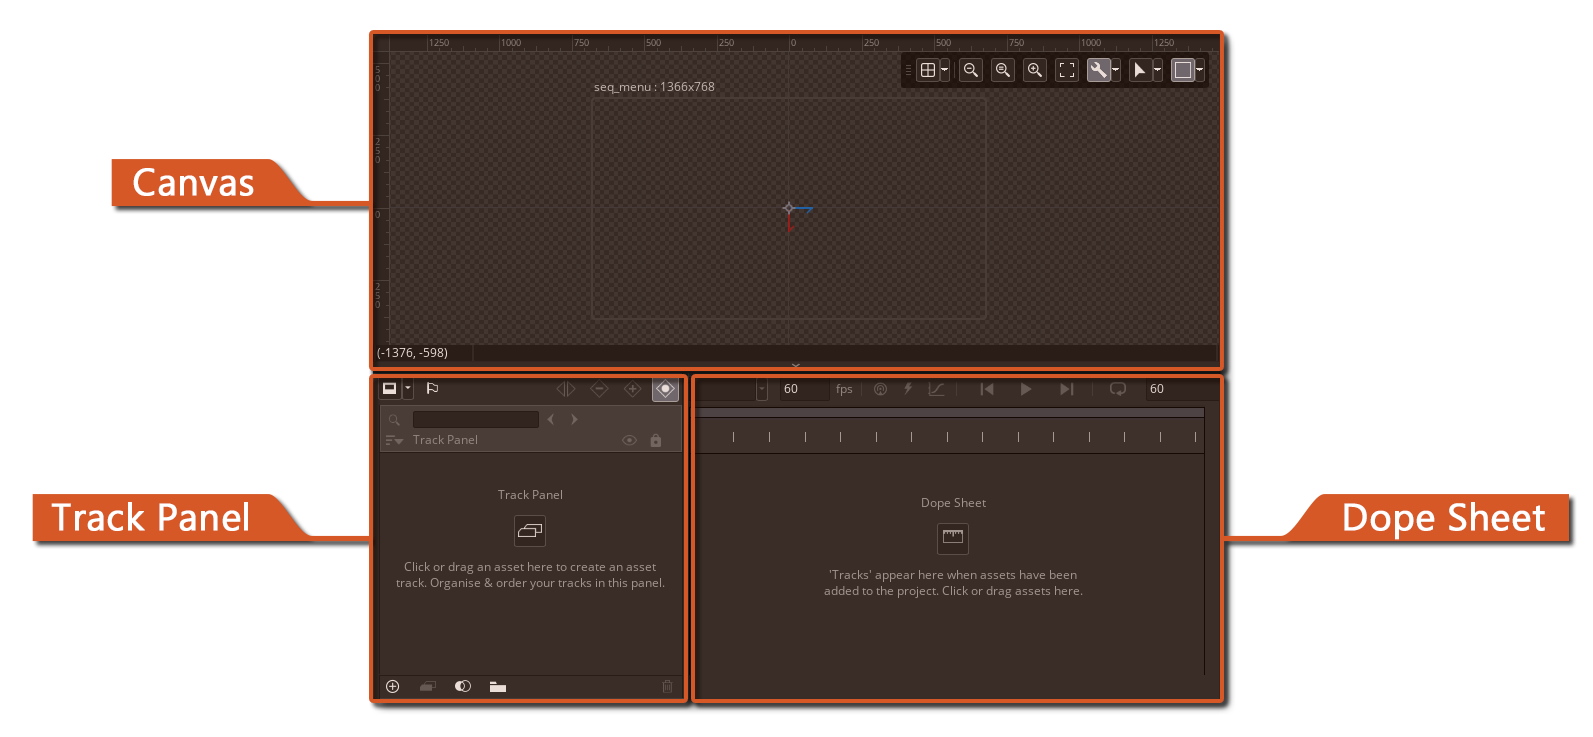
The Canvas is where you place and animate sprites/objects. The Track Panel is a list of your tracks (which are just your sprites/objects), and the Dope Sheet is where you can edit the timings of your animations.
While we will be going through the process step-by-step in this tutorial, it is recommended to go through the following resources first to get a proper introduction to Sequences:
Menu Sequence
We’re going to create a Sequence for our main menu, where the game logo and menu buttons will have entry animations. As always, we need to import some sprites first.
Sprites
In your “Sprites” group, create a new group called “UI”. This will contain all the sprites for the main menu and the game over screen.
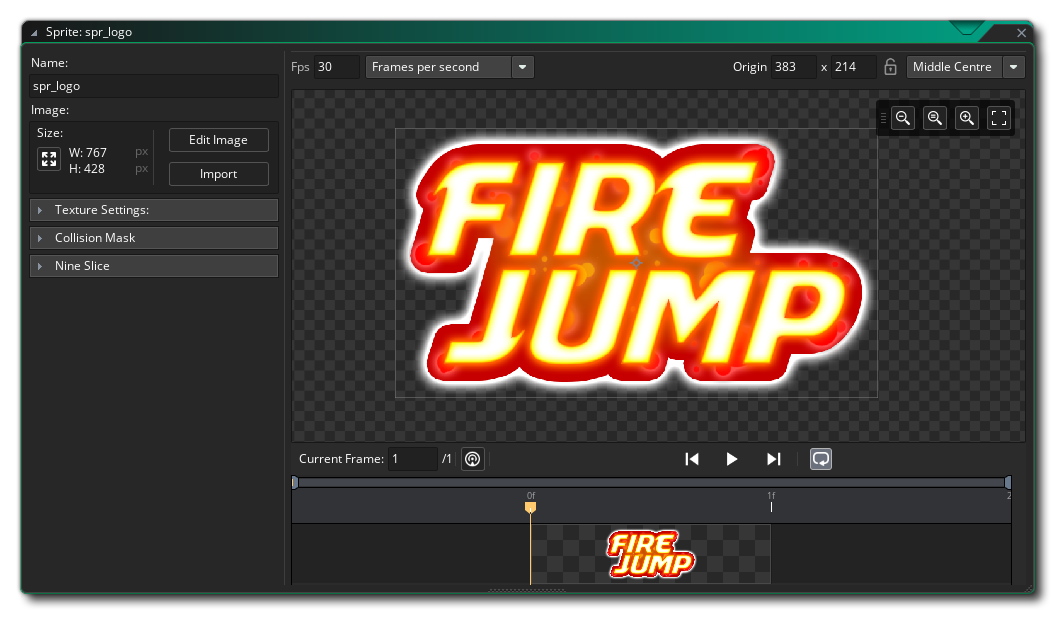
In your new group, create a new sprite called “spr_logo” and import it from the tutorial assets. Set its origin to “Middle Centre”.
Now, add another sprite called “spr_button”. In the tutorial’s art assets, you will see three button images: spr_button_0, spr_button_1 and spr_button_2. Hold control (or command on macOS) and select the three files one-by-one using your mouse, in ascending order. Once the three images are selected, click on “Open” and they will be imported into the sprite.
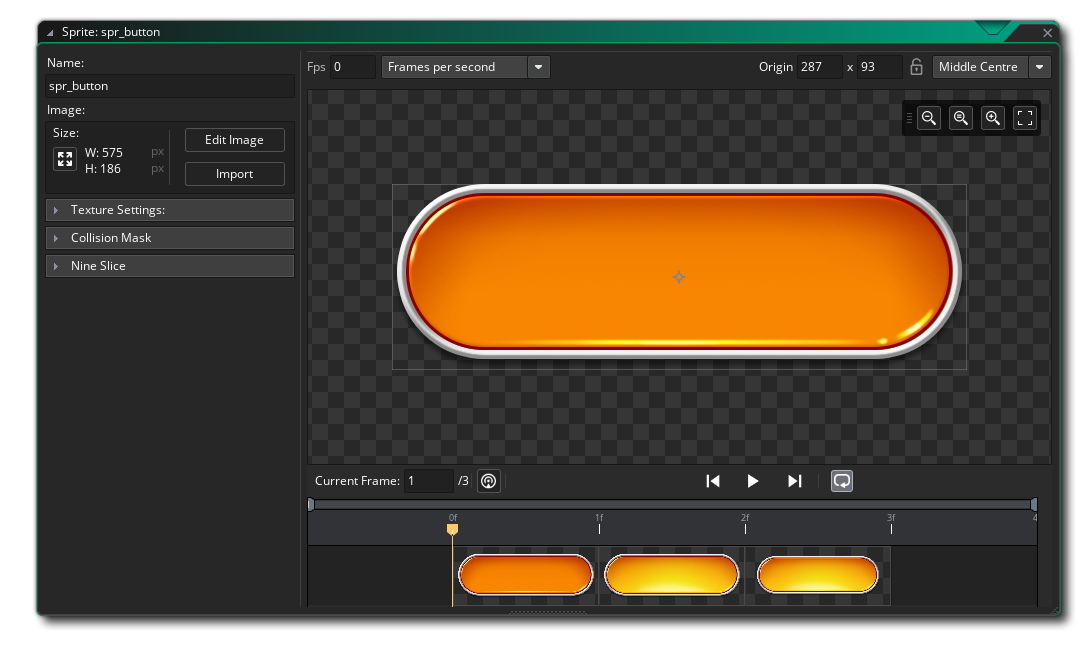
First of all, set the origin for this sprite to “Middle Centre”. This sprite now has three sub-images, which are usually used for animation, however just like the window these are different “states” for the button. Since we don’t want this to play as an animation, set the “Fps” for this sprite to 0.
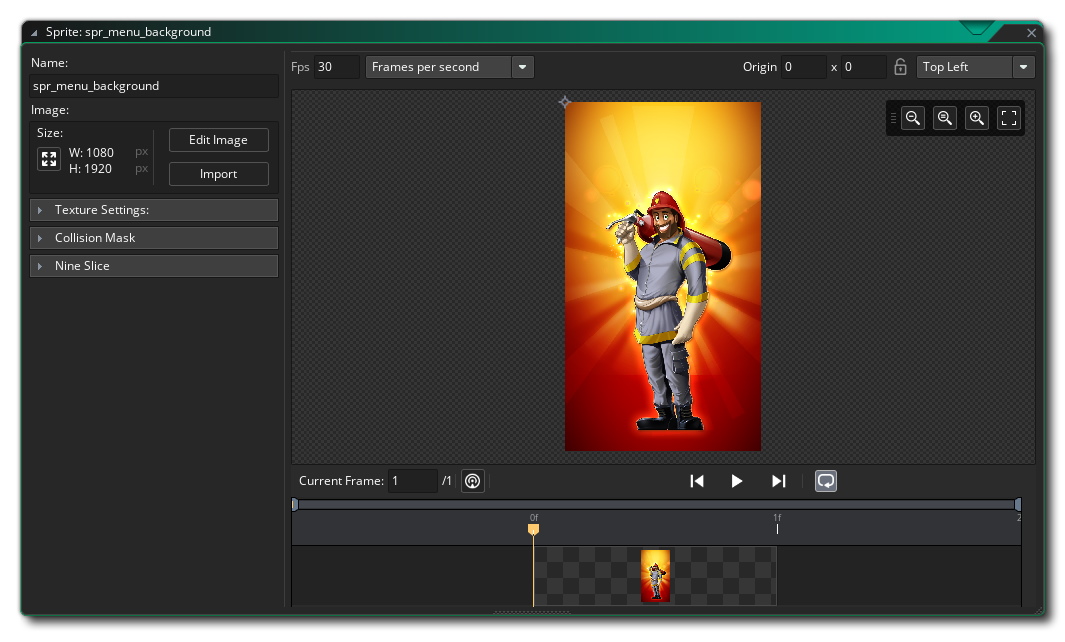
Finally, we need to import a background for the menu room. Create a new sprite called “spr_menu_background” and import it from the tutorial assets. Leave its origin at "Top Left".
Sequence
In your Asset Browser, find your seq_menu Sequence asset and open it. Once you are in the Sequence Editor, we can start creating our main menu!
First of all we need to define the length of this Sequence, which is the number of frames that it runs for. You will see that field above the top-right corner of the Dope Sheet, which you need to change to 120:
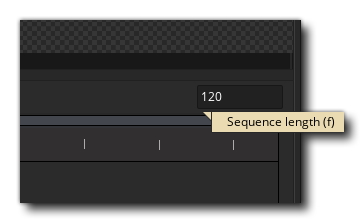
Each second has 60 frames, so this makes our Sequence 2 seconds long.
Canvas
In
the top-right corner of the Canvas, you will see a toolbox
with the canvas options at the end. Click on the  arrow to open
the Canvas menu, and make sure your settings match the following:
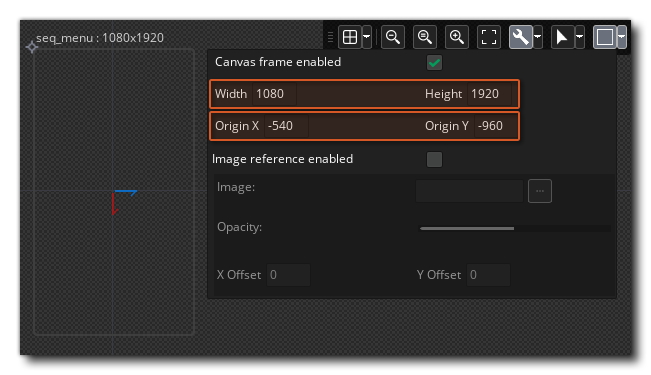
We’re setting the width and the height of the canvas to 1080 and 1920 respectively, to match the size of our rooms. Do note that this canvas does not affect the animation at all, and is only visible in the Sequence Editor for reference.
Just like a Sprite, a Sequence also has an origin. By default it’s at the center of the canvas, but we want the origin for this Sequence to be at its top-left corner, so we’re setting it to -540 and -960 respectively (both values are half of the canvas size).
Logo Animation
We’re going to place and animate our game’s logo now.
In the Asset Browser, go under “Sprites” > “UI” and find spr_logo. Drag and drop it into the Sequence canvas. Once you have added it, you will see its track in the Track Panel and the Dope Sheet.
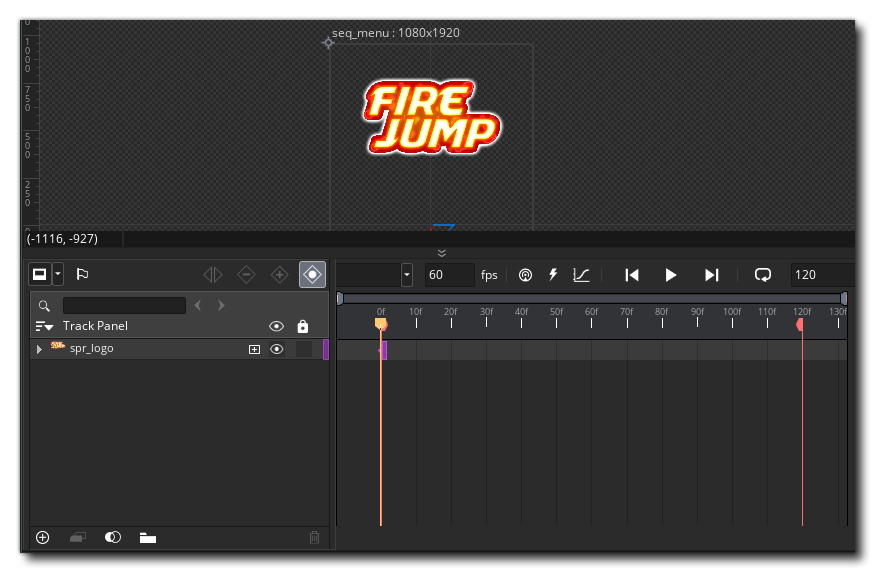
Note: Theplayhead controls what frame is visible on the canvas, and the same frame is edited when any properties are changed. New tracks are also added to that frame, so we need to make sure that this playhead is at frame 0 before adding any new tracks.
In
the Dope Sheet, the ![]() purple rectangle (may be a different color for
you) is called an “asset key”. Your track will only be visible when the
playhead is on this asset key. Since we want our logo to always be
visible, we need to resize the asset key to fit the whole Sequence.
purple rectangle (may be a different color for
you) is called an “asset key”. Your track will only be visible when the
playhead is on this asset key. Since we want our logo to always be
visible, we need to resize the asset key to fit the whole Sequence.
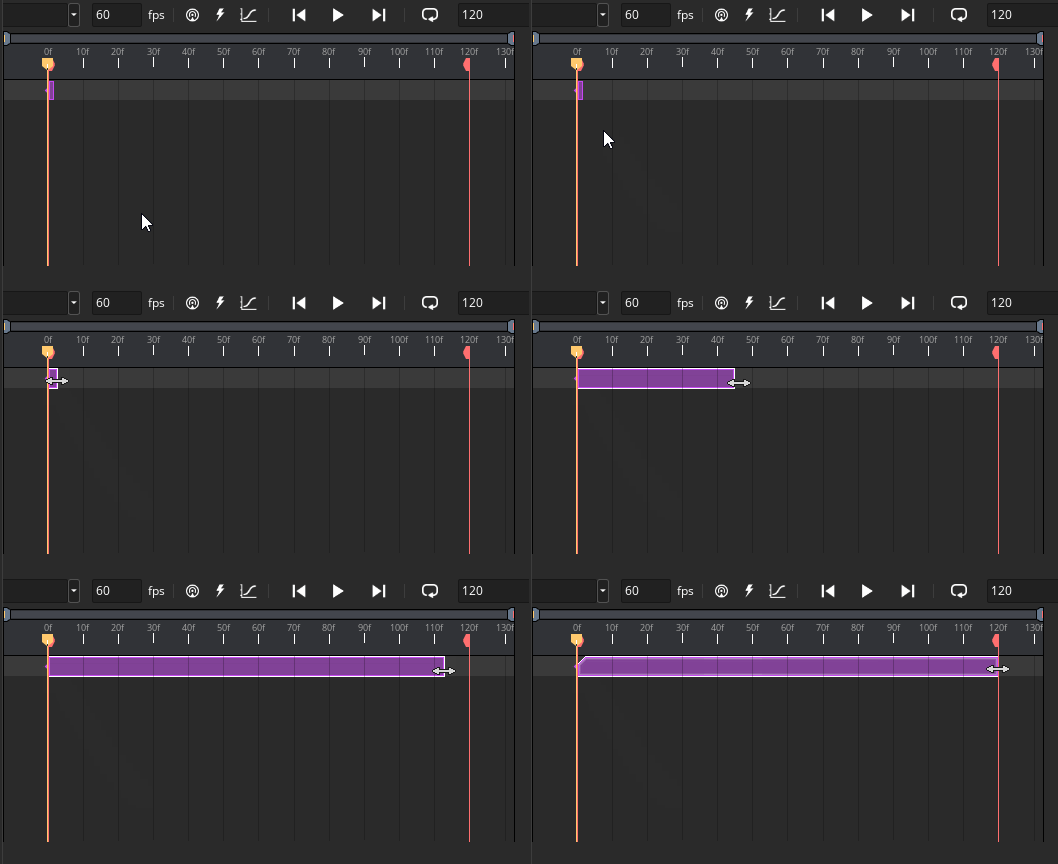
Tip: You can hold control (or command on macOS) and scroll the mouse wheel to zoom in and out of the Dope Sheet (you can do the same on the Canvas too).
Now let’s animate the logo. It’ll be small in the beginning and grow up to its full size.
Place
the playhead at the first frame of the Sequence, and make sure that the
spr_logo track is selected. Above the Track Panel, find and click on
the  button (“Record a new key”) to add keyframes to the track.
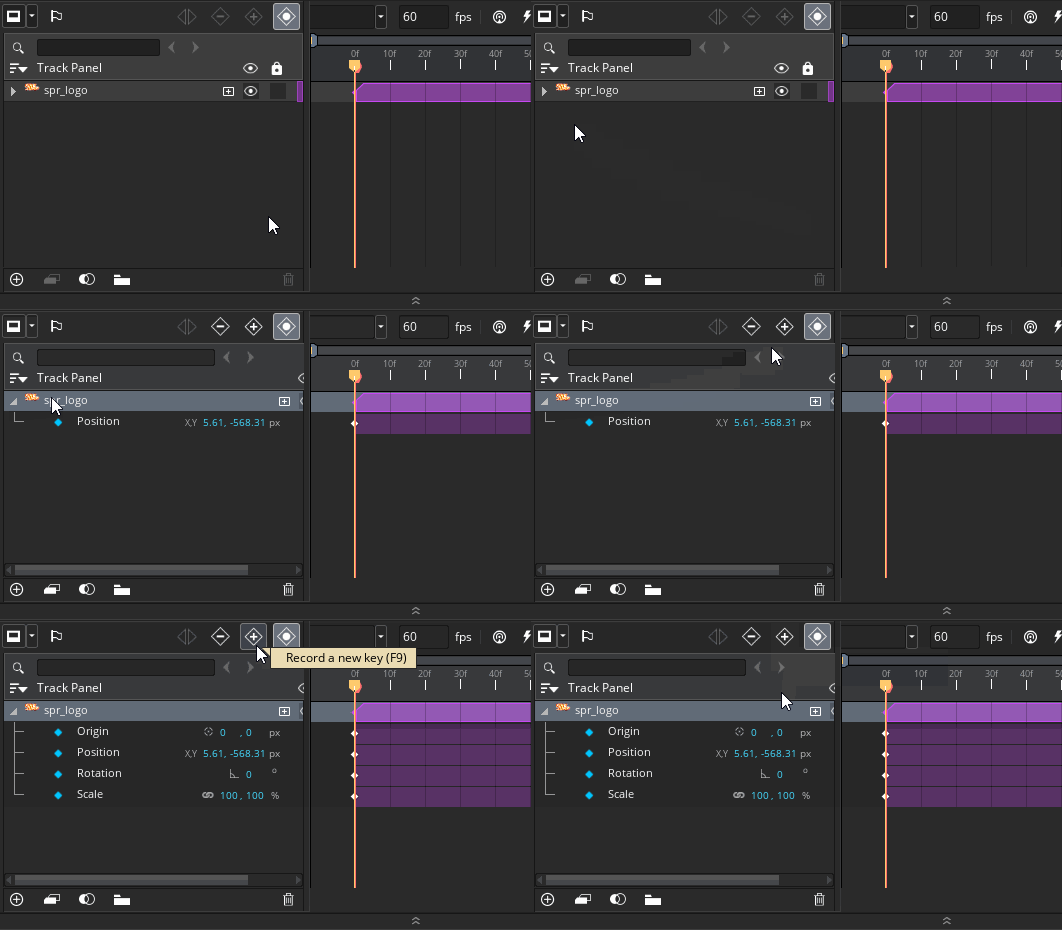
A keyframe can be placed at any frame on the track, and controls its properties at that moment. You can have one keyframe where the sprite is small, then another keyframe where the sprite is big; between those two keyframes, the sprite will animate between the two sizes. This is known as “tweening”.
We’re going to do the same thing with the logo track. To add our second set of keyframes, place the playhead on the last frame and click on the same “Record a new key” button to add keyframes on this frame.
Note: When you are told to “go to a frame”, it means you need to move the playhead to that frame.
Go back to the first frame, and look at the canvas. What you are seeing here is the Sequence at its first frame, with the logo fully visible. We want it to be smaller here, so scale it down in the canvas using the Gizmo controls:
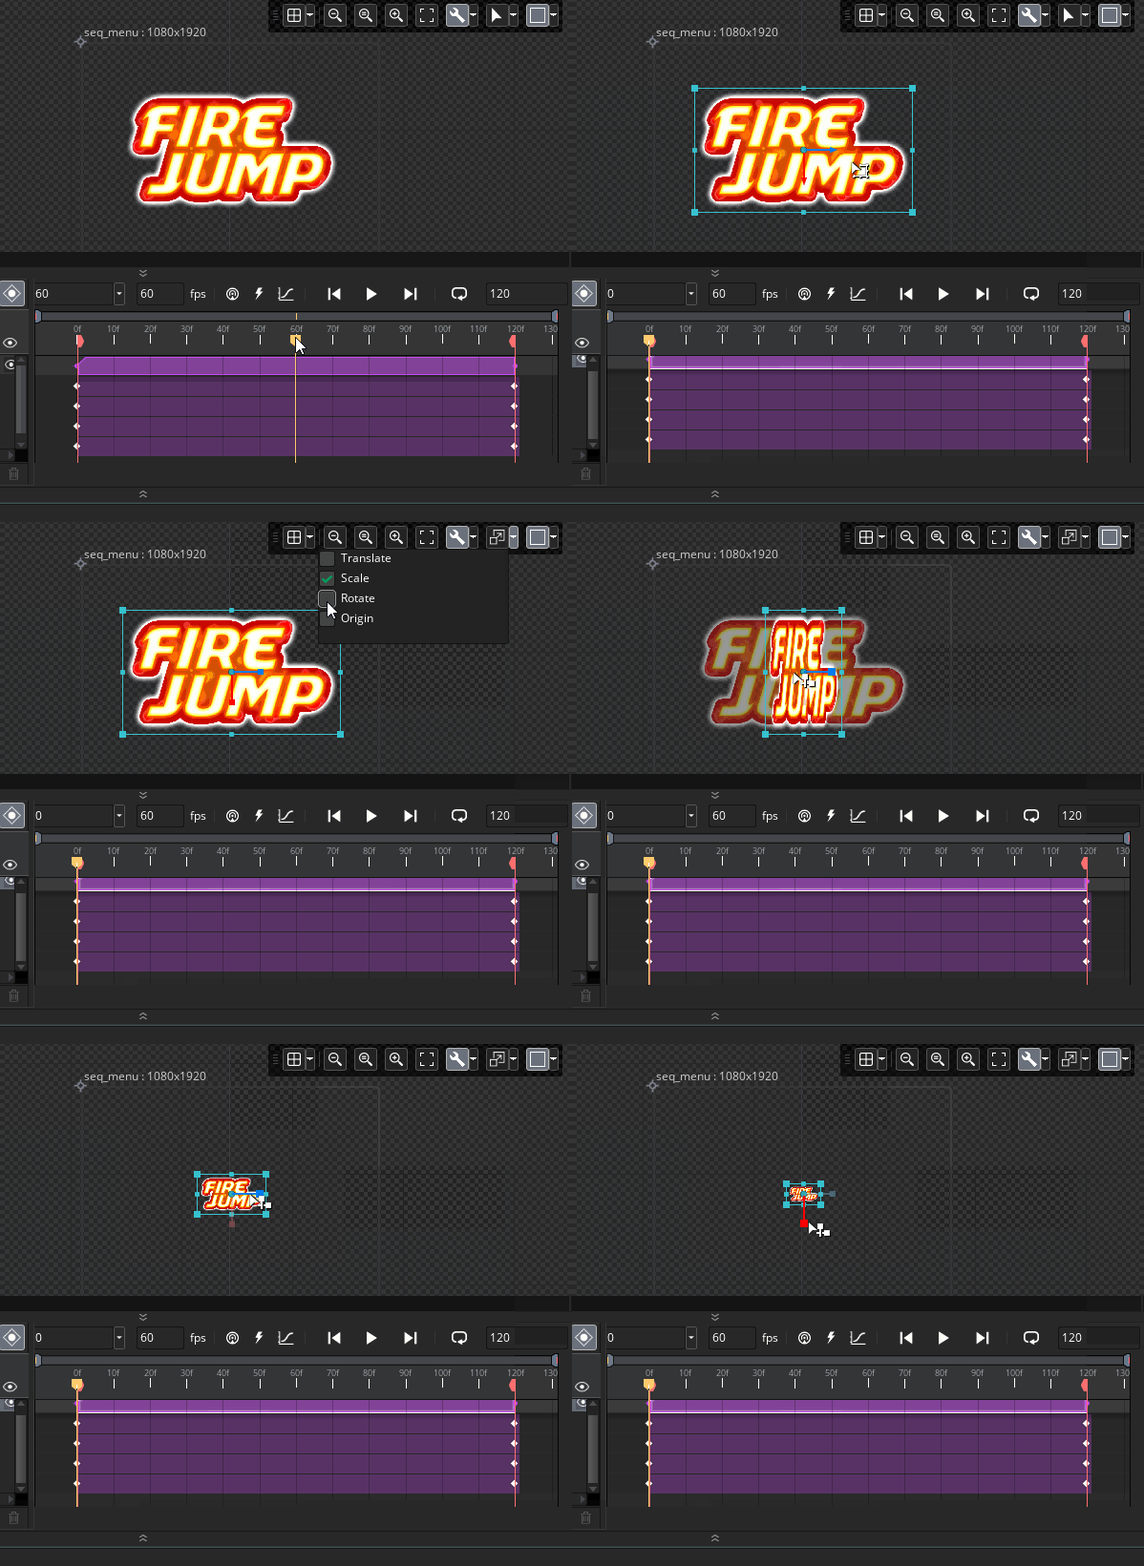
By
doing this, we are changing the properties of the track at the playhead
position. Since it is now smaller at the first frame, it will grow
gradually until it reaches the last keyframe where it has the default
size. Click on the  Play button to preview your animation:
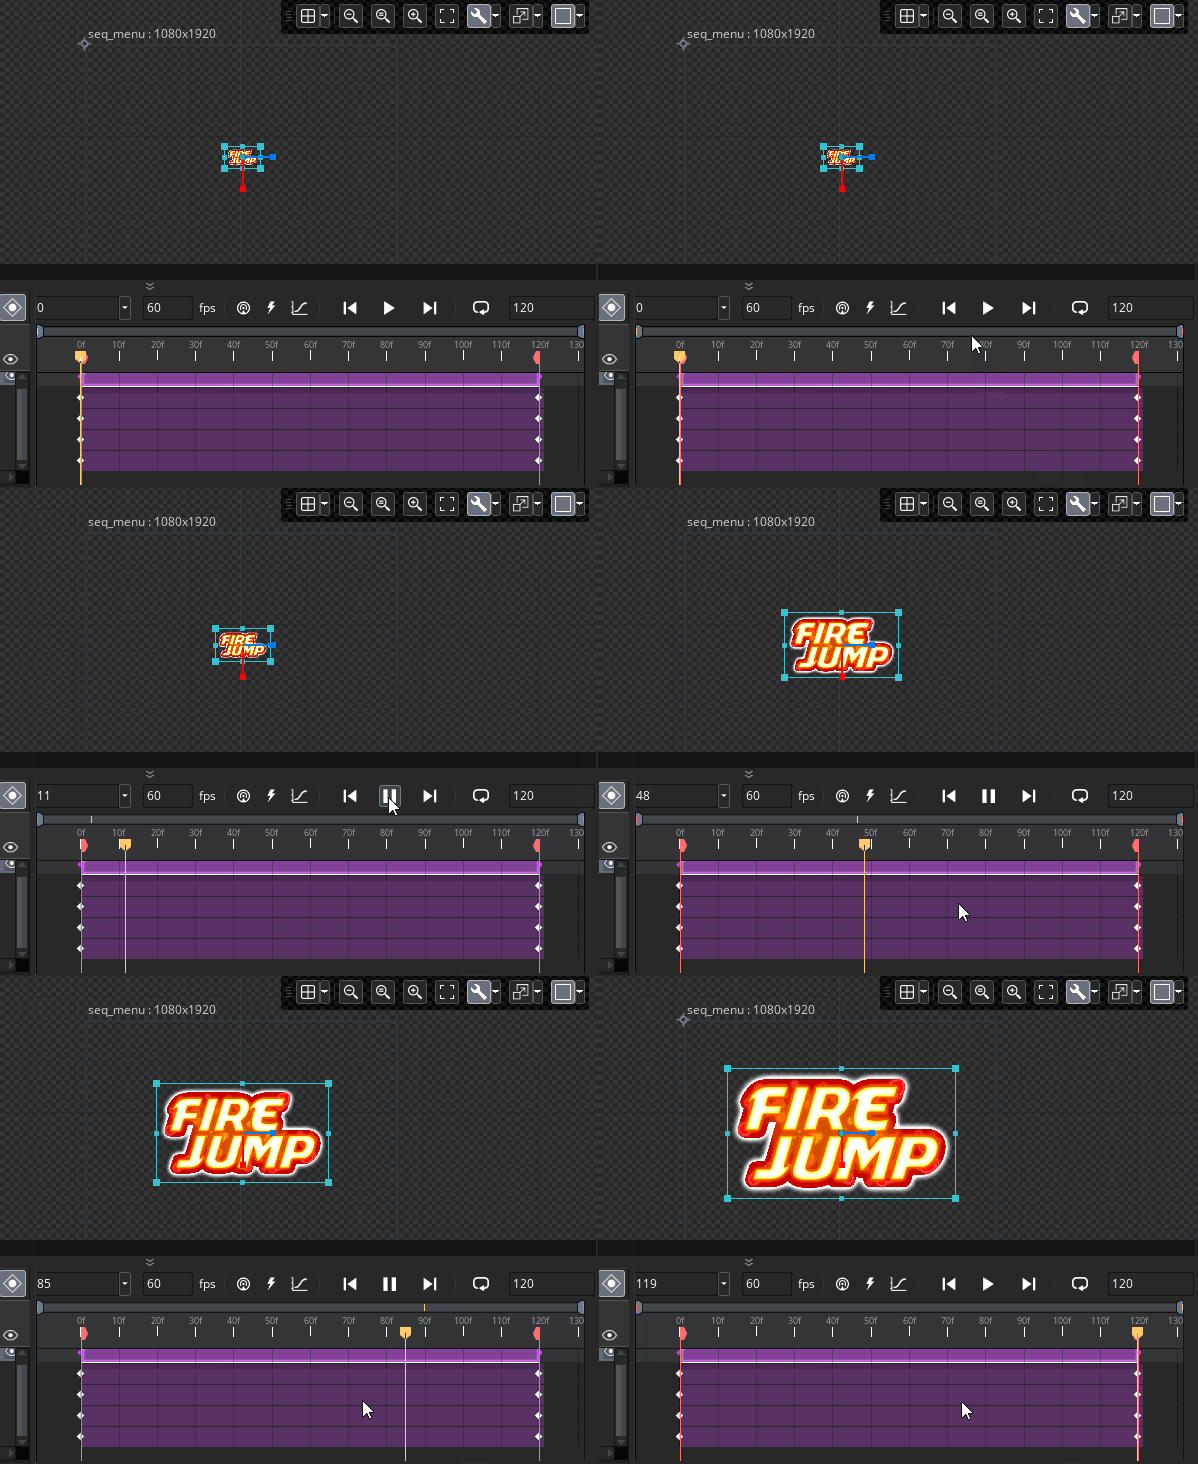
Looks nice, but it could definitely use some more movement. How about… elasticity?
Animation Curves
Animation Curves are similar to keyframes, but they can have a curve between two keyframes for smooth animation:
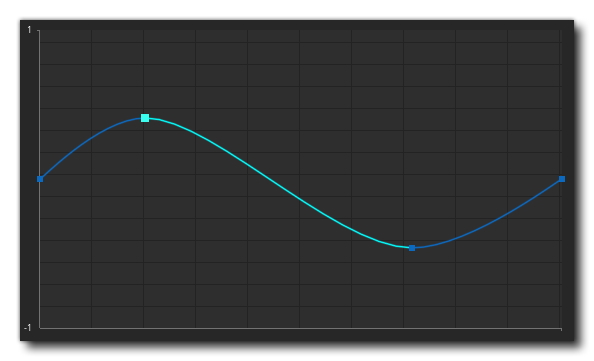
We’ll use a curve for our logo’s scale so that it animates smoothly. In the Track Panel, expand the spr_logo track by clicking on the arrow to the left, which will expose all of its properties:

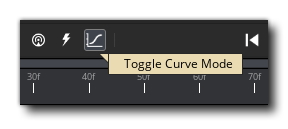
These are the properties that can be animated for this track, such as Position, Rotation and Scale. Select the Scale track, and then above the Dope Sheet, click on the “Toggle Curve Mode” button.
This will now open the Curve Editor for this property. You will see that it is not a curve, so we need to click on the “Convert to Curve” button so generate a curve from our keyframes. Once you do that, you will see the curves for the X and Y scale of your logo and you will notice how they're "going up":
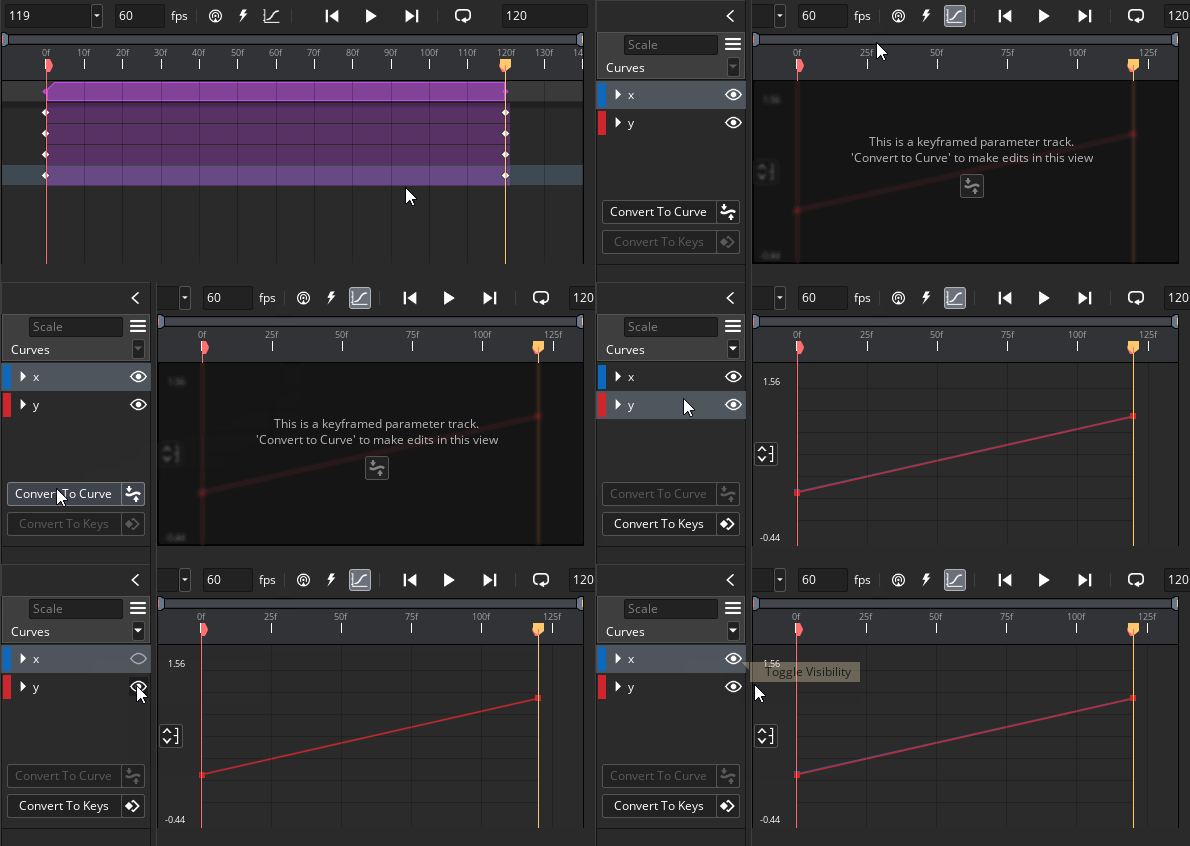
If you play the animation, it will be exactly the same as we haven’t changed our curves yet. On the left of the curve, you can see two “channels”: x and y. These are the individual curves for the horizontal and vertical scale of the track. We’re going to apply a “Curve Preset” to both of these tracks, so that the animation looks more realistic.
Before applying a preset, make sure that both of your x and y curves look like this (slanting up), otherwise the preset will have no effect:
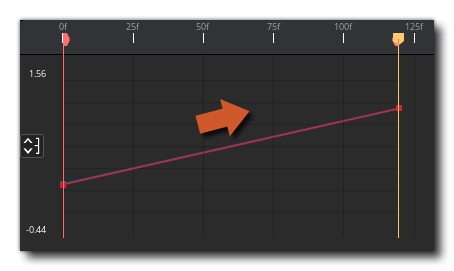
Select the x channel
from the “Curves” list, and then click on the  arrow above the
eye icon to open the Animation Curve Library window. Set the “Type” to
Bezier, and from the “Presets” list, select “Elastic” (or any other
preset you prefer!).
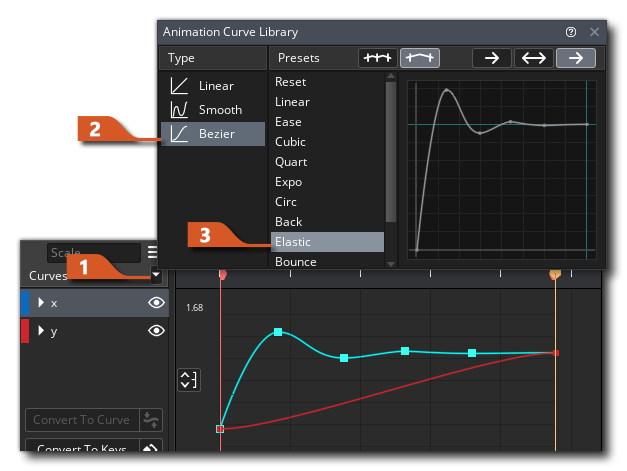
Now repeat the same procedure for the y channel. Your final curve should look like this (of course, unless you chose a different preset):
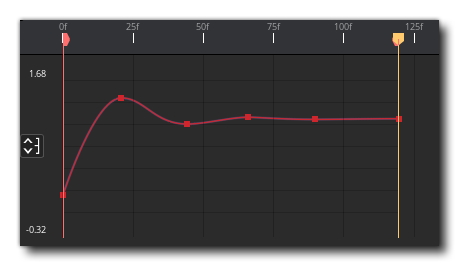
Note: If you're having trouble getting the proper results in the Sequence Editor, make sure to go through the manual and the tutorial videos linked in the “Sequences” section above.
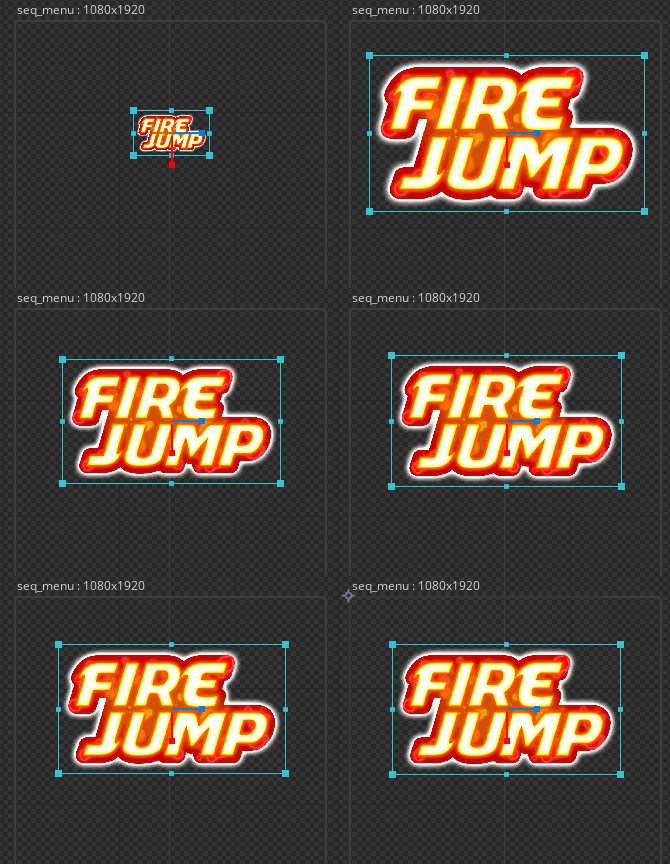
If you play the Sequence, you will find that the logo now has an elastic animation!
Menu Room
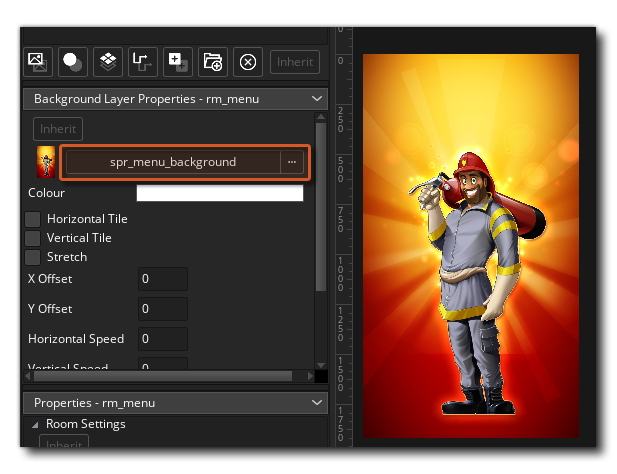
Find the rm_menu room in your Asset Browser and open it. Once inside the Room Editor, go to the Layers panel and select the “Background” layer. Below the Layers panel you will see the Background layer’s properties, where you can click on “No Sprite” and assign a new background sprite. We will use the spr_menu_background sprite as this room’s background (it will be under the "UI" folder in "Sprites").
Now we want to place the menu Sequence here, so we'll add an Asset Layer which is used to place Sprites and Sequences in a room. Click on the following button to create an Asset Layer and name it “Menu”:
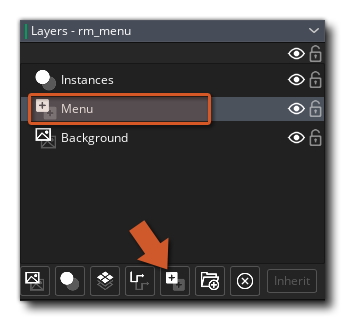
From the Asset Browser, find and drag the seq_menu Sequence and drop it in the room. Make sure to place it in the top-left corner so the room and the Sequence align with each other (you can click on the added Sequence to make sure it's in the correct place). You can now hit Play in the Room Editor’s toolbox to see the Sequence in action!
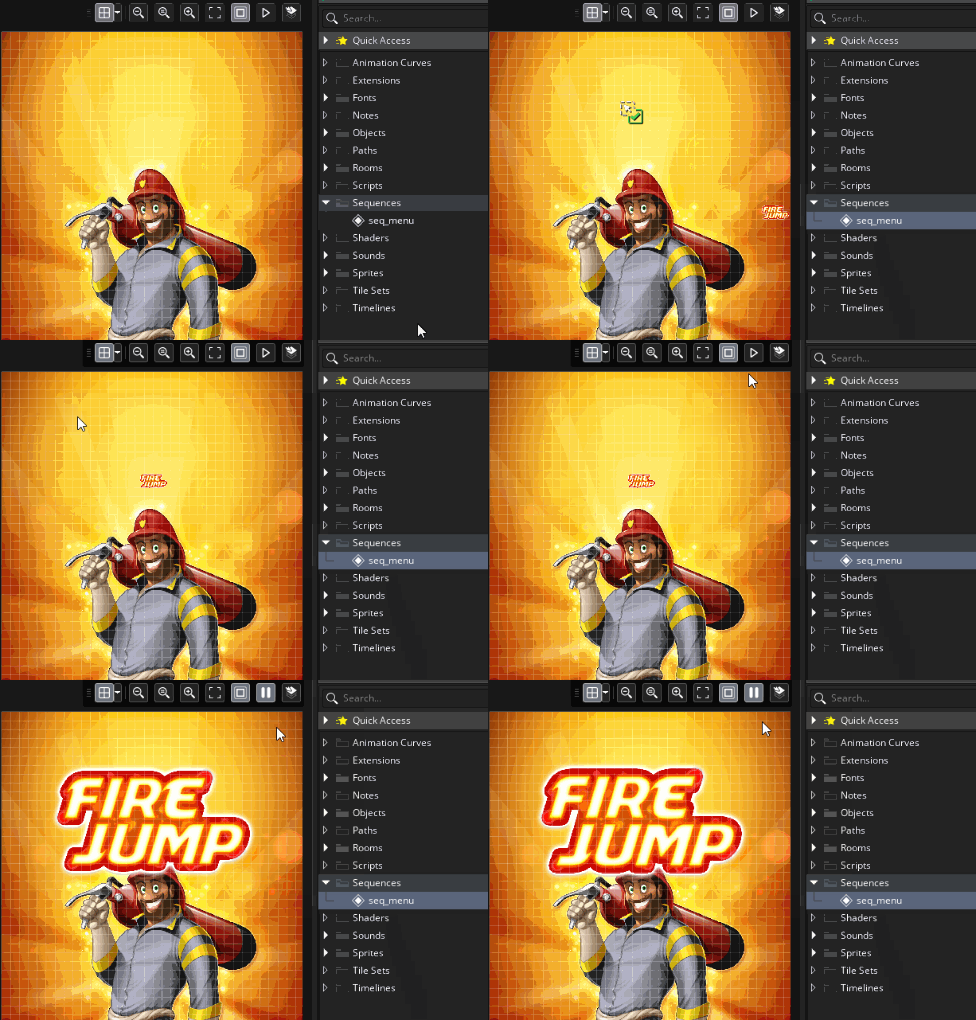
Note: If you find that your logo disappears at the end of the animation, go into the Sequence Editor and make sure that the track’s asset key is stretched till the end of the Sequence.
If you run the game, you will see the same thing. Nice looking logo, however, we’re not able to go into the game because we don’t have a “Play” button yet. Let’s work on that now!
Buttons
In the previous section, we imported a sprite for the button. Now we’re also going to import a sound effect that plays when the user clicks on a button.
Go into the “Sounds” group and create a new Sound asset called “snd_button”. Import the snd_button.wav file from the tutorial’s assets.
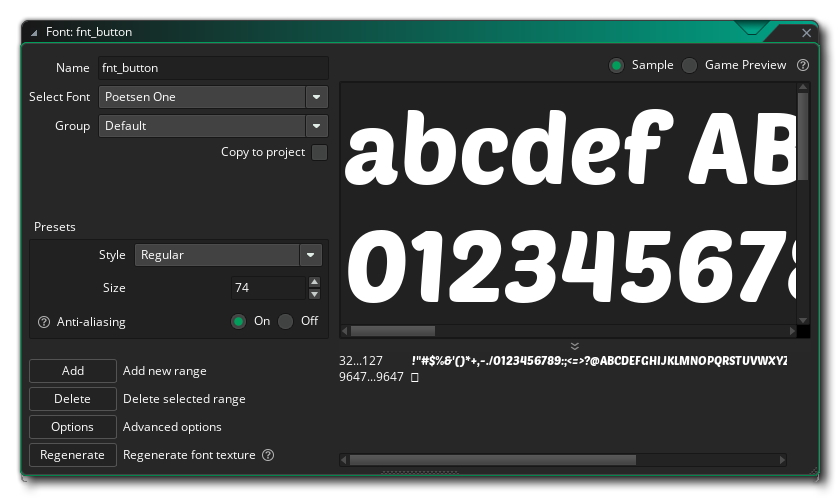
We'll also create a new font for our buttons. In the "Fonts" group, create a new Font asset called "fnt_button", assign it a font you like (preferably the same one used in fnt_score) and make it large (as the buttons are also large).
Button Parent
We’re going to create a parent object for all buttons. This parent object will have all the basic functionality required for a button, and its child objects will have their own actions for what happens when the user clicks on them.
In the “Objects” group, create a new group called “UI”. In this new group, create an object called “obj_button_parent”. We don’t need to assign a sprite to this object as it’s only a parent.
Let’s start with programming this object with events. Add the Create event, and in that event add an “Assign Variable” action. We’ll create a variable called text that has a default value of “Button” (quotes included - this is a string variable).
This variable stores the text that is displayed on the button, which we will be changed by the object's children so they can have unique text.
Drawing
Let’s draw the button now, along with its text. We have done this before with the score objects, so it should be pretty straightforward to implement again.
Add the Draw event to the object. In that event, add the following actions in the given order:
- “Draw Self”
We use this action to draw the instance itself. - “Set Font”
We’re going to use the fnt_button font that we created earlier, so set the “Font” field to fnt_button (or find it through the Asset Explorer). - “Set Text Alignment”
We want to draw our text at the center of the button, so we need to change its alignment.
Set “HAlign” to fa_center and “VAlign” to fa_middle. - “Draw Value”
This is where we draw our button’s text.
Clear the “Caption” field so it's empty, as we only want to draw one value. In the “Value” field, enter text (which is our variable). Enable “Relative” for both “X” and “Y” and leave their values at 0. - “Set Text Alignment”
We use this to reset the text alignment to default. Leave the fields as they are.
Here is what your event should look like:
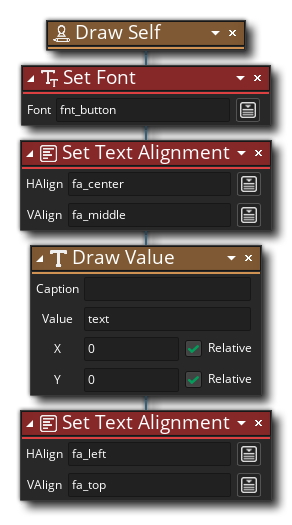
This event will now draw the button’s text on top of it.
Hover Behaviour
When the user hovers their mouse over the button, we want it to change its appearance, to indicate that this button can be clicked on. If you remember, our button sprite has three frames:

The first frame is the button’s default appearance, the second one is for when the user hovers over it, and the third one will appear when the user clicks the button. Let’s implement the hover behaviour first.
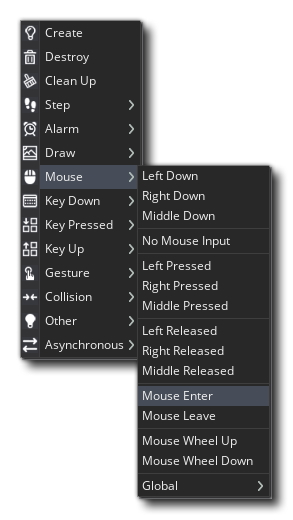
Click on “Add Event”, go under “Mouse” and select “Mouse Enter”. This event runs when the mouse enters the instance’s area, so we know that it’s hovering over it.
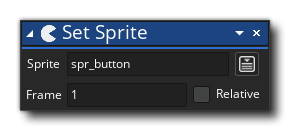
When this happens, we want the button to switch to its second sub-image (frame 1). From the Toolbox, add the “Set Sprite” action. Set its “Sprite” field to spr_button (so it retains the same sprite) and the “Frame” field to 1.
Click on “Add Event” again, go under “Mouse” and select “Mouse Leave”. This event runs when the mouse leaves the instance’s area, so we know that it’s not hovering over it anymore.
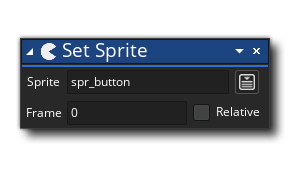
In this event, add the “Set Sprite” action. Set the Sprite” field to spr_button and the “Frame” to 0, so it reverts back to its default frame.
Here’s what will happen now:
- When the mouse hovers over the instance, its frame will switch to 1.
- When the mouse leaves the instance, its frame will reset back to 0.
This technique can be used in any project where the mouse needs to hover over an instance to invoke certain behavior.
Click Behavior
We also need to program what happens when the user clicks on a button. Since this is only a parent object, it will have no specific behavior for clicking (as that is up to the child objects), so we will only change its sprite and play a sound.
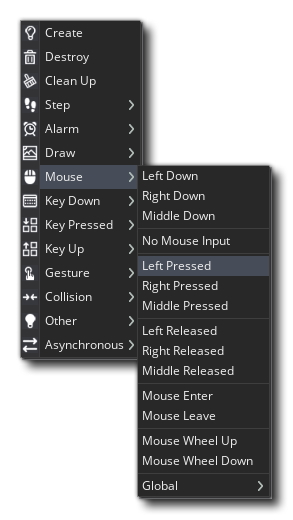
Click on “Add Event”, go under “Mouse” and add the “Left Pressed” event. This event runs when the user left-clicks on the instance. It only runs once on a click, as opposed to the “Left Down” event which runs as long as the mouse is held.
In this event, add the “Set Sprite” action. Set the “Sprite” field to spr_button and the “Frame” field to 2, so that is the frame shown when you click on a button.
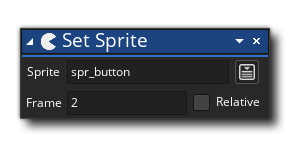
Now we're going to add an event that will cause the button to actually be "clicked" - which is when the mouse button is released. This way the click frame will be shown for as long as the mouse button is still held, and when it's released, the button will play a sound and then perform an action.
Click on “Add Event” again, go under “Mouse” and add the “Left Released” event. This event runs when the user releases the left mouse button while hovering over this instance.
In this event, add the “Set Sprite” action. Set the “Sprite” field to spr_button and the “Frame” field to 1. We’re setting it to Frame 1 because the user is still hovering over the button (otherwise the event wouldn't run).
This is the event where our button will be seen as “clicked”, and any children objects can perform their actions here (such as starting the game). This means that we should also play the button sound at this moment.
Add the “Play Audio” action and set its “Sound” field to snd_button (or find it through the Asset Explorer).
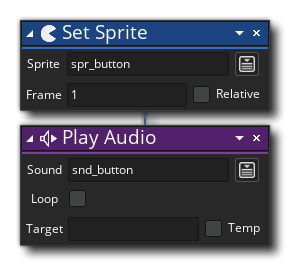
Here’s what will happen now:
- When the user clicks on the button, it will switch to Frame 2.
- When the user releases the click, it will switch back to Frame 1 and a sound will play.
Add this point, a child button object can perform its actions.
Play Button
Let’s create the “Play” button now. In the “Objects” group, under “UI”, create a new object called “obj_button_play”. Assign the spr_button sprite to it, and set obj_button_parent as its parent object.
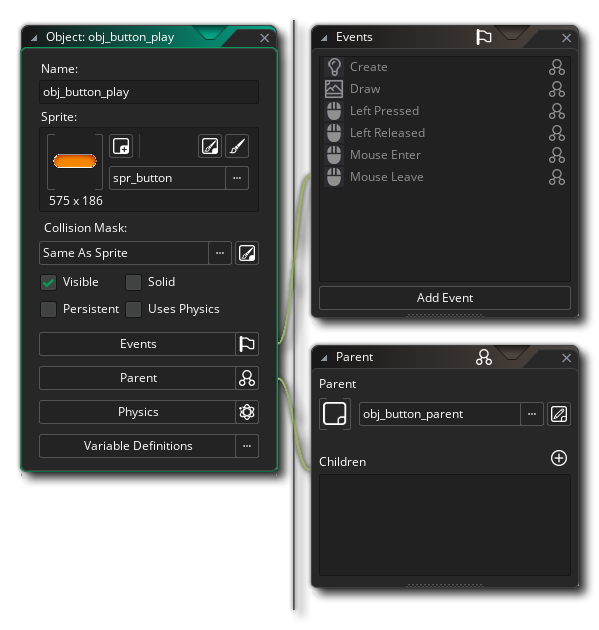
You will see that the Events window is filled with events from the parent object. This means that obj_button_play will execute those events as well, since it’s a child of obj_button_parent. Because of parenting, it automatically gets all the button behavior!
We can now “inherit” any of these events, which will retain the original event’s actions, and also allow us to add new ones. This means that we can add on to the parent’s behavior, making the child object unique.
Right-click on the Create event and select “Inherit Event”.
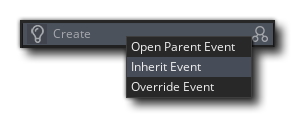
This will add a Create event to the child object, with a “Call Parent Event” action inside it. This action makes sure that the parent’s actions are executed.
Now we need to change the text for this button. Add the “Assign Variable” action below the "Call Parent Event" action, and set the text variable to “Play”. This is the text that will appear on this button.
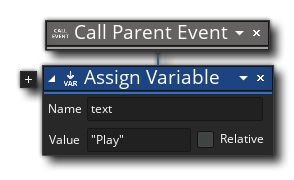
Note: If you place this action above "Call Parent Event", then the parent's event will be run after it, which will override the text variable.
Let’s tell this object what it should do when the user clicks on it. We’ll use the “Left Released” event for this, so it’ll only do something when the user releases their click.
Right-click on the “Left Released” event and select “Inherit Event”. In the Toolbox, search for the “Set Alarm Countdown” action and drop it in the event.
This action lets us run an “Alarm” event after a certain number of frames. Set the “Alarm” field to 0 and the “Countdown” field to 20 (“Relative” should be disabled).
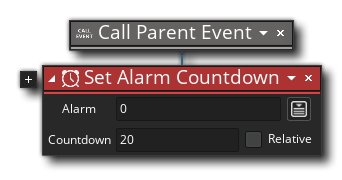
This will now run the “Alarm 0” event after 20 frames. But where’s the event? Let’s add it!
Click on “Add Event”, go under “Alarm” and add the “Alarm 0” event. In this event, we want to open the rm_game room. In the Toolbox, search for the “Go To Room” action and drop it into the event. Set the “Room” field to rm_game (or find it through the Asset Explorer).
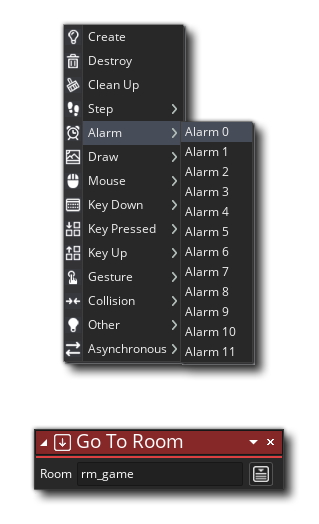
This will now change the room to rm_game, essentially starting the gameplay. This will happen 20 frames after we've clicked on the button.
We could have just added this action in the “Left Released” event, to make the room change instantly, however we added a 20-frame gap using an Alarm because we’ll be adding a transition animation later in this tutorial. That is why we need the 20-frame wait so that the transition animation can play.
Quit Button
We’re now going to create a quit button, but we don’t have to start from scratch. Right click on the obj_button_play object, select “Duplicate” and name the new object “obj_button_quit”.
We don’t need the Alarm event here, so right click on it and select “Delete Event”:
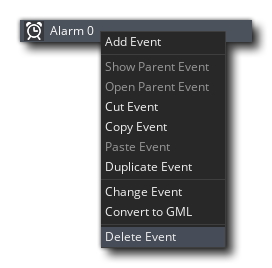
Now open the Create event, and in the “Assign Variable” action, change text to “Quit”:
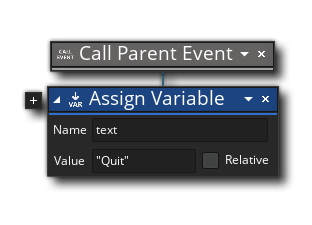
Open the “Left Released” so we can program what happens when this button is clicked. First of all, remove the “Set Alarm Countdown” action by clicking the cross (X) button, or by right-clicking on the action and selecting “Delete”.
In the Toolbox, search for “Exit Game” and drop it into the event. Clicking this button will now close the game.
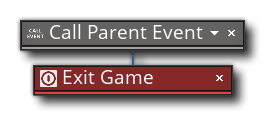
Note: We didn’t use an Alarm event for this button, as there are no transitions involved in quitting the game.
Buttons in Sequence
You can also place objects in a Sequence, so we’ll add our buttons to the menu Sequence and animate them.
Find the seq_menu Sequence in your Asset Browser and open it. Once in the Sequence Editor, make sure that your playhead is on the first frame, and drag and drop the buttons one-by-one into the canvas (obj_button_play and obj_button_quit).
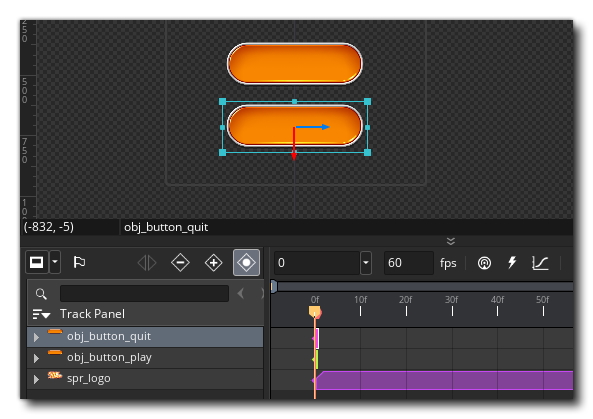
In the Dope Sheet, stretch their asset keys to cover the duration of the whole Sequence.

We
want to animate these buttons so they slide in from the left. Let’s
assign their final position first. Move the playhead somewhere after the middle point of
the Sequence (let’s say frame 80f), select the obj_button_play track, and then click on  "Record a new key" to create keyframes at that frame. Do the same for the obj_button_quit track.
Now move the playhead to the first frame, repeat the same process and add keyframes to both tracks. Keep the playhead on the same frame, and in the canvas, move both buttons to the left so they are outside the canvas.
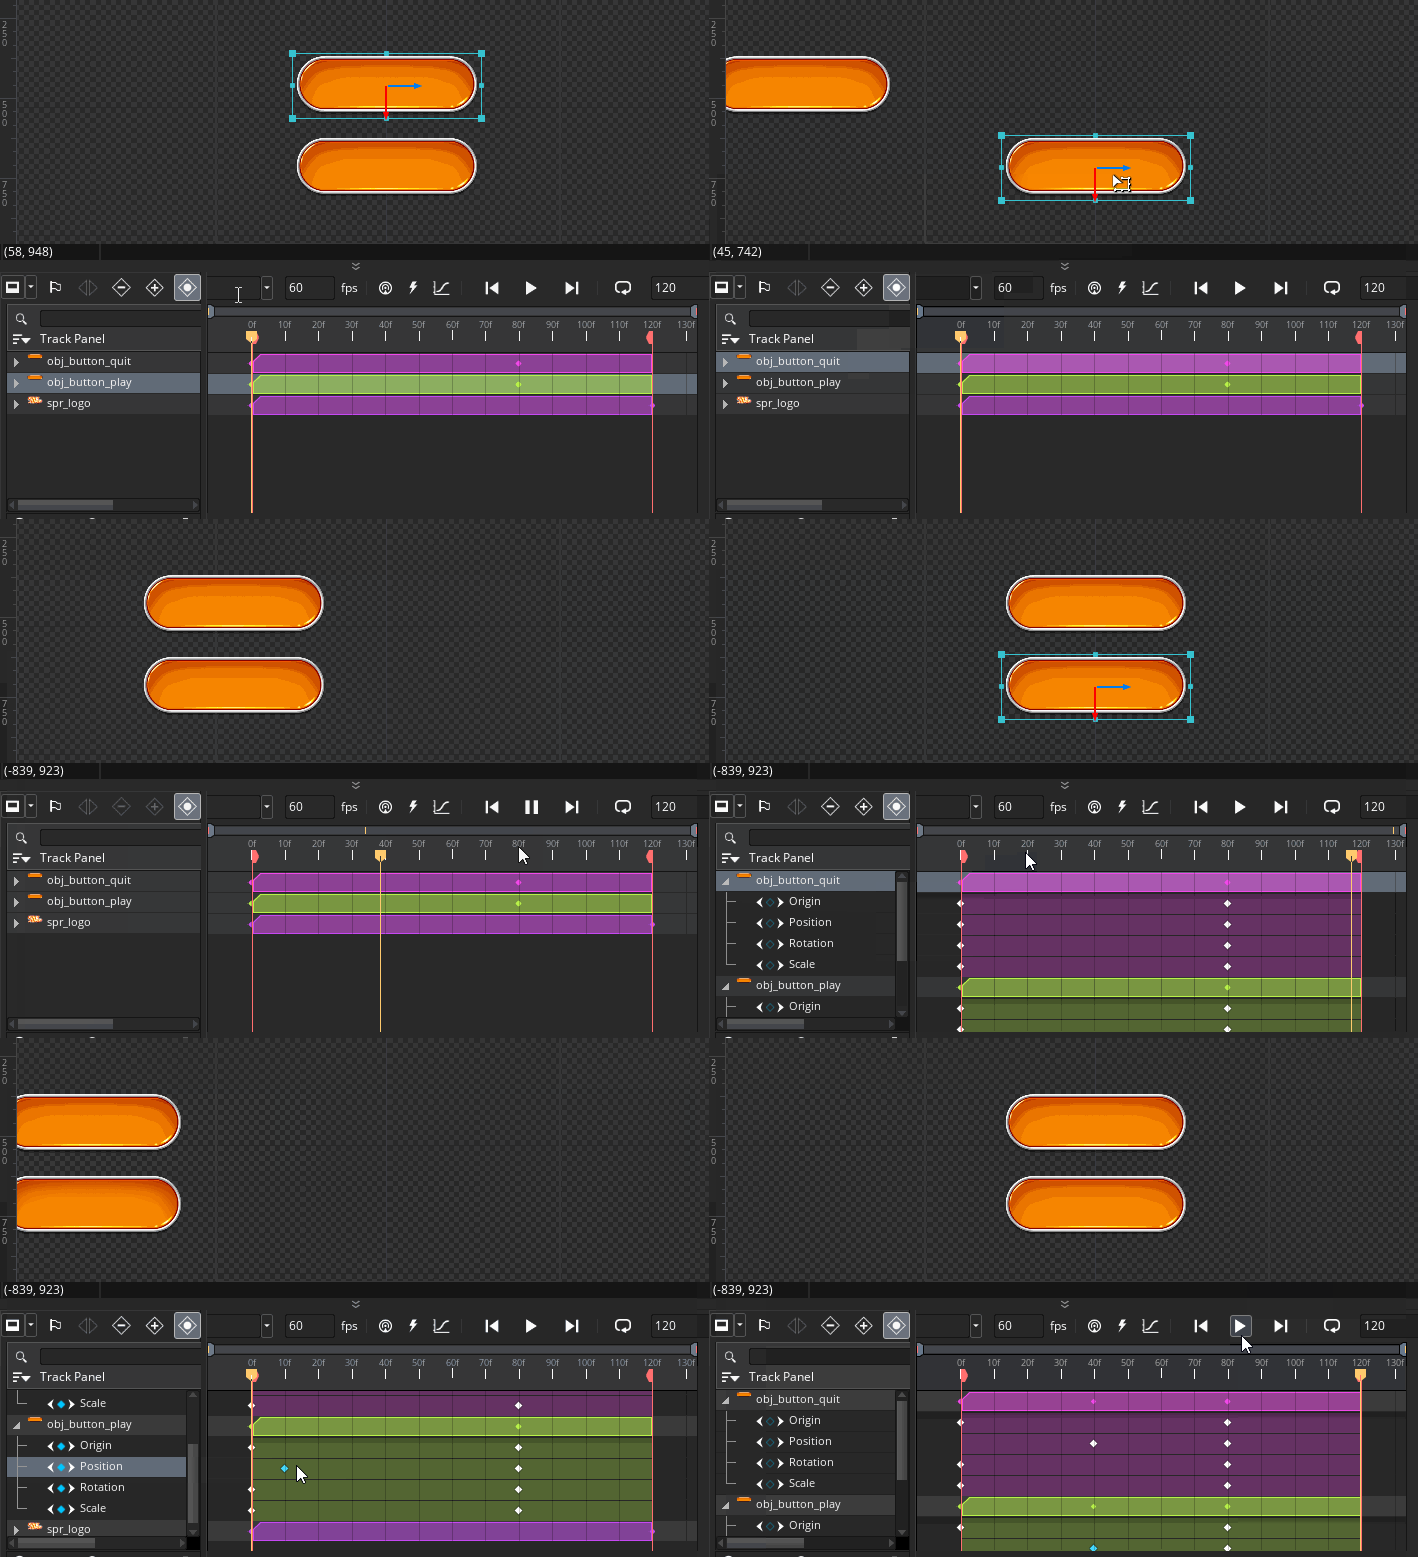
You can move the keyframes for the "Position" tracks to a later frame (such as 40f) to delay the entry of the buttons.
If you don’t see the Transform controls, you can enable them from the Toolbox:
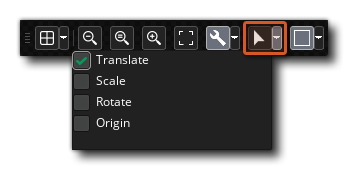
If you play the Sequence now, the buttons will animate between the two sets of keyframes and enter the view after the logo!
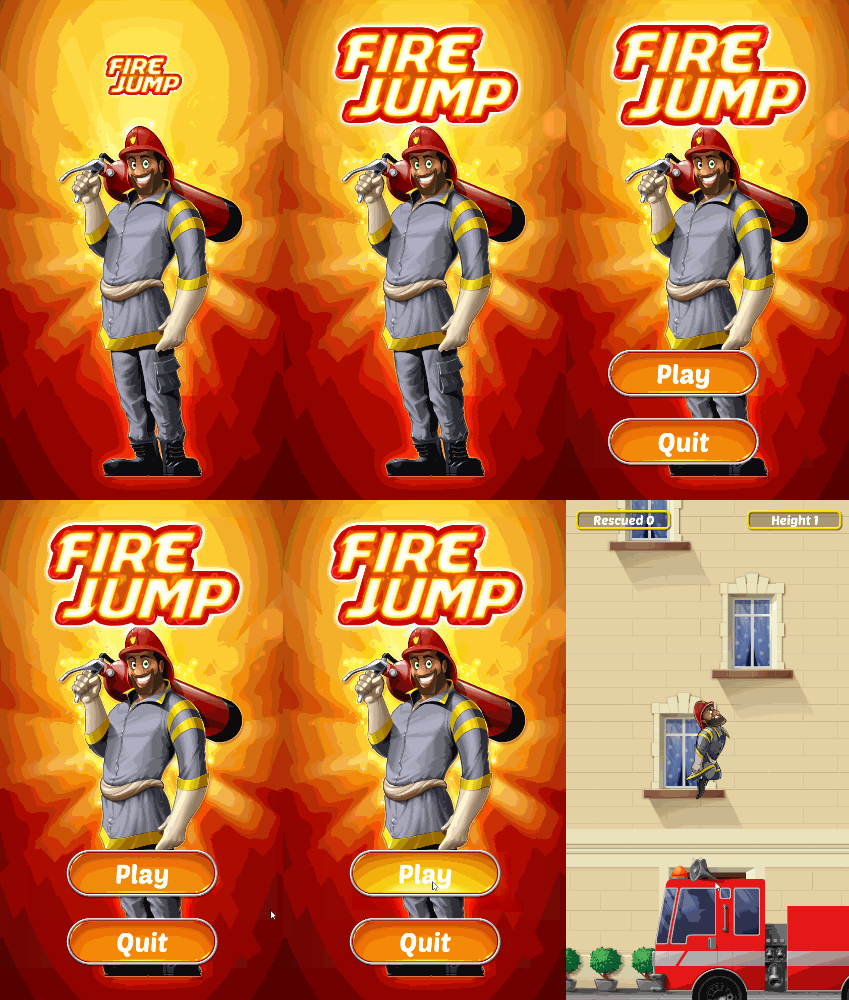
Run the game, and you will see the buttons pop up in the main menu. You can see that they are highlighted when you hover over them, and if you click on the Play button, the game will start!
Fade Transition
We’re now going to create a black fade transition between the menu and the game:
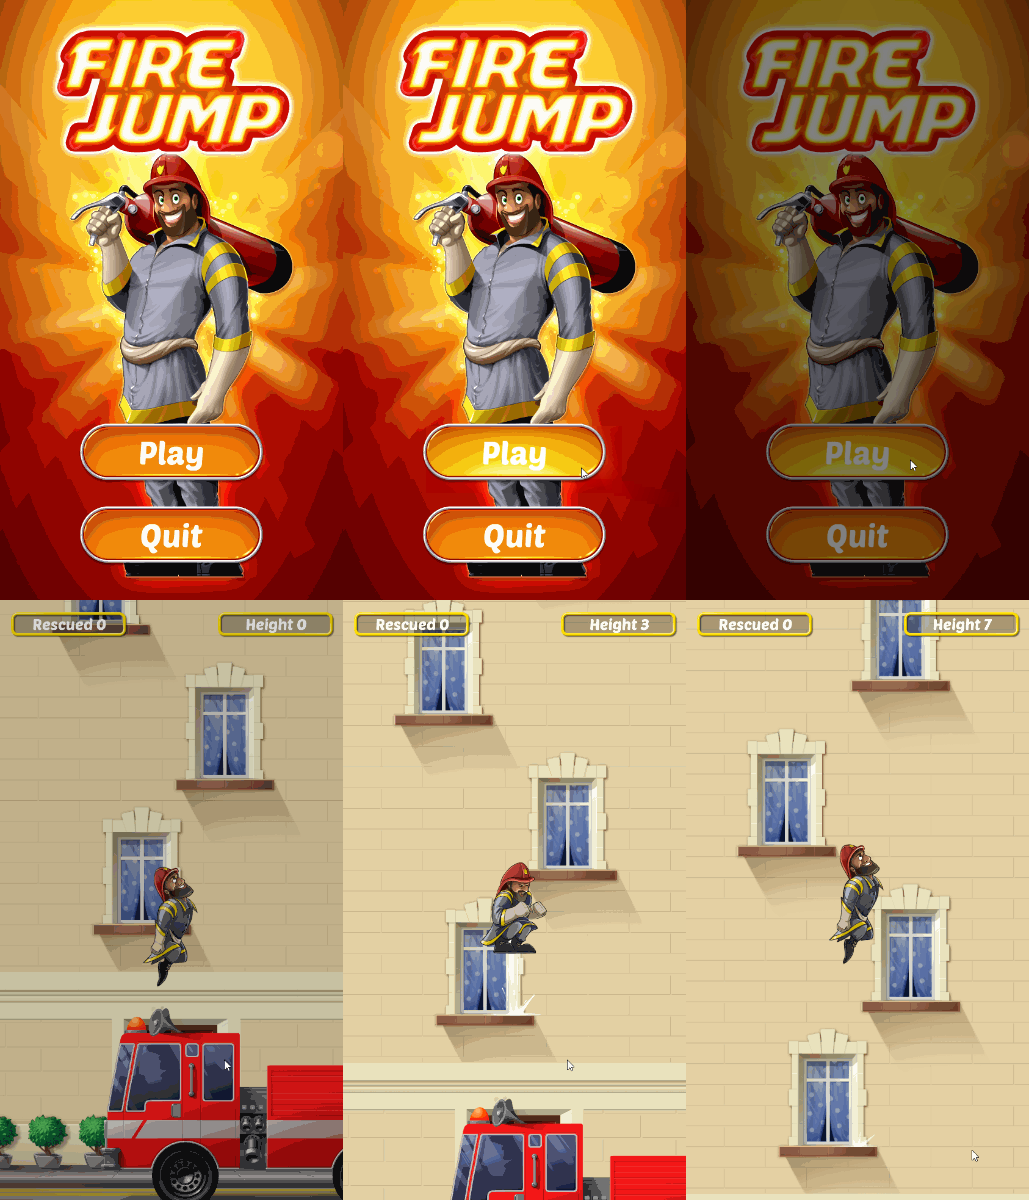
Since this is a black fade, we need a sprite that is simply filled with a black colour. In the "UI" group under "Sprites", create a new sprite called “spr_transition”. In its Sprite Editor, click on “Edit Image” which will open the Image Editor. Change the primary colour to black and use the fill tool to fill the image:
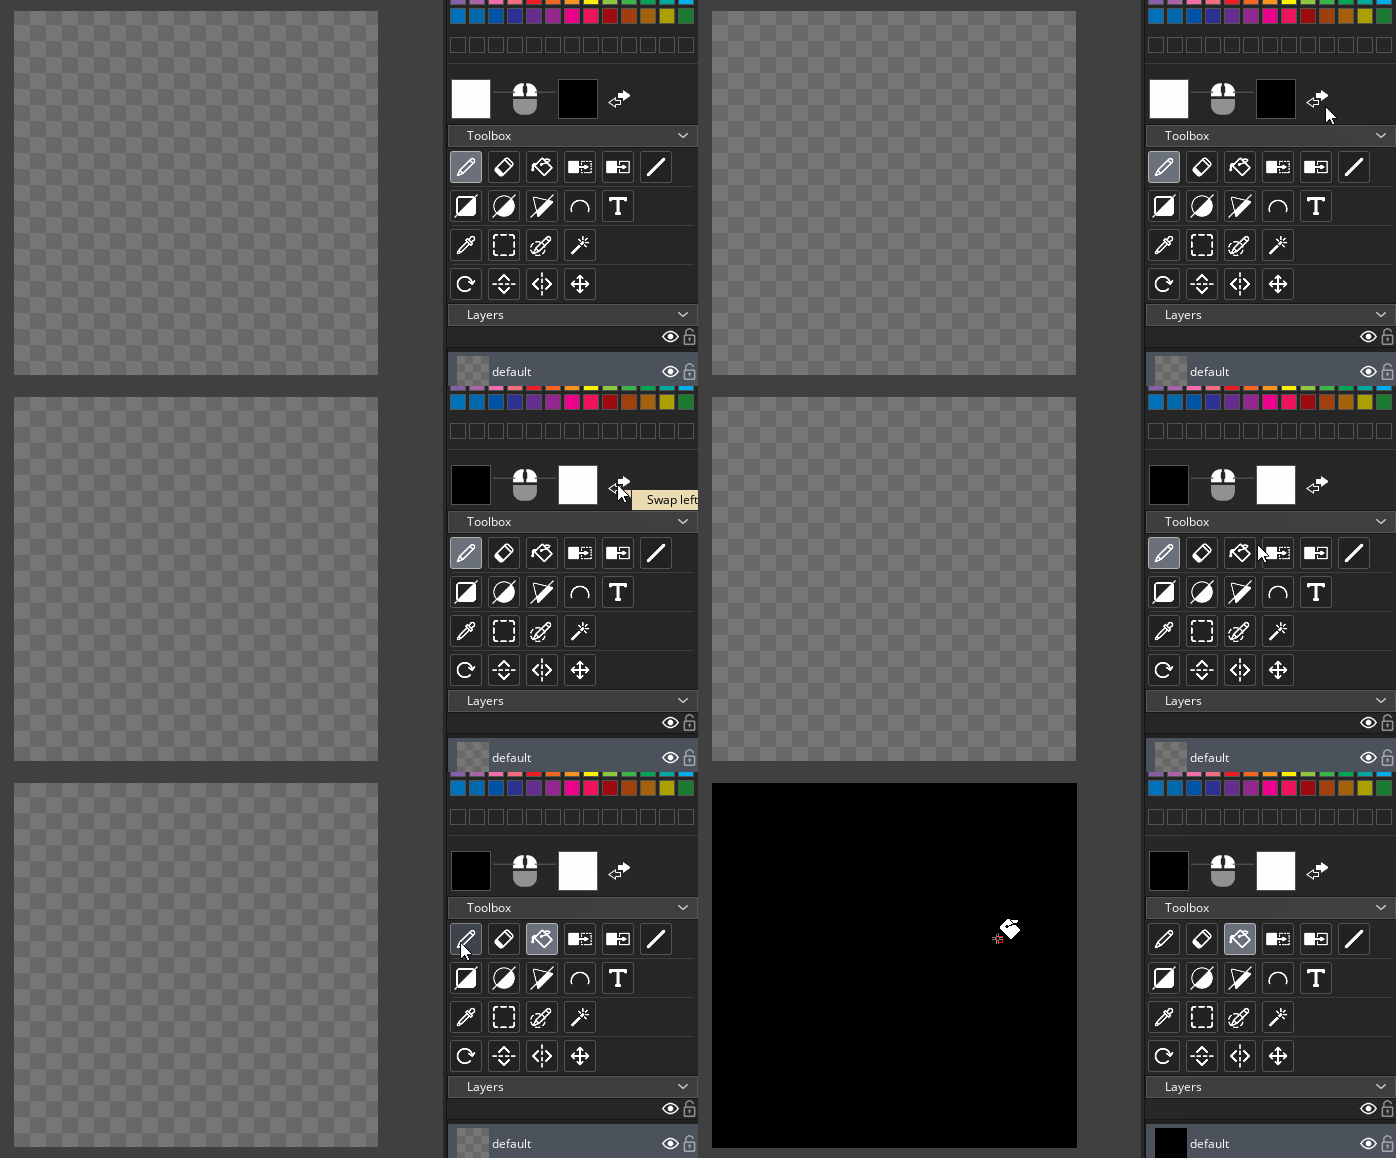
Alternatively, you can import it from the tutorial assets.
We’ll make use of two new Sequences for this transition: “seq_transition_start” and “seq_transition_end”.
- seq_transition_start: This will contain the first half of the Sequence, where the screen will go to black. This will play in the menu room.
- seq_transition_end: This will contain the second half of the Sequence, where the black sprite will disappear. This will play in the game room.
Start Sequence
Let’s work on the "Start" Sequence first. Create a new Sequence asset in the "Sequences" group and name it seq_transition_start. Open it and once you are in the Sequence Editor, set its length to 20 frames.
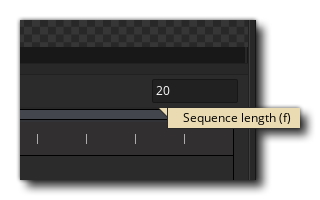
Remember how we set Alarm 0 to 20 frames in the play button? We did that to allow this Sequence to play.
Set the Canvas settings to be the same as the menu Sequence:

Now drag and drop the spr_transition sprite from the Asset Browser into the canvas. Stretch its Asset Key so it fits the whole Sequence.
We want this black sprite to cover the whole screen, so that we get a complete fade. In the Canvas, stretch the sprite and position it so that it fits the canvas (making it larger is okay too):
Note: Before doing this, make sure that your playhead is on the first frame as we want to change its default position.
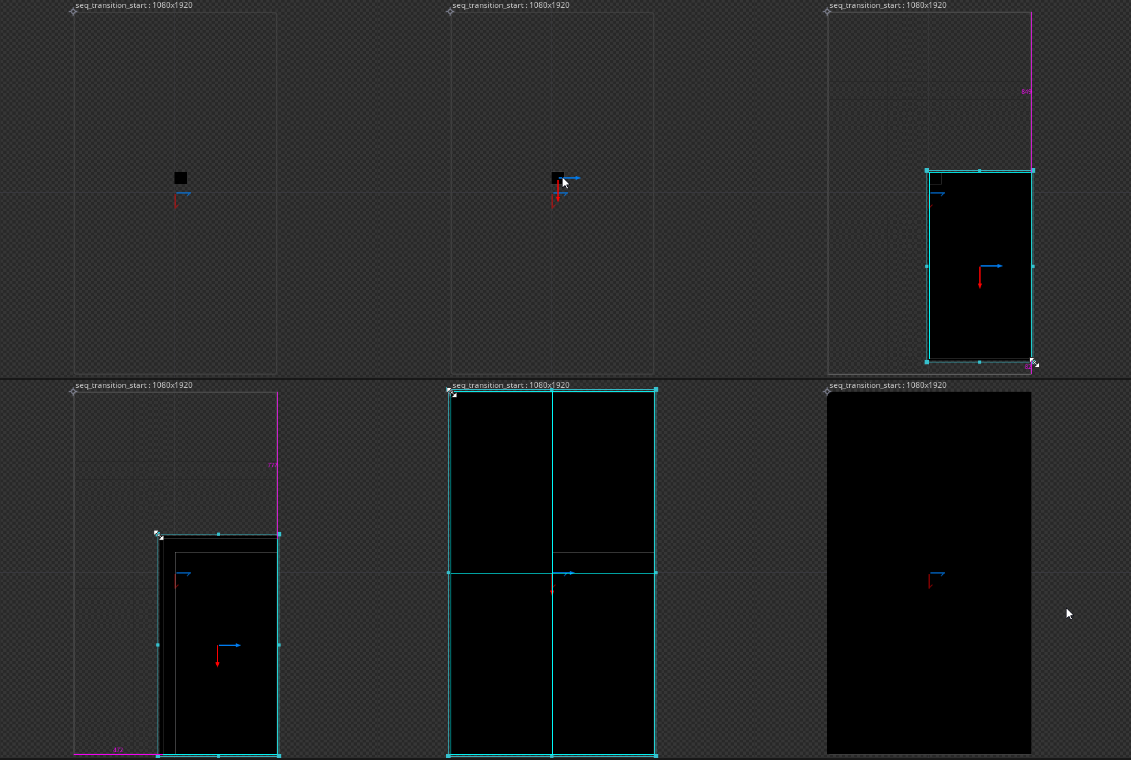
We have all we need now, except for the actual fade. The sprite should animate from an alpha of 0 to full alpha.
In the Track Panel, expand the spr_transition track
so you see its parameters, and then click on the  button to add a
new parameter track. From the list that opens, select “Colour
Multiply”.
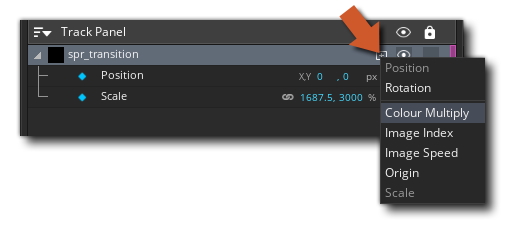
This parameter controls the blend color of the track, and also allows you to change its alpha. Keep your playhead on the first frame, and click on the empty diamond icon to create a new keyframe. Then go to the last frame of the Sequence, and repeat the same action to add another keyframe.

The Colour Multiply track will now have two keyframes, one in the beginning and one at the end, and we can modify their properties to create an animation.
Move your playhead to the first frame, and in the Track Panel, click on the colour swatch in the Colour Multiply track:

This will open the Colour Picker. Set the alpha for this keyframe to 0 using the Alpha slider:
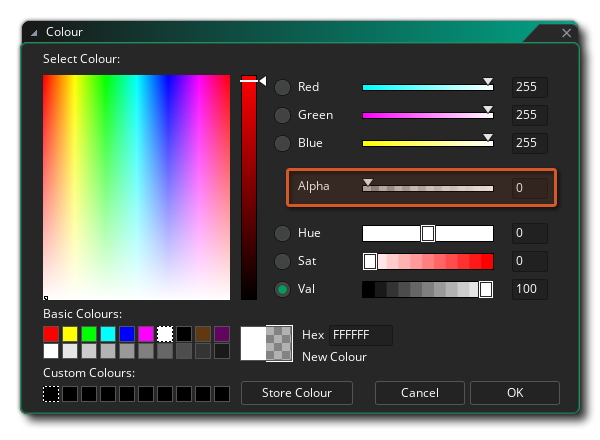
Press OK and the colour will be applied to the track. You will see that the sprite becomes invisible at this frame, and as the animation progresses, it gradually becomes visible. You can play it to see the animation:
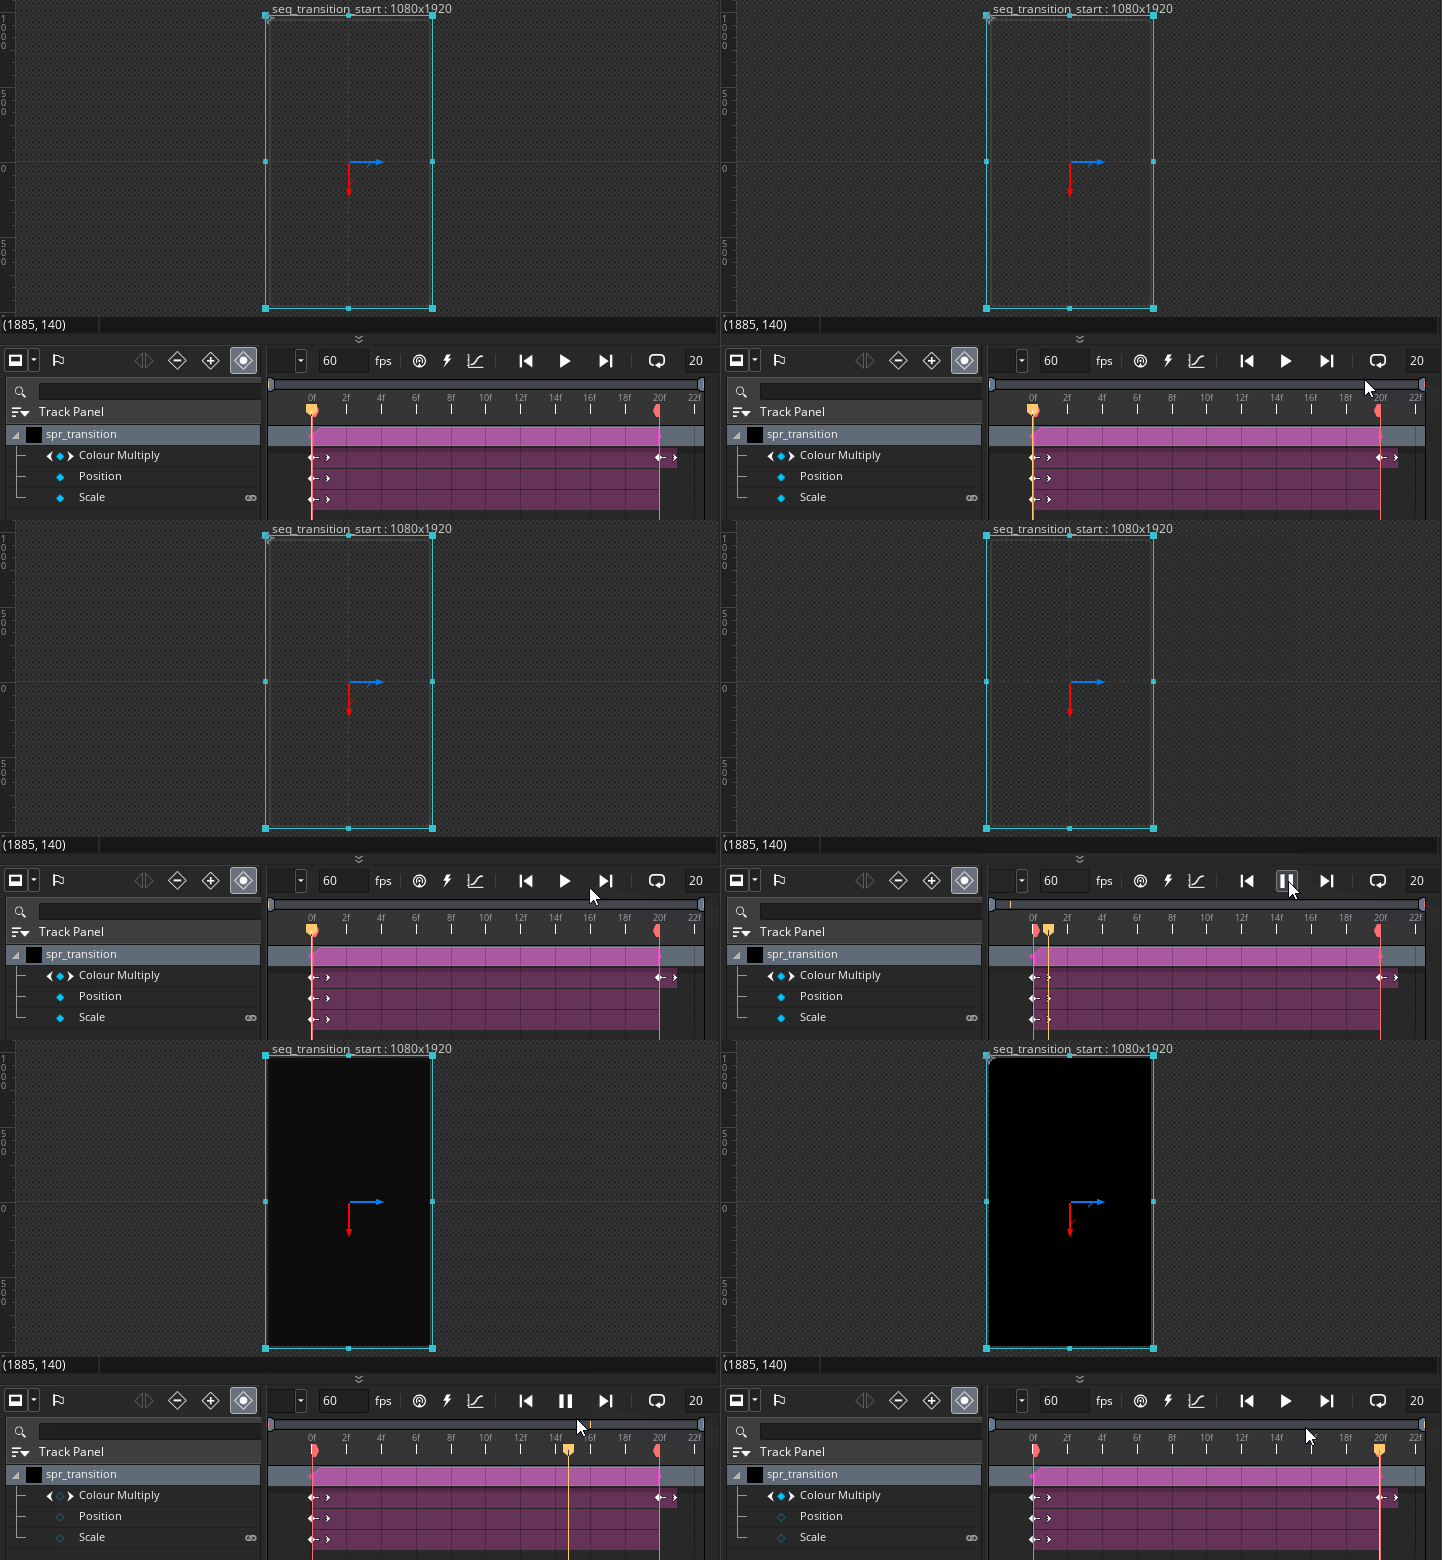
We now have the starting of our transition, which will make the screen fade to black. Let's work on its second half now, where this black rectangle will disappear.
End Sequence
Now we’re going to create the End Sequence for the transition, where the black sprite will fade away so the game can appear.
Luckily, we don’t have to start from scratch. Let's right click on the seq_transition_start asset and duplicate it. Name the new Sequence “seq_transition_end”.
Go into the Track Panel for this Sequence, and expand the spr_transition track. We have two keyframes on the Colour Multiply track, where the first keyframe has an alpha of 0, and the last keyframe is completely visible. We’re going to turn these two around.
Keeping your playhead on the first frame, click on the colour swatch in the Colour Multiply track, and set the Alpha slider to its full value (255). Now move your playhead to the last frame, and set the alpha for this keyframe to 0.

You will now see that the sprite goes from fully visible to invisible:
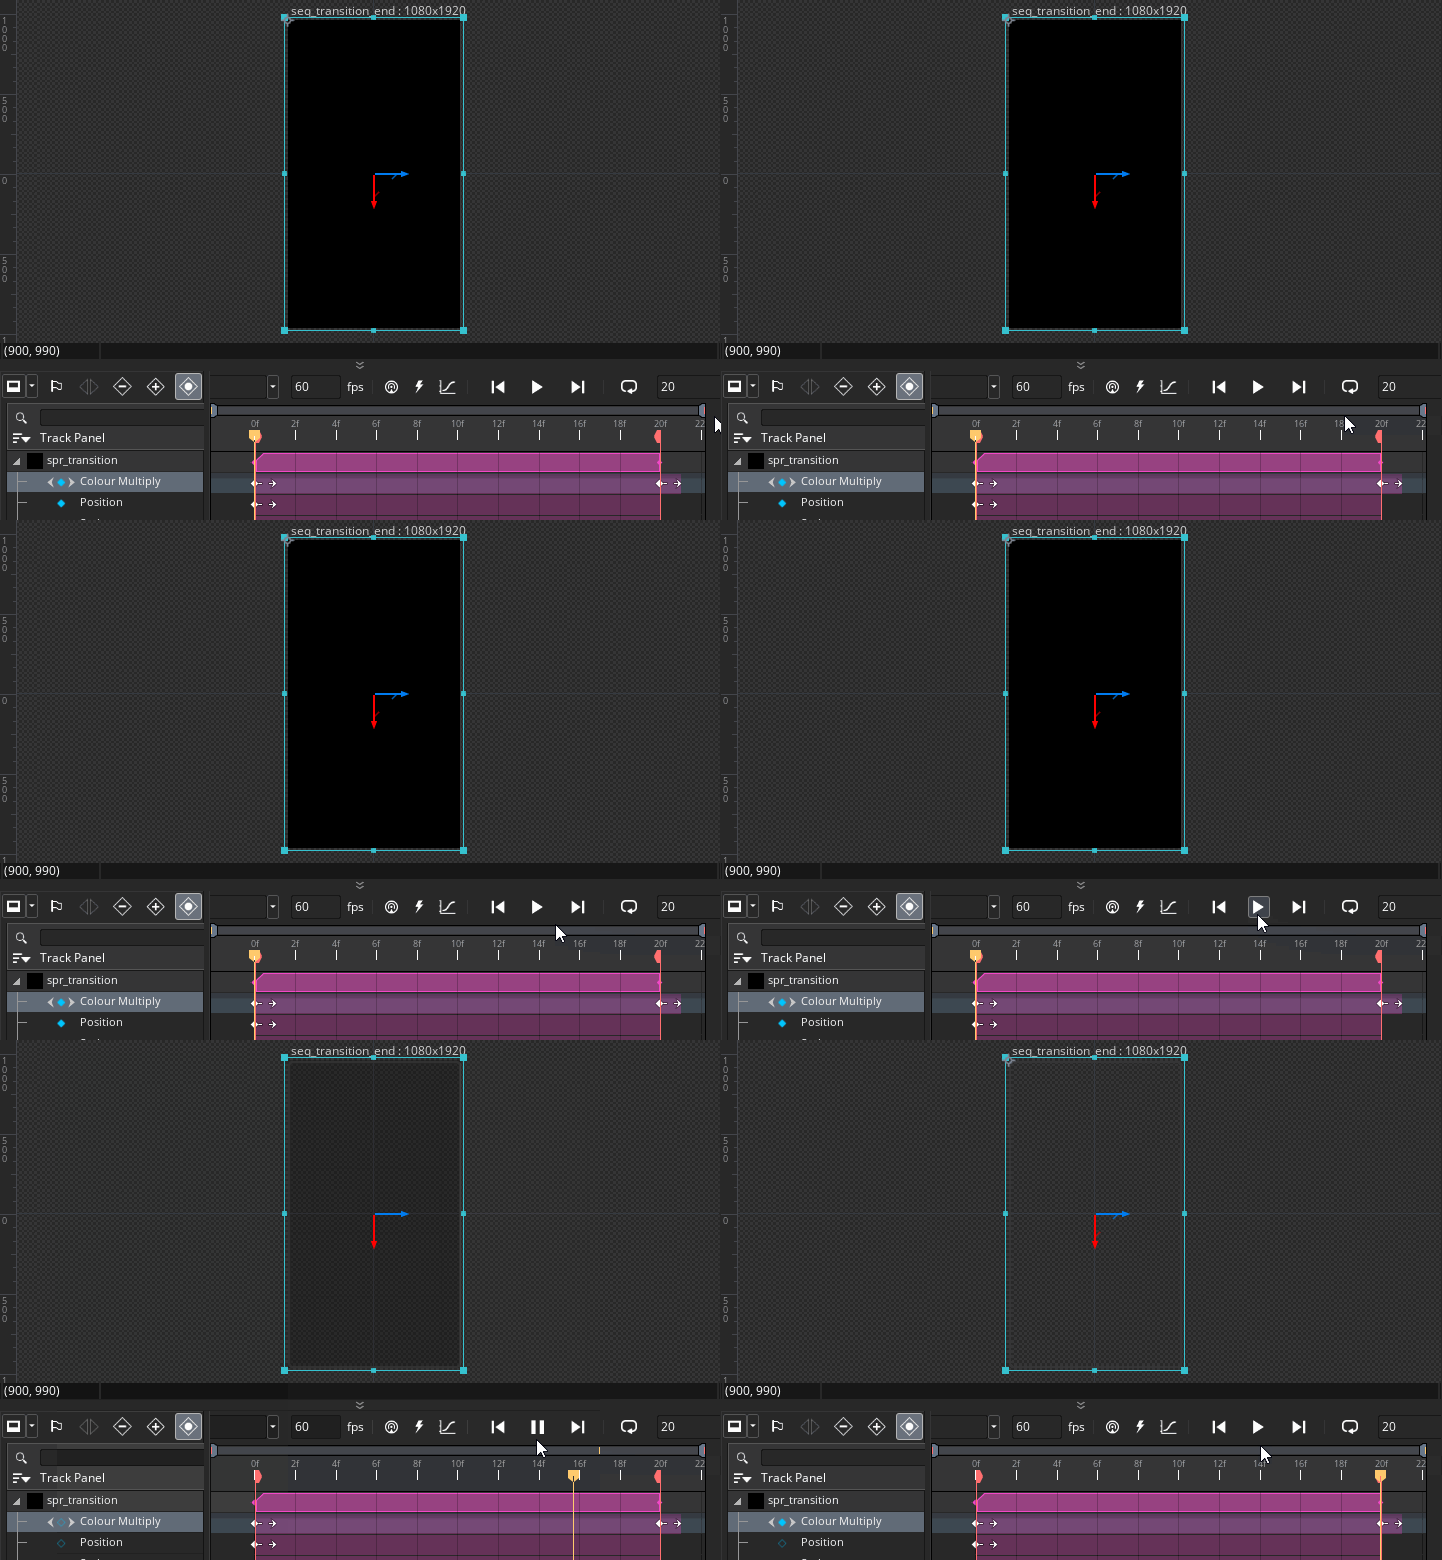
The two parts of our transition are ready, so let’s insert them into our game!
Playing Transition
We first need a new layer for this, in both of our rooms. Open rm_menu, and in the Layers panel, create a new Asset Layer called “Transition”. Make sure that it’s placed at the top.
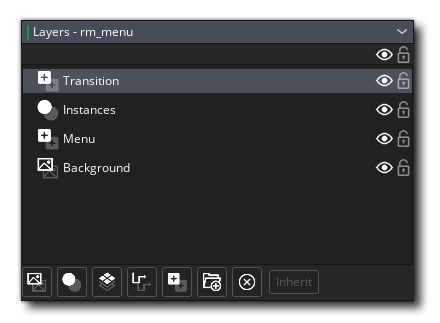
Open rm_game and do the same -- both rooms need to have the same layer at the top (make sure the names match).
Now we’re going to play the Start Sequence, which should play when the user clicks on the Play button. Go into obj_button_play and open its Left Released event.
In the Toolbox, search for the “Create Sequence” action. You can use this action to play a Sequence at any moment in the game. Since we want to play our transition’s Start Sequence, set the “Sequence” field to seq_transition_start (or find it through the Asset Explorer).
Leave the “X” and “Y” fields at 0 and 0, so the Sequence is created in the top-left corner of the room. "Relative" should be disabled for these fields as we want to create the Sequence at (0, 0) in the room.
In the “Layer” field, enter “Transition” (with quotes) which is the new layer we just created. Clear the "Target" field.
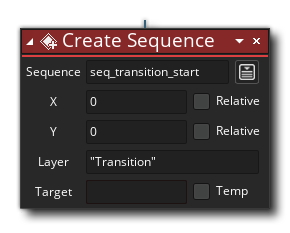
This will now create the Start Sequence when you click on Play, which means that the screen will fade to black. Now it should also fade into the game room when it starts, and to achieve that, we’ll go into the obj_game object.
Open the Create event and add the “Create Sequence” action. Set the “Sequence” field to seq_transition_end, the “Layer” field to “Transition” and leave the rest of the fields at their default values.
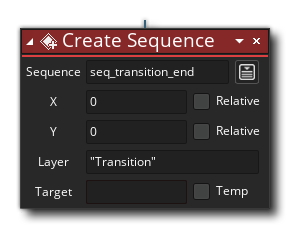
This will now create the End Sequence whenever the game starts, making it fade from black into the game.
Run the game now, click on the Play button and you will get a smooth fade transition into the game! It feels much nicer to hit that button now.

Game Over Screen
We’re now going to add a game over screen, which will be similar to the main menu screen, as it has an image at the top and the two buttons at the bottom:
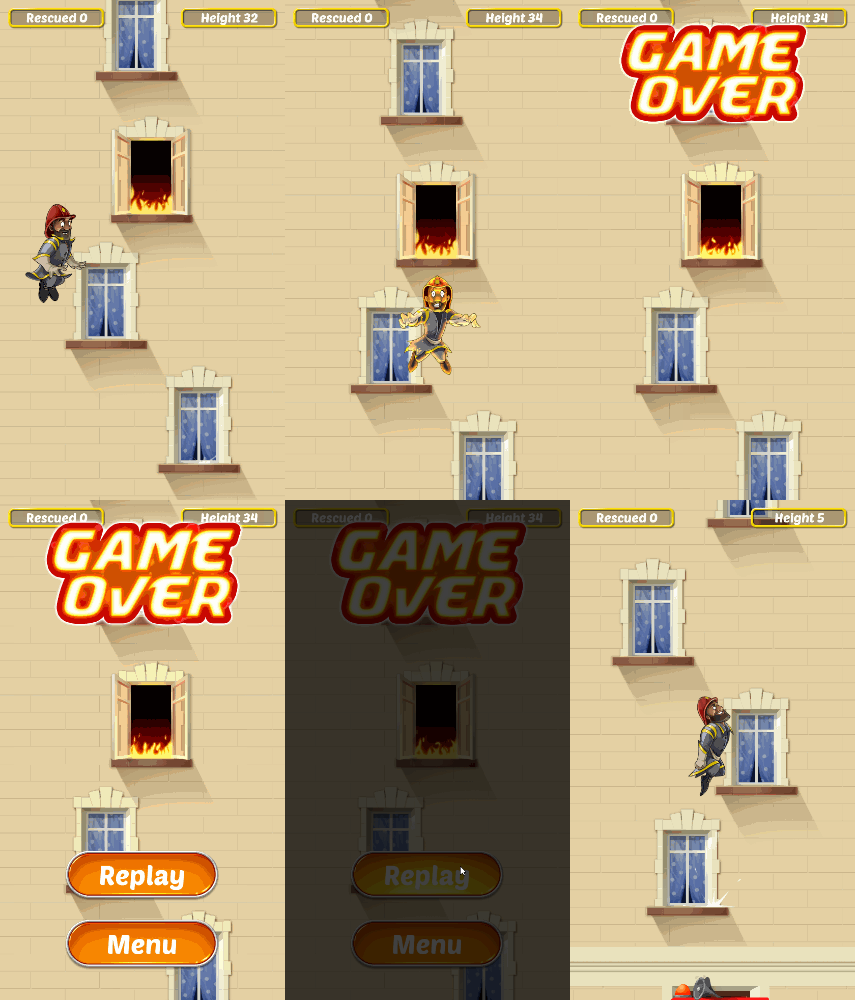
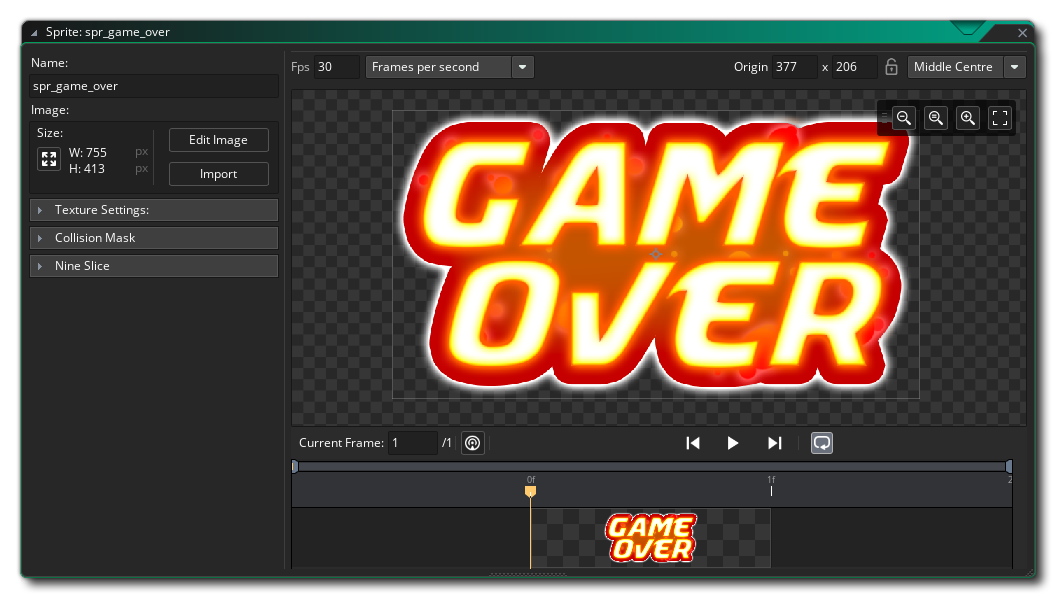
Let’s import an image for the game over text. In your “Sprites” folder, go under “UI” and create a new sprite called “spr_game_over”. Import the image from the tutorial’s assets, and set its origin to “Middle Centre”.
We now need to create two new buttons for the game over screen: a “Replay” button, which starts the game again, and a “Menu” button which takes you back to the main menu.
Replay Button
In the “Objects” group, go into the “UI” group and create a new object called “obj_button_replay”. Assign the spr_button sprite to it, and then open its Parent menu.
We’re not going to make this a child of obj_button_parent. Instead, we’ll make it a child of obj_button_play, as it needs to do the same thing: start the game.
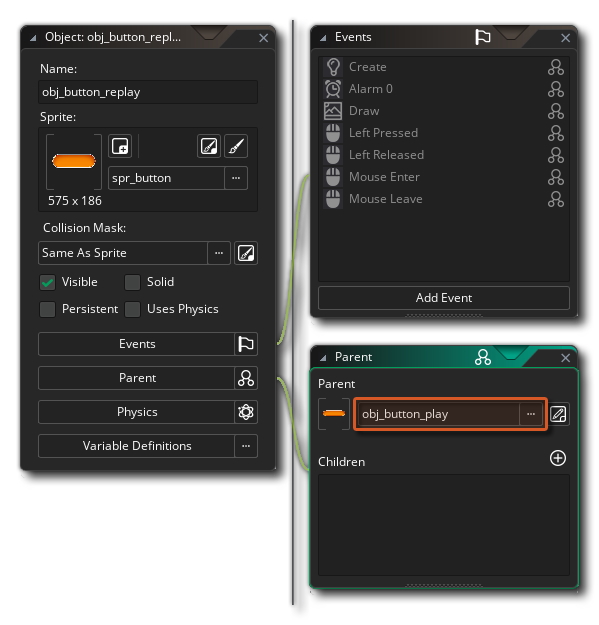
The replay button now gets all the functionality of the play button, including the transition. However we do need to change its text, so right click on the Create event and select “Inherit Event”. Add the “Assign Variable” action into this event and set the text variable to “Replay”.
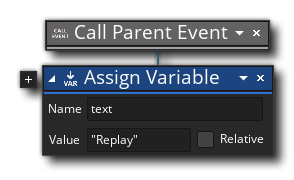
Tip: You can right-click on any inherited event and select "Show Parent Event" to see what the parent does in that event.
We don’t need to do anything else in this object now as it’s already inheriting the play button’s functionality, so clicking this would just restart the game (and show the transition!).
Menu Button
This button will take us back to the main menu. We’re going to duplicate an existing button for this, so we don’t have to start from scratch.
Find the obj_button_quit asset, duplicate it and name the duplicated object “obj_button_menu”. Go into its Create event and change the text variable to "Menu". Let's program its click behaviour now.
Open its Left Released event, and you will see that it already has an “Exit Game” action. We don’t need this, so delete that event by pressing the cross (X) button on the right.
We want this button to change the room to rm_menu. In the Toolbox, search for the “Go To Room” action and drop it into the event. Set the “Room” field to rm_menu (or find it through the Asset Explorer button on the right).
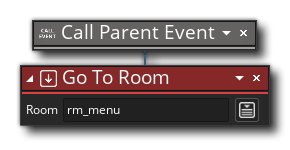
Clicking on this button will now change the room to rm_menu, taking the player back to the main menu.
We’re now going to create our Game Over Sequence, and luckily we don’t have to start from scratch -- we’re going to duplicate an already existing Sequence.
Sequence
In your “Sequences” group, find the seq_menu asset, right click on it and select “Duplicate”. Name the duplicated asset “seq_game_over”.
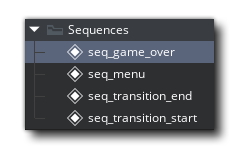
Now open this new Sequence (you can double click on the asset to open it) and let's work on creating our Game Over screen!
All we need to do now is to replace the logo image and the buttons, which we can do through the Inspector.
It should be open on the left, however if it's not, you can open it from the "Windows" menu:
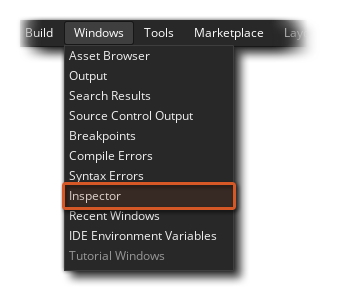
This will open the Inspector window (it may be on the left side in your GameMaker window).
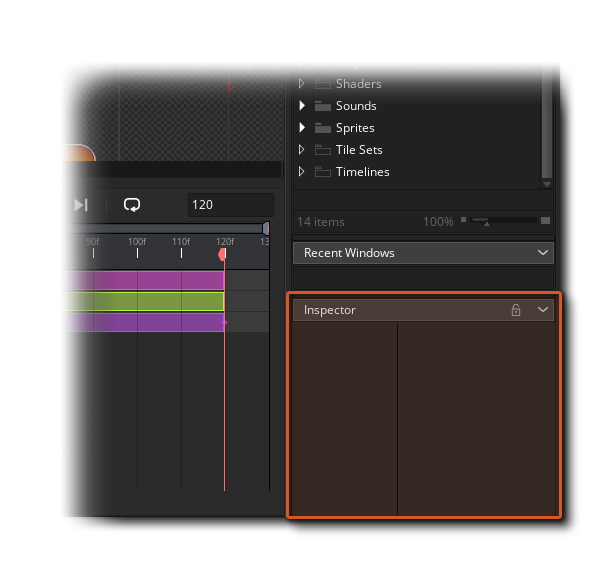
Note 1: If you cannot find the Inspector there, look at other parts of the IDE in case its position has changed due to an update, or try selecting the Windows -> Inspector option again.
Note 2: If the Inspector window is too small, you can drag it from the top to make it larger.
The Inspector lets you change properties of a Sequence track, including the asset that is assigned to it. This means that we can keep all of a track’s animations as they are and simply change the asset it uses!
Let’s first swap the Fire Jump logo with the “game over” sprite. Select the spr_logo track in the Track Panel, and go into the Inspector. Under the “Sprite Information” section, you will see a button for assigning a sprite to this track, similar to the one in the Object Editor. Click on it and select the spr_game_over sprite, which will then be assigned to this track.
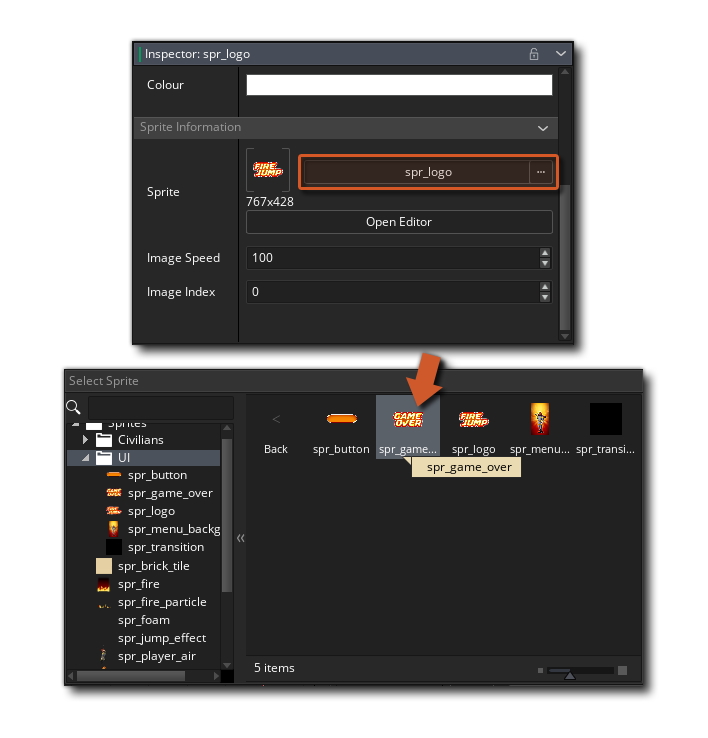
In the Canvas, you will see the game over logo animating in the same manner as the Fire Jump logo. It’s the same track with the same animations, but with a different asset!
Let’s do the same for the buttons now: we need to swap the “Play” button with the “Replay” button, and the “Quit” button with the “Menu” button.
Select the obj_button_play track and go into the Inspector. Under “Instance Information”, you will find that the obj_button_play object is selected, as expected. Click on it to open the Asset Explorer, and find and select the obj_button_replay object instead.
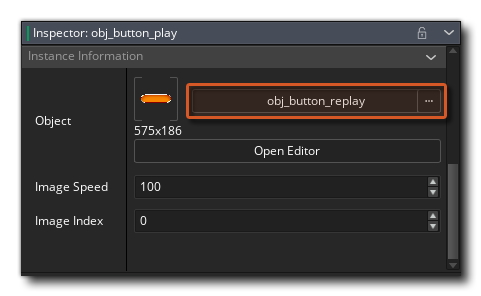
Let’s replace the quit button now. Select the obj_button_quit track, go into the Inspector and change its object to obj_button_menu.
This Sequence is now ready to be shown in the game, so let’s make sure that happens!
The Game Is Over
Our new Sequence will be played when the player is defeated, so we need to go into the obj_player_defeated object.
Open the Step event, which already has a couple of actions. This event checks if the instance is below the room, and in that case, restarts the room. We’re going to change this behavior, so go ahead and delete the "Restart Game" action.
We want this event to create the Game Over Sequence when it goes below the room, so search for the “Create Sequence” action and attach it to the "If Variable" action. Set the “Sequence” field to seq_game_over and the “Layer” field to “HUD” (we use this layer for our score objects).
This will now create the game over screen when the player is defeated, however if the defeated player instance is allowed to exist any longer, it will keep creating more Game Over Sequences as the condition will continue to stay true. To prevent this, we’re going to add a “Destroy Instance” action into the action chain.
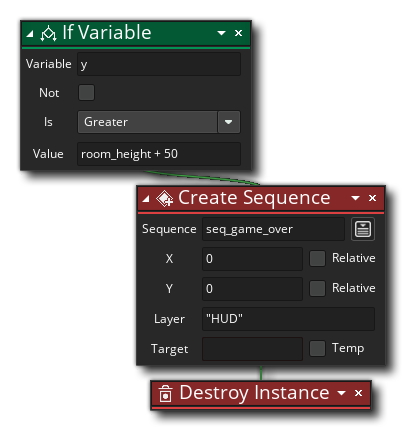
Run the game now, try to lose from a fire or by falling down, and you will see the game over screen pop up! Clicking on “Replay” will show the transition and start the game again.

Challenge!
The Game Over Screen could use a dark background to give it some nice contrast!
Open the seq_game_over Sequence and add the black sprite (spr_transition) as a track - make sure it's at the bottom of the Track Panel so it appears behind everything.
Animate this to fade in, just like we did in the transition Sequences, and make sure that its final alpha is lower than 1 so you can still see the game in the background.
This will make your Game Over screen look more polished!
Good luck!
UI Sound Effects
We’ve created a lot of UI so far, but haven’t added any sounds! Let’s work on that now.
Importing Sounds
In the “Sounds” group, create a new group called “UI”. This group will contain all the sounds used in our UI.
Create the following Sound assets and import them from the tutorial’s assets:
- snd_intro: Sound effect that plays when the logo appears
- snd_menu_music: Music that plays in the main menu
- snd_game_over: Sound effect that plays on the game over screen
- snd_highscore: Sound effect that plays when the player gets a new high score (we will add that soon!)
Let’s now play these sounds effects in their appropriate places.
Menu Intro
Sequences also allow you to play sounds, so we can play the menu intro sound directly within the Sequence.
Open the seq_menu Sequence, and from the Asset Browser, drag the snd_intro sound into the Track Panel (make sure your playhead is on the first frame).

If you play the Sequence, you will hear the intro sound. You can move its Asset Key in the Dope Sheet to change when it plays, and resize it to adjust its duration.
Note: If the duration of the Asset Key is longer than the duration of the sound effect, it will repeat.
Game Over Sound
We’re going to do the same thing as before, but in the seq_game_over asset. Drag in the snd_game_over sound into the Track Panel and it will now play with the animation.

Menu Music
We want to play a music loop in the main menu, using the “Play Audio” action. This means that we need to create a new object, add an event into it, put the action there and then place the object in the room. However, we can avoid having to do that by using the room’s Creation Code.
Open rm_menu, and once you’re in the Room Editor, navigate to the Properties panel at the bottom-left corner of the IDE. Here you will see the Creation Code button:
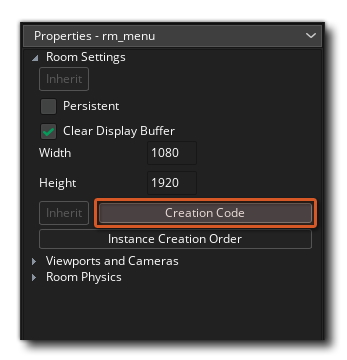
Clicking this button will open a new "script" window within the Room Editor. Any actions you put here will automatically run when the room starts, so we can use this to play our menu music.
First of all, we want to stop all the audio that is playing at the moment. This will not be of any use when the game first starts, but if you’re coming back from the game room, the game music will still be playing. To stop that, add the “Stop All Audio” action into this script.
Now to play our menu music, add the “Play Audio” action and set the “Sound” field to snd_menu_music. Enable the “Loop” option since we want this music to repeat after it ends.
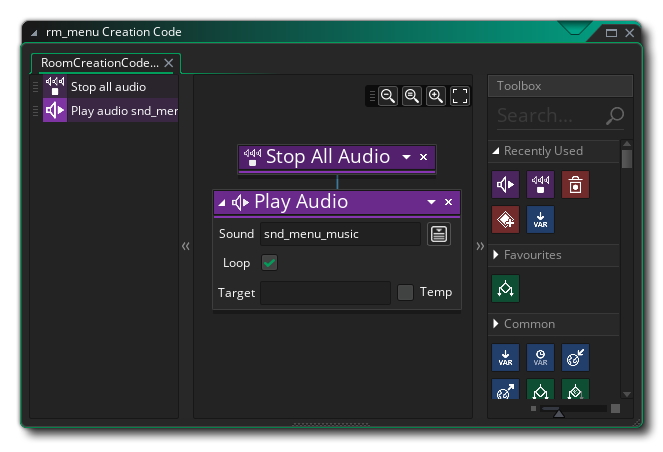
You can now run the game and hear the intro for the menu, the background music and the sound that plays when the game is over. If you find that any of these sounds are too loud, you can open those sound assets from the Asset Browser and adjust their volumes.
High Scores
Our final addition for this part will be High Scores. These will be displayed on the game over screen, and when the user breaks their own record, they will be congratulated with a sound effect and some particles.
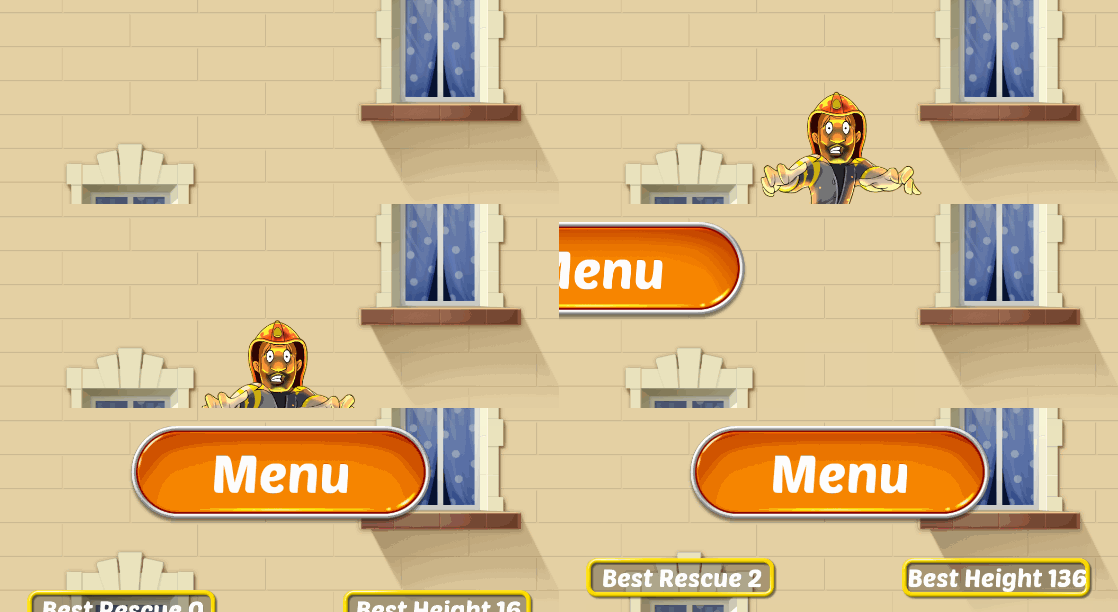
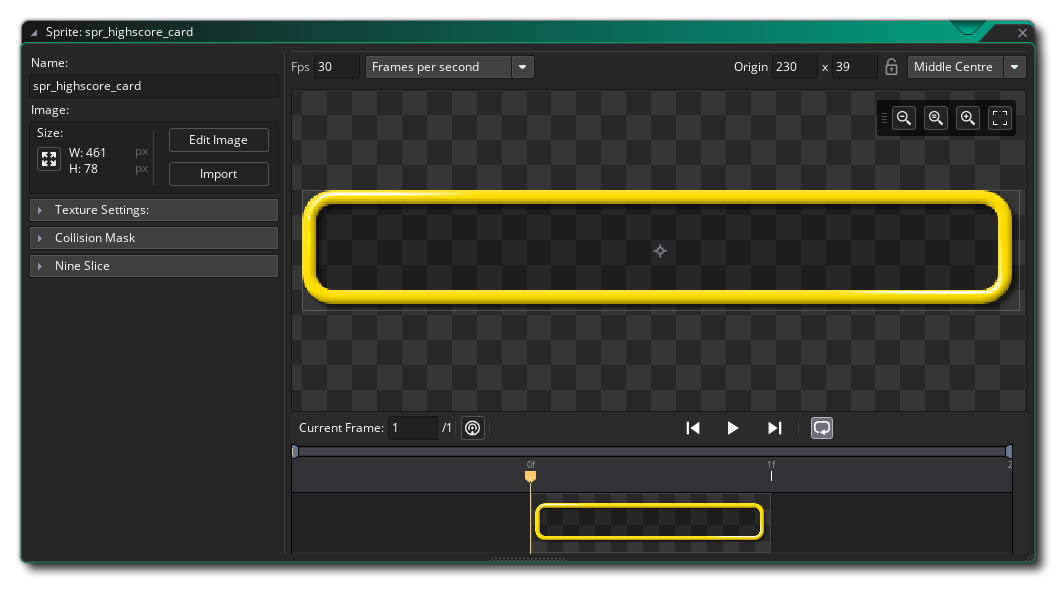
Let’s import a sprite for the highscore UI. In the “Sprites” folder, go into “UI” and create a new sprite called “spr_highscore_card”. Import the image for it from the tutorial’s assets, and set its origin to “Middle Centre”.
Script
We will initialize our high score variables in a Script. Scripts are usually used to create new functions, however if you place any actions directly in a script (outside of the function), they will run when the game starts.
Go into the “Scripts” group in your Asset Browser (or add one if you don’t have it) and create a new Script asset. Name this “scr_init”.
Note: "scr_" stands for script.
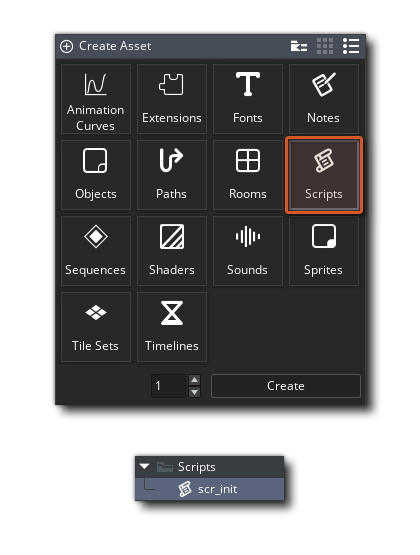
This script will open up in the workspace. It will already contain a “Declare A New Function” action, which is used to create a new function that can be called later. We don’t need this, so delete the action by clicking on its X button.
We’re going to create global variables for the high scores, so add the “Set Global Variable” action into the script. Create a variable called highscore_rescue and set it to 0. Click on the  plus button to add a new variable, and name this highscore_height.
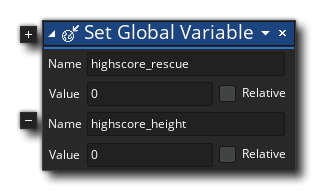
We’ve created two high score variables here: one for the rescue score, and the other for the height score. Since scripts run as soon as the game starts, these global variables will be created at that point and will be available throughout the game.
"Rescue" High Score Object
We’ll now create an object to display the rescue highscore, but we’re going to be efficient again and duplicate an already existing object to save our time. In the “Objects” group, duplicate obj_score_rescue and name the new object “obj_highscore_rescue”.
Since this is the score object, it'll have the spr_score_card sprite assigned to it. We want to change this to spr_highscore_card, which is just the same image but a little wider.
Open the Draw event for this new object, which should already have some actions. We want to change what text it draws, so go to the “Draw Value” action. Change the “Caption” field to “Best Rescue ” (with quotes and the extra space) and the “Value” field to global.highscore_rescue.
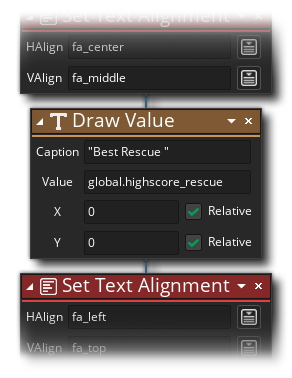
We're essentially just replacing mentions of "score" with "highscore"!
This object will now draw the rescue high score. We need to add more events as well, to check whether the player has reached a new high score, and to congratulate them if they have.
Checking "Rescue" High Score
Add the Create event to this object. In the event, add the “Set Alarm Countdown” action and set Alarm 0 to a countdown of 100 frames.
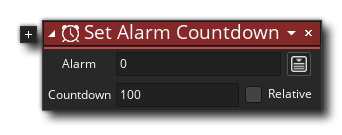
We’ll do all of our high score checking in Alarm 0, which runs 100 frames after the instance is created. This is to make sure that the instance is visible on the screen when we check the high score, as we’ll animate them into the view just like we did with the menu buttons. It also adds some suspense after the game is over!
We need to program our high score check now, so add the Alarm 0 event to this object. We’ll do the following in this event:
- Check if the rescue score is greater than the rescue highscore
-
Set the rescue highscore equal to the rescue score
-
Create particles
- Play audio
Add an “If Variable” action into the event. This condition should check if global.score_rescue is greater than global.highscore_rescue, which means that the player have surpassed their previous rescue highscore.
We’ll attach some actions to this condition. Add an “Assign Variable” action and attach it to the "If Variable" action. Set the “Name” field to global.highscore_rescue and the “Value” field to global.score_rescue, so the new score overwrites the previous high score.
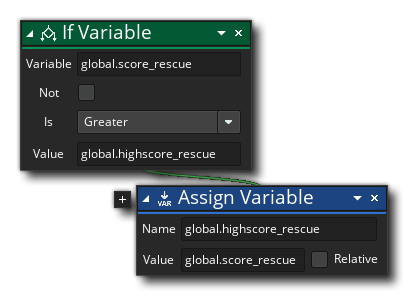
When the player makes a new high score, this updates the high score variable to their new score.
Let’s spawn some particles now, to tell the player that they’ve done something good. We’ll create the same particles that we used for the fire going out, so add the “Burst Particles” action into the action chain.
Set the “System” field to obj_game.particle_system and the “Type” field to obj_game.fire. Enable the “Relative” option for both “X” and “Y”, so the particles are created on the instance, and set the “Count” field to 8 (you may change this).
Finally, add the “Play Audio” action and play the snd_highscore sound so the player can hear the good news.
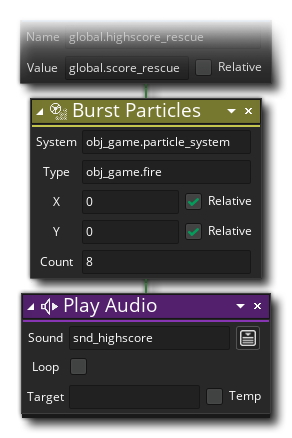
This object now handles drawing, checking and updating the rescue highscore. Let’s do the same for the height score now!
"Height" High Score Object
In your Asset Browser, find the obj_highscore_rescue object (that we just created) and duplicate it. Name this new object “obj_highscore_height”. This object will be used for displaying and checking the height high score, so we’ll change what text it draws and what variables it uses.
Open the Draw event, and in the Draw Value action, set the “Caption” field to “Best Height ” and the “Value” field to round(global.highscore_height). This will round the height highscore before drawing it, since we want to draw it as an integer value.
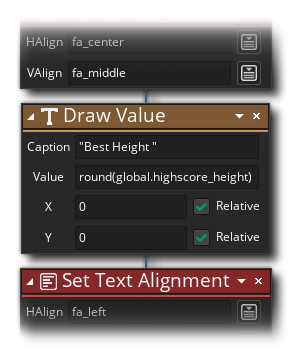
Now open the Alarm 0 event so we can change what variables it checks -- essentially replacing "rescue" with "height".
- The “If Variable” action should check if global.score_height is greater than global.highscore_height
- The “Assign Variable” action should set global.highscore_height to global.score_height
- The rest should remain the same.
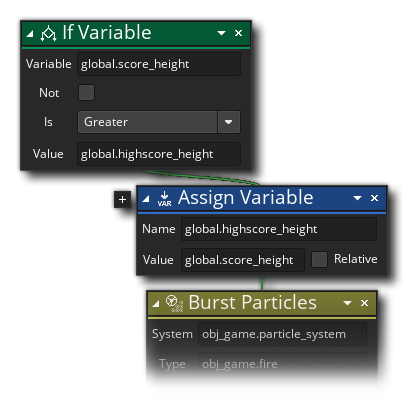
Since both of our highscore objects are now ready, let’s place them in the game over Sequence so we can see them in-game!
Updating the Game Over Sequence
Open the seq_game_over Sequence. Make sure that your playhead is on the first frame, and drop the obj_highscore_rescue object in the canvas. Position it near the bottom-left corner of the canvas.
In the Dope Sheet, stretch its Asset Key so that it covers the whole Sequence. We’ll animate this instance to enter the canvas from outside, similar to the replay and menu buttons
Select the obj_highscore_rescue track,
and using the  “Record a new key” button, add keyframes to this
track on frames 0 and 90. Move your playhead to the first frame and in the canvas, move the instance so it's below the canvas. You
will now have an animation of the instance entering the canvas.
This animation will be very slow however, as it animates between frames 0 and 90. We want the instance to actually enter the canvas after frame 70, so we'll copy the Position keyframe from frame 0 and paste it at frame 70 (you can use CTRL/Command+C to copy and CTRL/Command+V to paste, or access these options by right-clicking on a keyframe).
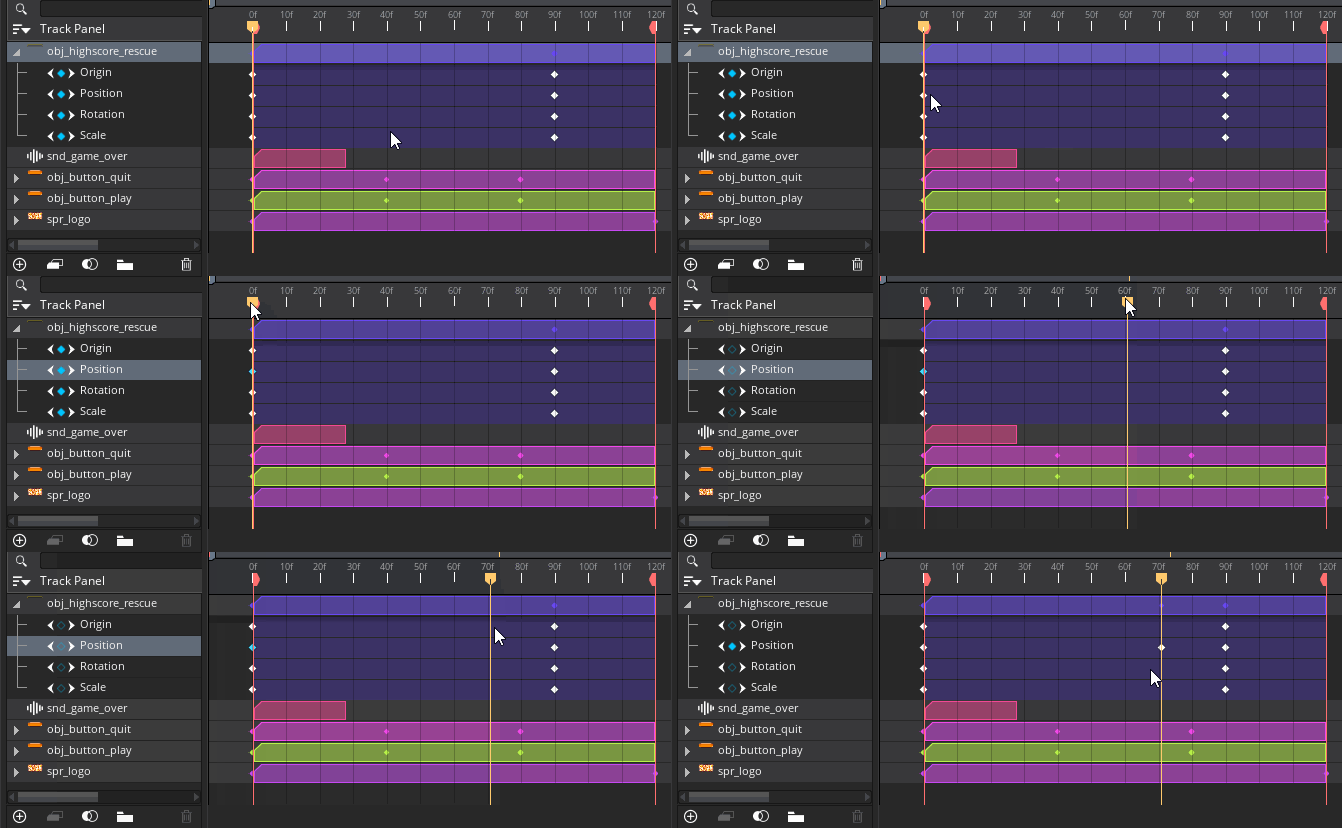
The instance will now only enter the canvas after frame 70.
Now add the obj_highscore_height object into the Sequence (again, make sure the playhead is on the first frame) and repeat the same process, until you have both instances entering the canvas:
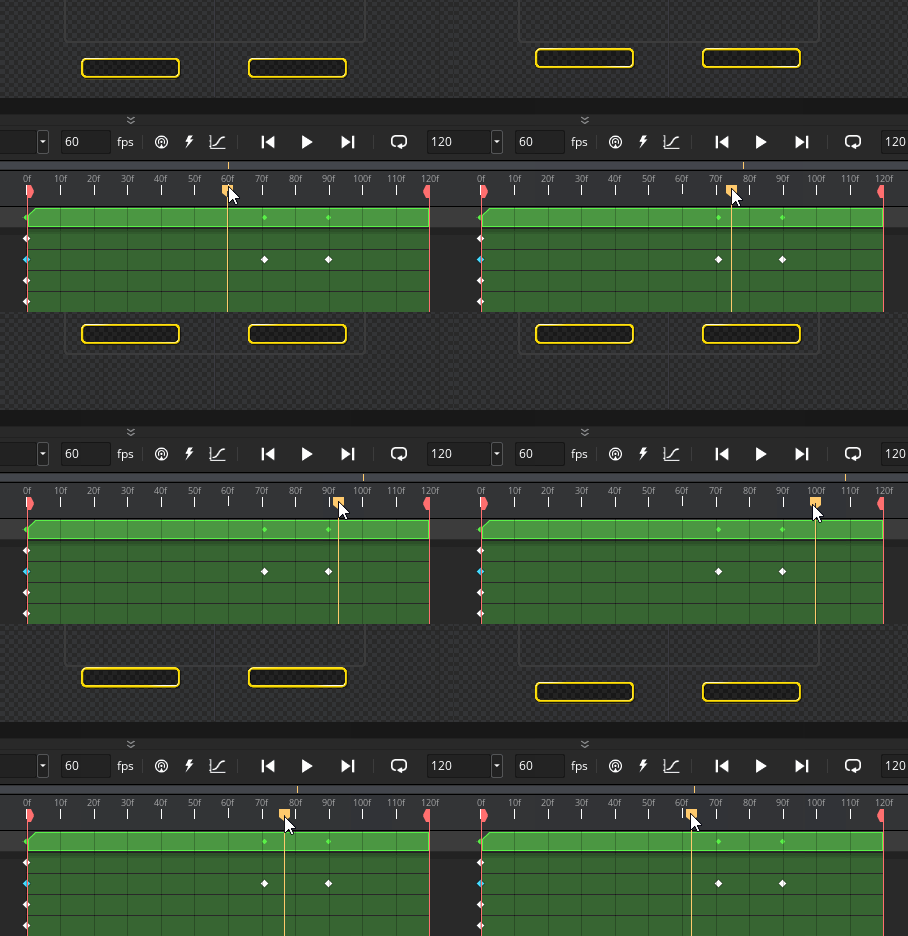
You can now run the game and try to make as high a score as you can. When you lose, you will see the highscore instances pop up and congratulate you with particles if you have reached a new highscore!

A Greater Fire Jump
You have done a fantastic job building Fire Jump along with this tutorial. We created a solid game loop with slick animated menus and challenging gameplay; however, this doesn’t have to end here! There can yet be a greater, improved version of Fire Jump, created by you!
This project is now in your hands, and you can make as many improvements and upgrades as you like. Here are a few ideas you can implement:
- Increase the player’s jump speed to make the game harder.
- Destroy the window that the player collides with, so you can only jump off it once.
- Create a new obstacle and add a third case to the window respawn switch to spawn that.
- Add more sprites and animations to the transition Sequences so it's not just a black fade.
- There’s no transition when you go from the game back to the menu. Why not add one?
Click here to download a polished demo version of this project with extra features, visual effects, and best of all: comments in all events for explanation, so you don't have any trouble understanding the project!
Thank you for sticking around, and Happy GameMaking!

