Just getting into GameMaker, and already know Unity?
This guide will aim to explain some parts of GameMaker when looked through a Unity lens.
Engine
There’s a core difference between both engines: GameMaker’s primary focus is 2D, while Unity supports both 3D and 2D.
You can do 3D in GameMaker, but you’d have to do a lot of the groundwork that other 3D engines have already laid for you.
IDE Comparison
Let’s compare a screenshot of Unity with one of GameMaker, with the Room Editor open.
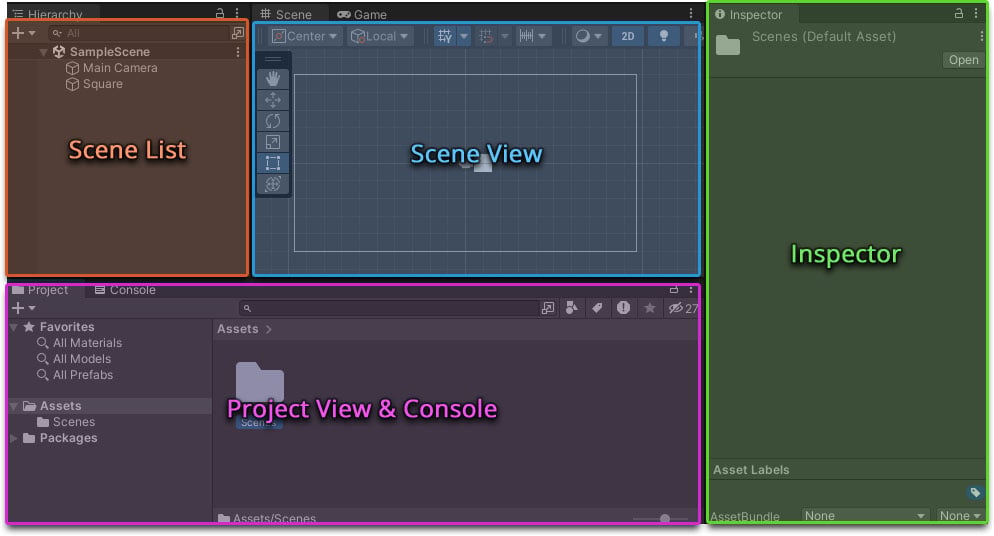
Unity
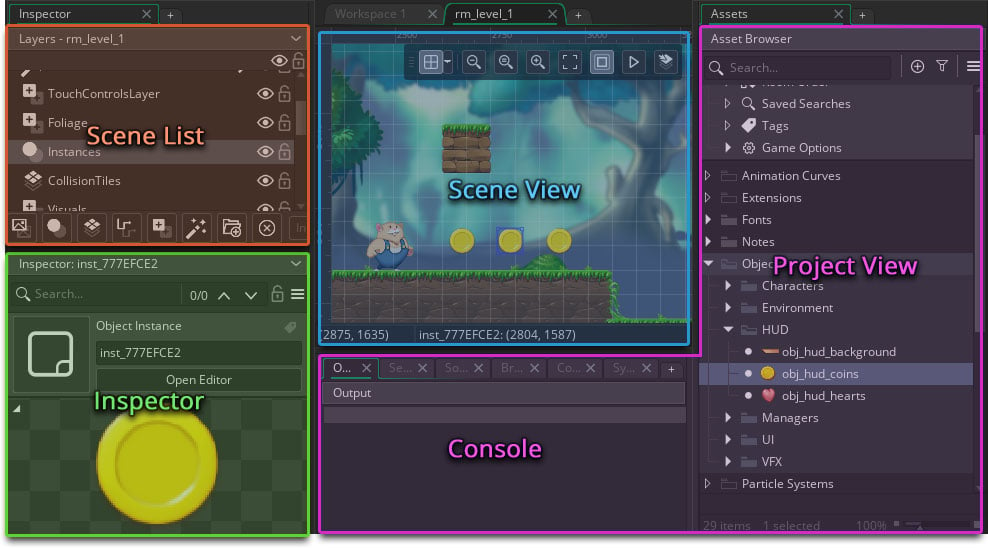
GameMaker
You’re seeing GameMaker with the Room Editor open. A Room is an asset, and a GameMaker project can have many different kinds of assets, just like Unity can have assets like prefabs, materials, images, etc.
By default, you see GameMaker with no editors open, so the “Scene List” and “Scene View” will not be there initially:
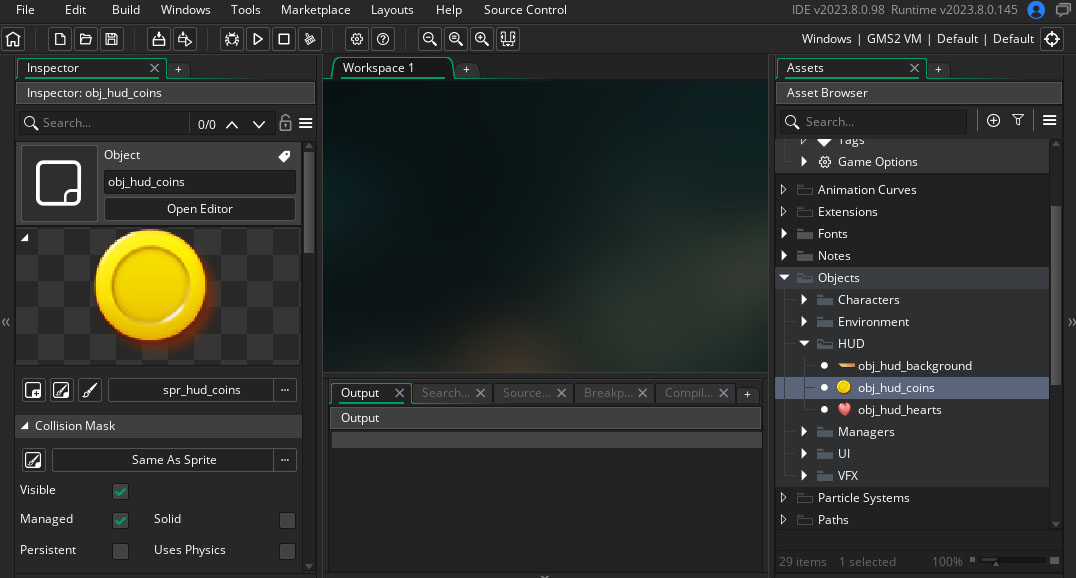
Asset Browser
The Asset Browser (on the right of the IDE) displays all assets for your project, and allows you to create assets and groups.
Assets in GameMaker are managed by the IDE and, unlike Unity, you can’t add or move files directly using a File Explorer.
You can make many kinds of assets, with the crucial ones being Sprites, Objects and Rooms.
Using Assets
A basic GameMaker asset workflow looks like this: Sprite -> Object -> Room.
You add an image as a Sprite, then create an Object that uses that sprite. The Object can be programmed. Objects can then be instantiated in Rooms, which are your scenes.
Each asset gets its own editor, which opens in the Workspace. The Inspector can also edit some basic properties for an asset.
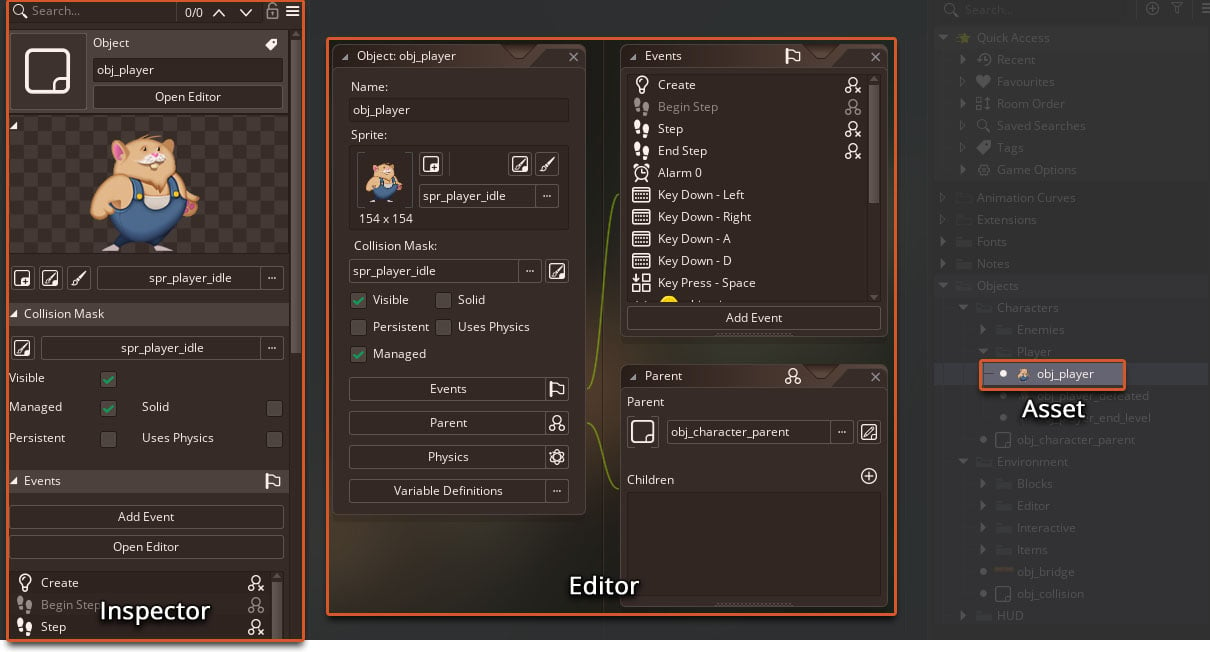
Editing An Asset In GameMaker
Prefabs And GameObjects
In Unity, you usually design a GameObject first, and create a Prefab from that. Then you can use the Prefab to instantiate more GameObjects from it.
In GameMaker, it’s the other way around. You create an Object, which is your Prefab, functioning as a blueprint for game objects that can be instantiated.
You then place your Objects in your scene, which creates Instances of that Object.
In short:
Objects are Prefabs
Instances are GameObjects
However, unlike in Unity, you can’t put an Instance inside an Instance, so it’s functionally different from a GameObject.
Programming An Object
In Unity, a GameObject holds components, some of which may be scripts that run update functions and receive events.
In GameMaker, an Object (equivalent to a Prefab) holds Variables and Events.
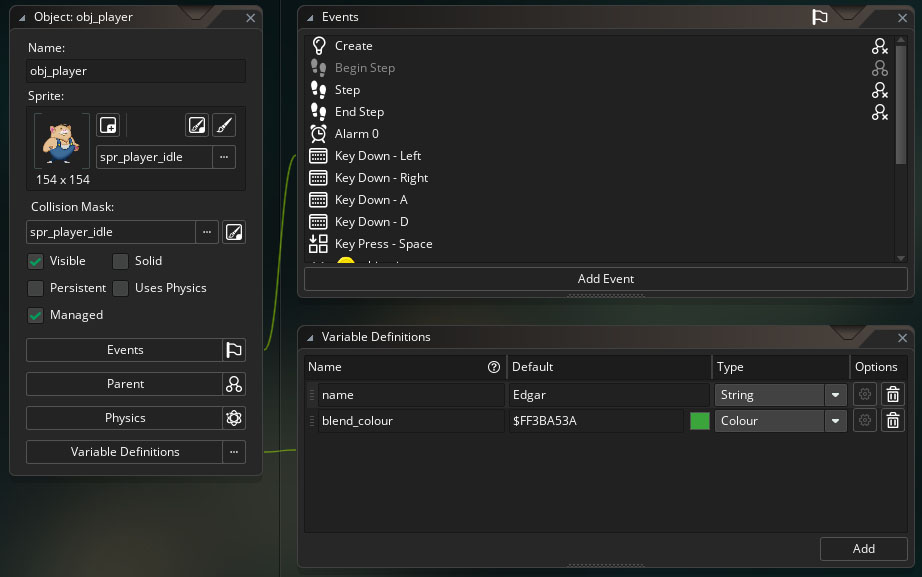
Events at the top, Variables at the bottom
It’s through these events that you program objects. The most basic events are:
- Create Event: This runs when an Object is instantiated in the room. It’s comparable to the Start() function in a Unity script.
- Step Event: This runs every tick of the game, which is 60 per second by default. This is comparable to the Update() function.
- Draw Event: This event overrides the default draw functionality of an Object’s Instance. Use this to draw anything you would like!
- There are input events for keyboard and mouse, but you can just use the Step event with input function calls.
- The manual describes the rest of the events.
Movement
Moving an Instance is as simple as modifying its x and y variables!
There are functions like move_and_collide() for advanced movement functionality.
Collision Masks
In Unity, you apply a Collider component to an object, and then listen for a Collision event.
In GameMaker, a Collision Mask is associated with every sprite:
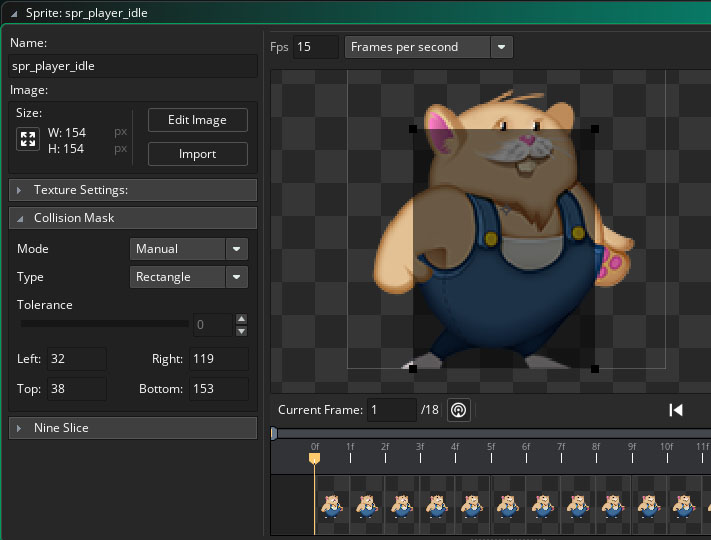
For collisions, you can use a Collision event to check for collisions against a certain object. You can also check collisions in code by using any one of the Collision functions.
Scripts
In GameMaker, code is primarily written in two places: Object Events and Scripts.
An Event is simple: whatever code you place in an event is executed when that event runs, as long as that Instance exists in the room.
GameMaker also has Script assets, which are executed at the start of the game. This is a great place to define global variables and functions.

Coding Language
GameMaker uses GML Code, and allows you to program visually using GML Visual.
GML is similar to JavaScript. Variables are not statically typed, and you can define classes and methods.
Classes in GML are known as Constructors, which create Structs - these are equivalent to JS Objects.
An Instance of an Object is a special Struct (with added functionality), so both a Struct and an Instance can hold variables and functions.
Global Scope
A GameMaker game has a global scope, which contains global variables and functions that GameMaker provides and that you create, but also all the Assets you’ve defined in the Asset Browser.
This makes it very easy to access an asset, so you can instantiate an object, use a sprite, etc. all through their globally available references.

This also means that all GameMaker functions are available in that global scope, ready to be called. You don’t need to import libraries like in Unity.
Other Scopes
The next main scope is an Instance scope. This is active when you’re inside the event of an Object, and allows access to all variables made for the Instance that’s running the code.
There’s the Struct scope, which is active when you’re inside a Struct.
Finally, there’s the local scope, where you make variables using the var prefix. These variables only last for the event or function they’re created in, and are then removed from memory.
Coroutines
GameMaker doesn’t have a 1:1 equivalent for coroutines, but Alarms and Time Sources come close.
An Alarm event can be set to run after a given amount of frames. You can have this perform a behaviour once, or have it loop by setting it to run every few given frames.
Time Sources allow you to have a method be called after a few frames, or repeat after an interval. You can apply a struct to the method so the function being called can house its own struct-scope variables.
Hierarchy
In Unity, you can have a hierarchy of C# Classes, e.g. an Enemy parent class and a child class for a Sniper enemy.
As GameMaker has no “script components” and you code Objects directly, hierarchies are achieved through Object Parenting.
An Object can be made a child of another Object. The child will inherit variables and events from its parent.
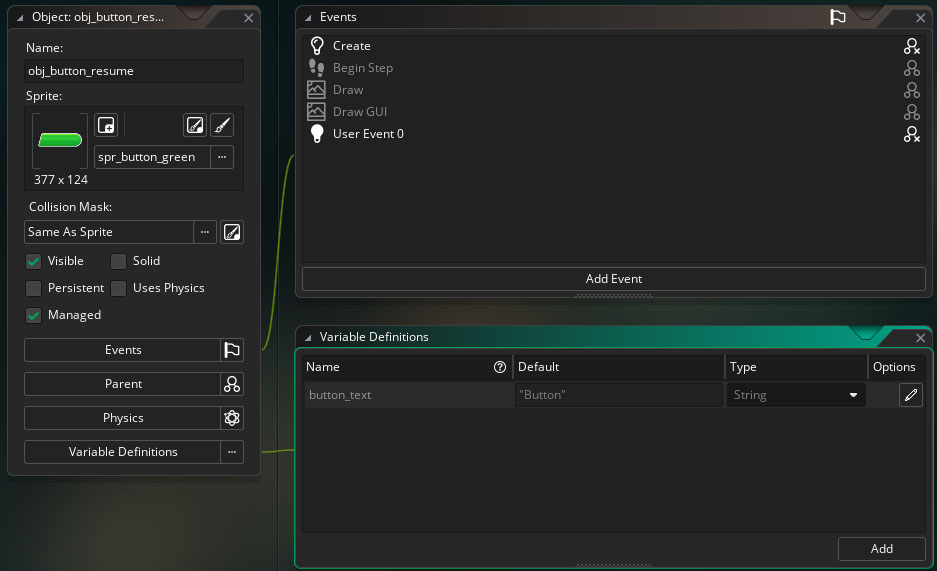
A resume button inherits events and variables from a button parent. Inherited items are greyed out unless overridden.
Inherited variables and events can be modified for the child, and this parent-child chain can go as long as you like.
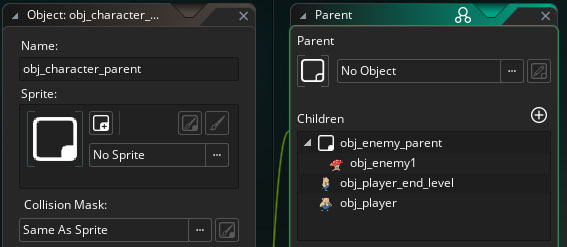
A character parent includes the player and an enemy parent as children.
The enemy parent includes an enemy as a child.
Structs also support inheritance when using Constructors. However, these cannot be instantiated in Rooms like Objects can, and so are more useful for holding data.
Rooms
Okay, let’s talk about Scenes or Rooms now.
A Room doesn’t directly take Object Instances, as you can have different kinds of items in a Room: Sprites placed directly, Tile Maps, Backgrounds, etc.
So, at the top level, a Room holds layers. Depending on the layer type, a layer can hold instances of a specific asset.
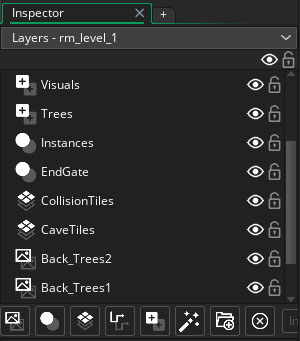
Layers in a Room, including Asset Layers, Instance Layers, Tile Layers and Background Layers
Room Dimensions
A Room in GameMaker is 2D. +X is right and +Y is down.
The third dimension is used for ordering layers. Each layer has a “depth” value which corresponds to its Z value when processed by the renderer.
Room space is measured in pixels, so when rendered 1:1 each pixel in a room corresponds with each pixel on the player’s screen.
Camera
If you have a large room and only need to see part of it, a Camera can be set up in the Inspector settings for a Room:
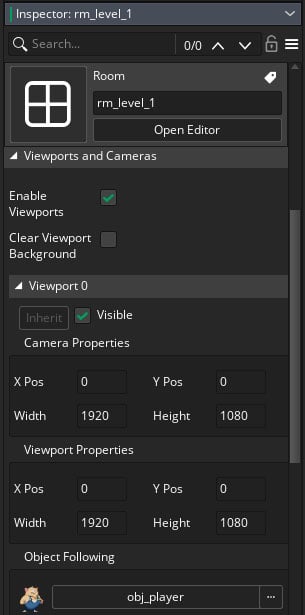
A 1920x1080 camera that follows obj_player
You can also set up a Camera at runtime by using the Camera functions.
Third Dimension
As the third dimension already exists, which is used for ordering layers, you can create a 3D camera and leverage this to create a 3D effect.
Read this tutorial for a demonstration of a 2.5D game.
Linking Instances In A Scene
You may want to create a link between two Instances (or GameObjects).
In Unity, one way of doing this is to create a public variable in a script component of one GameObject, and in the Editor, dragging the other GameObject into that public variable’s field.

Now your script has a link to the Door GameObject.
In a GameMaker Room, you can double-click on an Instance to see or change its unique ID:
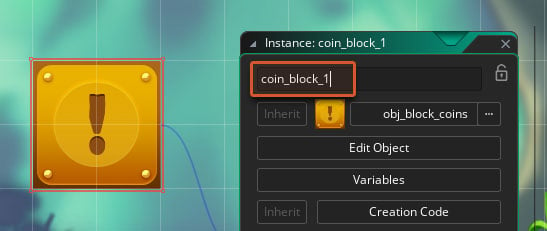
This ID becomes available in the global scope, so you can use it anywhere in your code.
Within the Room Editor, you can apply it to a variable in another instance, hence making a link from one instance to another.

Applying coin_block_1 to a variable, which also shows up in auto-complete.
Other Ways To Link
There are other ways to link to an instance:
- Use instance_find() to find an instance for an object, based on index
- Store the ID in a variable when you create an instance using instance_create_layer()
- Store the ID in a variable from collision functions like instance_place(), collision_circle() etc.
You can directly use the globally available reference for an Object to find its instance in the room, however that only works best for single-instance Objects.
UI Input
In Unity, you create a UI Canvas and place UI objects inside it, which draw to screen space and read input from there.
GameMaker has a GUI layer which exists in screen space, with functions for reading input, and events for drawing output.
Functions like device_mouse_x_to_gui() and device_mouse_y_to_gui() are used to read mouse input on the GUI layer. The event Draw GUI is used to draw elements to the same GUI layer.
By combining GUI-based functions and events, you can easily program user interfaces for your game.
Physics
In Unity, Physics is readily available for use in components like Rigidbody and the Collider components.
GameMaker’s 2D Physics system, also based on Box2D like Unity, is enabled separately. You enable physics for your Objects, and set up a fixture for it (a collision shape – only one per object).
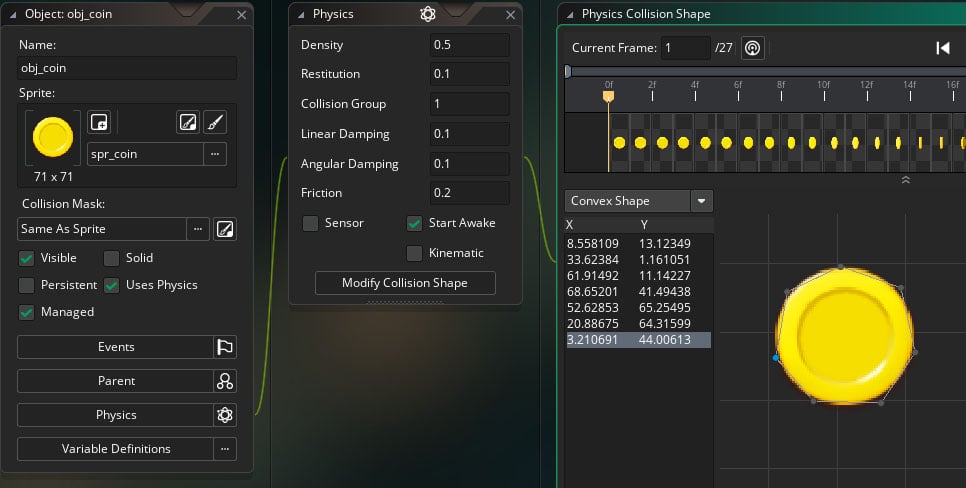
You also need to enable Physics for the Room your Objects will be in.
While this Physics system makes some things easier, it makes other things harder. We recommend only using the Physics system if the type of game you’re making can make good use of it.
Most kinds of games will not require the use of this Physics system. If yours does, we have tutorials for you.
Networking
GameMaker supports networking through TCP sockets and UDP connections. WebSockets are also supported.
However, there’s no high-level system for networking available inside GameMaker, apart from the GX.games multiplayer beta.
For most games, the networking functions available in GameMaker will need to be used to program connections between games and servers.
Conclusion
If you've never used GameMaker before, our 15-minute Arcade Space Shooter tutorial is the perfect place to start!
Happy GameMaking!

